12 Best Uses For Old Laptops
As much as we wish they would, laptops don't last forever. With every software or technological advancement, the demands on your laptop computer increase until, eventually, it just can't keep up. What's fresh out of the box today will leave you yearning for an upgrade in just a few years. Suddenly, your previously treasured laptop is destined for the trash or a box in the closet or attic, next to the discarded toys of your youth.
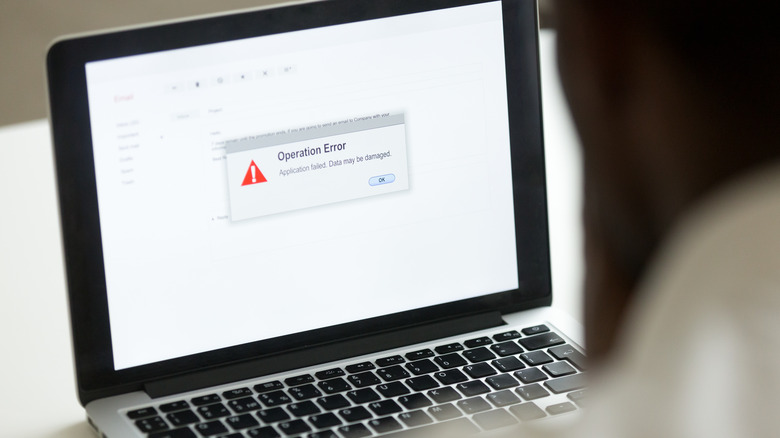
If you're the kind of person who just can't seem to let go of old tech, don't despair, but do check on your closet-dwelling laptop. There's a chance that the chemical reactions in the battery have gone rogue, resulting in an explosion or a fire just waiting to happen. Multiple manufacturers have experienced swelling batteries over recent years and that's a concern, even if your laptop hasn't been plugged in for some time.
Once you've ensured your old laptop isn't plotting your imminent demise, you can start considering what you want to do with it. Your older laptop need not die of old age or spend its twilight years in a garbage heap. Instead, it can enjoy a fruitful second life with a renewed purpose.
Turn it into a Chromebook or Android computer
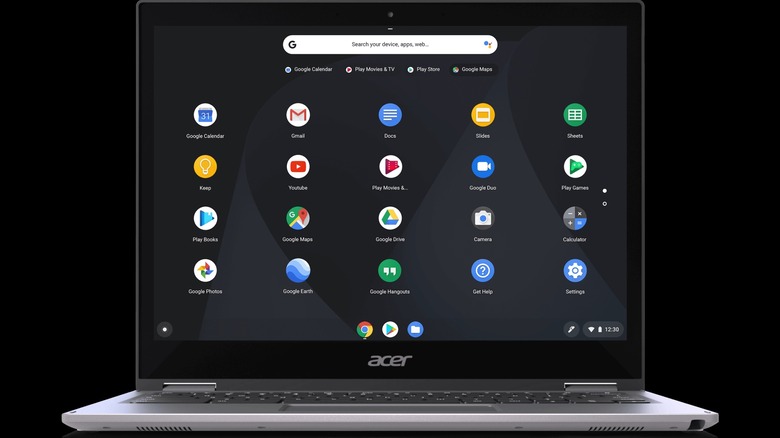
You probably shelved your old laptop not because it was broken but because it started slowing down and no longer suited your needs. Years' worth of use coupled with increasing demand eventually takes a toll on a computer, bogging it down beneath layers of digital sludge. Eventually, even running the operating system, let alone using it to do anything, becomes cumbersome. It might be that all you need is a lighter operating system to breathe new life into your old laptop.
As long as it meets some minimum requirements, you can upload a new OS like Neverware's CloudReady or PrimeOS quickly and easily. For CloudReady, your laptop needs to have 2 GB of RAM or more, 16GB of available storage space, administrative access, and suitable graphics and processor, (via Neverware). To make things easier, Neverware has a list of certified models which they guarantee will work. If your laptop was manufactured after 2007, it's likely to work just fine, (via PCWorld). You're also going to need a flash drive with at least 8GB of storage space, for installation.
Use your existing computer to load the installer onto your flash drive, then connect that to your old laptop. You'll have to bypass the automated boot when you turn on your laptop so that it accesses the USB drive as the boot device. Then install CloudReady and you're off to the races. Refer to Neverware's install guide for complete instructions.
Use it as a game server
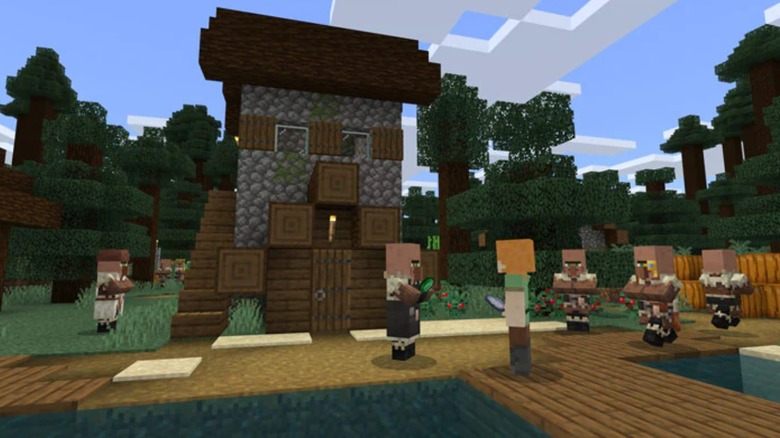
If you've ever wanted to set up a private game server, there's no better place to get your feet wet than Minecraft. It's only the highest selling game of all time and it's not even close. Grand Theft Auto comes in at second place with 150 million sales, compared to Minecraft's 238 million, (via HP).
If you've been resistant to using your regular computer to set up a server, a spare laptop might be the right answer for you. The process is relatively simple, if you're comfortable fiddling with Notepad files and copying a couple lines of characters. Minecraft has a series of instructions outlined in their Help Center, but we can walk through the basics here.
As explained by Tech Radar, the first thing you're going to want to do is make sure you're running the current version of Java and, if not, update it. Once that's done, you'll snag the Minecraft Java Edition server file. It helps to move those new files into a dedicated folder where they'll be easy to find.
You'll need to open the eula.txt file and change the line that says "eula=false" to "eula=true" in order to accept the EULA terms and get everything working. You'll also need to update the directory to point to the folder where you saved your server files. The process can be a little laborious but if you follow the instructions in the Help Center you should be fine.
Your own personal megaplex
Even if your old laptop doesn't run very well, it should be able to play stored video files without too much trouble. Using its onboard hard drive or a connected external drive, you can store any movies and TV shows you own. If you're not using the laptop for anything else, clearing it of any extraneous software opens up more space for popcorn fodder.
Of course, you could use the laptop to watch movies directly, but who wants to do that when you've got a fancy flatscreen mounted to your wall? Since you're no longer using your laptop for games, email, or internet browsing, you can connect it to your TV and leave it there permanently.
The easiest way to do this is using one of your TVs HDMI ports. If your laptop doesn't have HDMI out, a VGA-to-HDMI, DVI-to-HDMI, or USB-to-HDMI adapter should do the job, (via Lifewire). A non-HDMI output, however, could cause some trouble with capturing audio from your laptop. You'll need to connect the audio output to your TV or sound system with the available ports and any needed adapters. If your laptop isn't too old, it should have HDMI and none of that will be a concern.
As explained by How To Geek, you can also expand your library beyond what you have downloaded by connecting the laptop to a Plex server, giving it remote access to any media you have saved there.
The ultimate retro gaming machine
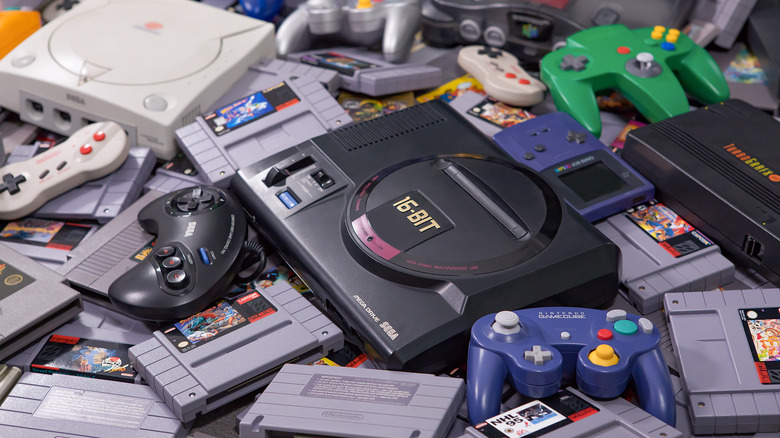
We've talked before about how to scratch your retro gaming itch either using a dedicated device or a repurposed phone. Those solutions work, and they have the benefit of being even more portable than a laptop, but they're really borrowing from technology that was pioneered on computers. Turning your laptop into a retro gaming machine is perhaps the best way to relive the early days of computer gaming.
As explained by Laptop, getting your hands on emulators and ROMs is super easy and the files are so small that you can easily house just about every retro game file ever made on a single machine. That turns your old laptop from a dust-gathering piece of molded plastic to the fully stocked arcade you always wish you had. No quarters required. Of course, as we've mentioned elsewhere, the legality of game ROMs is nebulous so proceed at your own risk.
Emulated games can be played using your laptop's native keyboard, by way of the direction keys or the WASD keys, and you can even play multiplayer on many games if you split up the keyboard, but that can feel like juggling with one hand behind your back. A compatible USB or wireless game controller lets you play your endless library of games the way they were intended.
Make a wireless at-home file server

Are your files eating up hard drive space on your everyday computer? You could get an external hard drive or a series of flash drives to store your files and free up space on your computer, or you could turn your old laptop into a remote file server and access your files anywhere.
Turning your laptop into a file server is like having your own personal mini cloud for housing all of your digital possessions. TrueNAS CORE (previously FreeNAS) is a free, open-source solution for converting your old laptop's operating system to a network-associated file server. Installing TrueNAS CORE on a flash drive connected to your laptop will leave more room available for storage, (via How To Geek).
Once installed, you'll be provided with a URL to access the web interface and it will ask you to set up a password with you'll need to access the server from another machine. Once that's done, you'll be able to access the server remotely to set up shared folders as well as store and retrieve files over the air.
Donate its computing power to science

Science proceeds in two stages. The first stage involves gathering data and the second stage involves figuring out what that data means. At present, the first stage is wildly outstripping the second stage. Gathering data is like sweeping loose puzzle pieces into a box, you've got a lot of information, but it isn't providing a coherent picture. In order to do that, you have to go through the laborious process of sorting your pieces and putting them in the right order.
Scientists are limited by how quickly their minds, or their computers can parse the data, which is why they've asked the public for assistance. The latent computing power we're all holding in our handheld devices and resting computers is staggering, and it can be put to good use doing science without any real effort from us.
As explained by Vice, distributed computing in science got its start in 1996 with a program which used volunteer computers to look for Mersenne prime numbers. Later, SETI got in on the action and since then hundreds of programs have spun up, borrowing computer power from citizen scientists.
A discarded laptop can join countless others to work on searching for alien signals, computing potential new disease therapies, calculating the orientation and spin of objects in space, and so much more.
Home security system
All you really need for a rudimentary security system is a camera, some software, and somewhere to store your recordings. If your old laptop has a webcam built in, or a USB port to connect one, you have everything you need to finally find out what your dogs are up to when you're not home. It's probably something adorable!
While you could set up a webcam to continuously record, you'd eat up your storage pretty quickly and finding notable footage would be a huge pain. What you really want is software that's capable of kicking on when it detects motion. That way you're not left with several hours of an empty living room every time you're away.
As explained by Engadget, the steps are going to be slightly different depending on if you're running a Mac or Windows machine, but the overall process is more or less the same. On a Mac, software like Evocam will trigger when it detects motion, send you a still photo, and start recording. On a Windows PC, something like TinCam can do the same.
Both applications also have the ability to add additional cameras, so if you have multiple old laptops or other independent webcams, you could feasibly setup a system to monitor every room in your house.
Set up a Wi-Fi hotspot
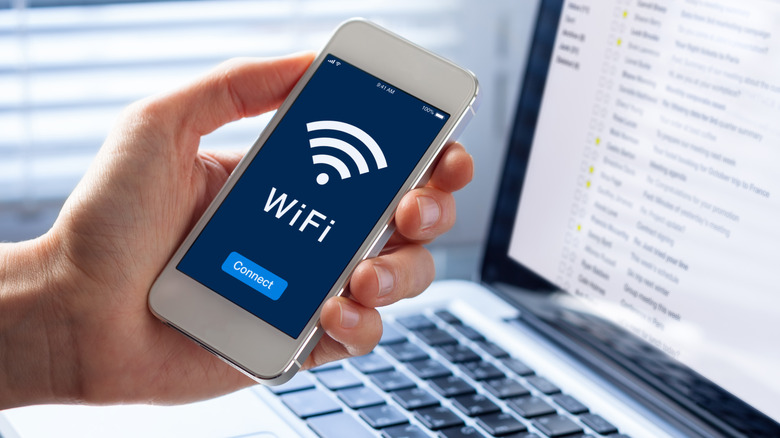
Increasingly, being connected is an absolute requirement for daily life. Whether you're working from home, trying to watch streaming content, or play video games online with your friends, a loss of connection is a recipe for a bad time.
More often than not, unless you happen to be next to your modem, your devices connect to the network through Wi-Fi, and depending on the size or construction of your home, that can limit where you can set up shop. Too far away from the signal source or on the other side of a thick wall and you connection might drop off at the worst possible time.
You could pick up a Wi-Fi extender to boost the signal beyond its native range, but why do that when you've got an old laptop sitting around? Provided, of course, that your laptop is running Windows 10. Navigate to Settings, then Network & Internet, then Mobile hotspot. If you have the right OS, and if your laptop has the necessary Wi-Fi hardware, you should see the option to create a hotspot, (via Tech Advisor).
You'll see a toggle switch under a header which reads "Share my internet connection with other devices." You'll also see a network name and password, which you'll need to connect other devices. Finally, you can watch YouTube in your basement without being disturbed.
Make a low-def projector
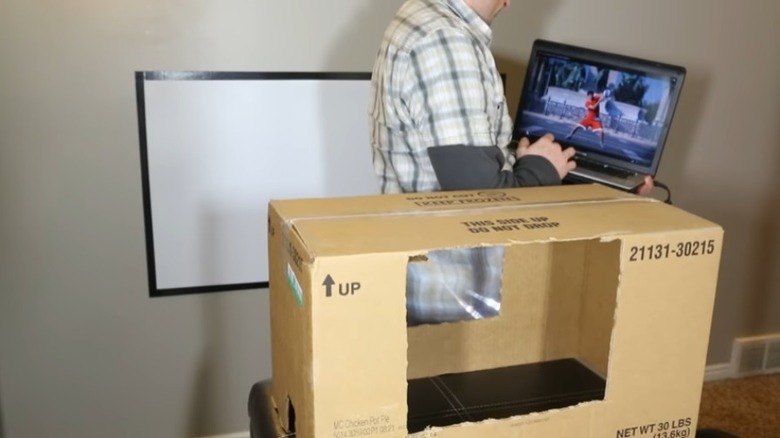
There's something magical about watching a movie or playing games on a projector. Even if you could get the same size picture with better quality on television, nothing really captures the mystique of a projector. It conjures feelings of visiting a movie theater, even if you're in your own bedroom. The major hurdle is they can be expensive and require a little more setup than the plug-and-play design of a television.
That said, if you've got an old laptop, an empty cardboard box, some tape, and the loose change from your couch cushions, you can rig up a low-definition projector in about half an hour. YouTuber The King of Random put together a tutorial that is pretty simple and promises to work no matter what sort of laptop you have, as long as it can play video, (via Lifehacker).
The key to this cobbled-together movie projector is a Fresnel lens, which you can pick up online for a few dollars. They're often used to gather light and focus it into a narrow beam, but if used from the opposite direction, they can magnify an image as long as you're comfortable with some distortion, (via Edmund Optics).
Use your cardboard box to create housing for the lens, then prop your laptop upside down with the monitor pointing through the lens. Investing in a higher-quality lens should net you a better picture, depending on how much you're willing to spend.
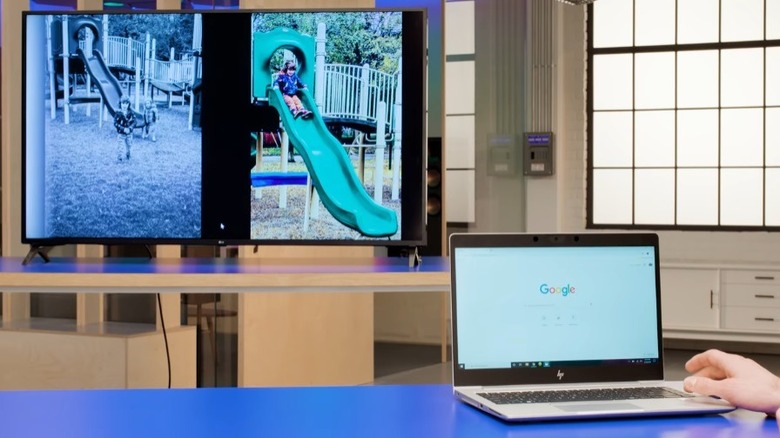
Make a second monitor
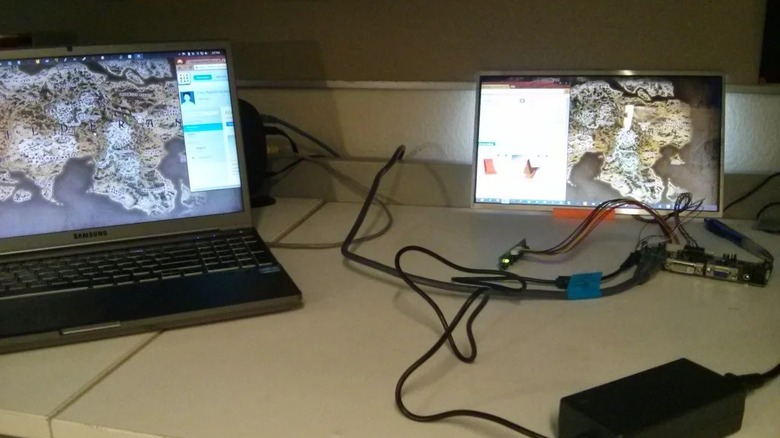
Provided your old laptop is still mostly functional and it's running Windows 10, you can set it up as a second monitor in just a few clicks. Microsoft's Miracast feature allows you to broadcast the signal from your primary computer to your laptop wirelessly. All you have to do is go into Settings on your spare laptop, select System, then Projecting to this PC, and choose what level of permissions you want to apply. On your primary computer press the Windows key+P, click Extend, and choose your laptop's computer name, (via HP).
There are a couple of downsides to this solution. First, there can be considerable lag on the secondary display because it's being sent over the air, instead of through a cabled connection. Second, it doesn't provide you the option to tear your laptop apart and look at its insides. If you want more complicated but more satisfying results, you're going to have to break some stuff.
Bear in mind that once you open your laptop you've probably voided the warranty. The steps for liberating your LCD from the laptop vary by model so you might need to experiment, but we're sure you'll figure it out. Find the model number of your LCD panel and obtain the appropriate controller board. Hook them together, and now you have an independent LCD monitor, (via Instructables). It's going to look like you cobbled it together from pieces you found after the collapse of civilization, but it'll work.
Turn that monitor into a screen only you can see
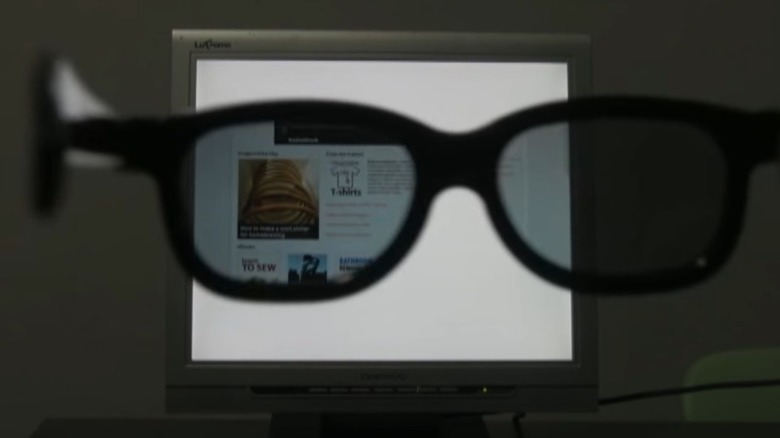
If you truly value your privacy and you don't mind looking a little weird, a few modifications and a little crafting ability can turn your DIY LCD monitor into the ultimate privacy display.
LDC screens use a polarizing film to filter the light from the display and make it readable to the viewer. Without that film, all you'll see when you look at your screen is a rectangle of white light, (via The Verge). That will get you the privacy you desire, but it's not very useful. The trick is putting the removed polarizing film where only you can see it.
If you've already removed the LCD from your laptop to make a second monitor, you're halfway done. If not, you'll need to do that. Once it's free from the casing, carefully peel away the polarizing film from the surface and set it aside. If your polarizing film also has a layer of anti-glare film, you'll want to remove that, (via Instructables). Now you're going to need a spare pair of glasses. Cheap reading glasses from the grocery store will do. All you really need is the frames. Cut out pieces of the polarizing film in the shape of the lenses and slap them in, making sure they are oriented correctly, and you'll be able to see what no one else can.
Make a magic mirror
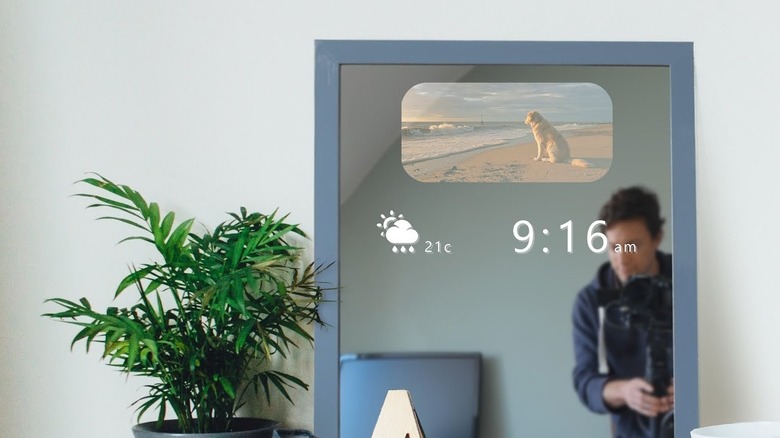
If you really want to feel like you're brushing your teeth in the 22nd century, you're going to need a smart mirror. Unfortunately, the cost is a barrier. They can run anywhere from hundreds to thousands of dollars depending on their size and functionality. If you've got an old laptop, however, you can build one for much cheaper.
We don't want to oversell this, it's going to take some work, but the result is pretty astonishing. To get started, you're going to need a mirror. Specifically, you need a two-way mirror that will show a reflection while letting light in from behind. If you're on a budget, mirrored plexiglass will also work, but it won't look as clean, (via Make Use Of). Try to find a mirror that closely matches the size of the monitor from your laptop.
Once again, you're going to have to remove the monitor from the laptop and get a compatible control board using the model number. Once you have that, you can attach it to the back of the mirror and connect a Raspberry Pi running the open-source Magic Mirror software. Refer to this handy Instructables guide with an accompanying video for full instructions. Package everything inside a frame and you're done. Now your old laptop can feed you the weather, news, and affirmations before you're even fully awake.