Many presentations are designed to autoplay, advancing from slide to slide without manual intervention and then looping when they are finished. It’s an easy way to set up a marketing slideshow, for example, or show a series of photos designed to play throughout the day.
If you’re using Google Slides, the slide creator that's part of Google's free suite, you can set up this autoplay action whenever you are ready. Here’s the most effective way to do it, along with how to get the results that you need.
How to autoplay Google Slides
Don’t worry about autoplay options until the slideshow is complete. When you are finished and everything looks like it's in place, you’re ready to publish the slideshow in a format that can be easily used in a variety of situations.
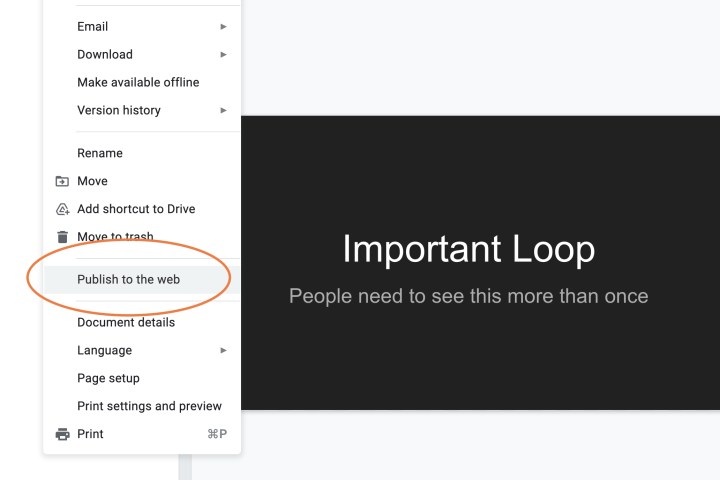
Step 1: Open your completed slideshow in Google Slides. Select File in the upper left.

Step 2: Select Publish to the web.
Step 3: A new window will open with your publishing options. First, note the top tabs to switch between Link and Embed. Choosing to publish as a link is a very versatile option that allows you to paste the link into an email, message, notes app, or whatever else you want so that it will always be available. The Embed option is designed to provide code for embedding the slideshow on a webpage. That’s not as a common, so we’ll stick with Link for now.
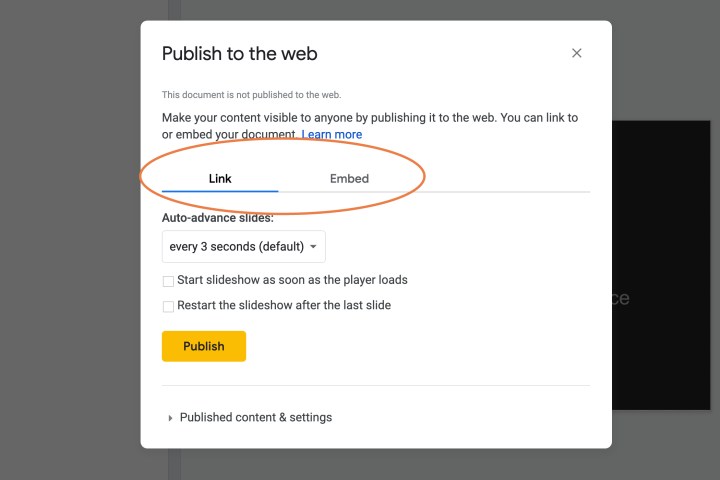
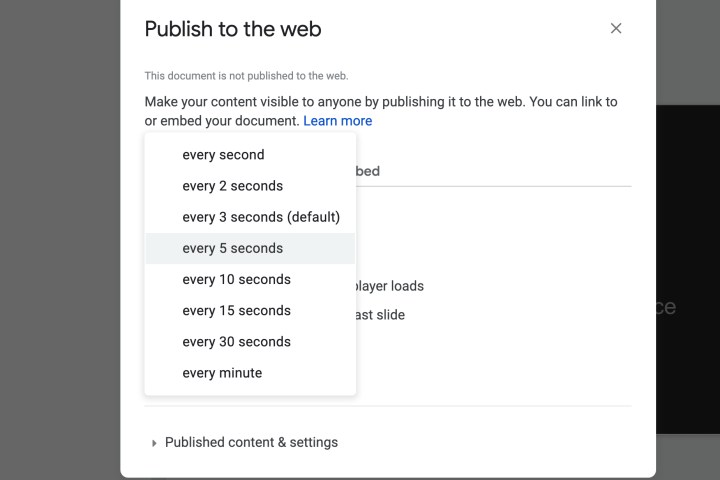
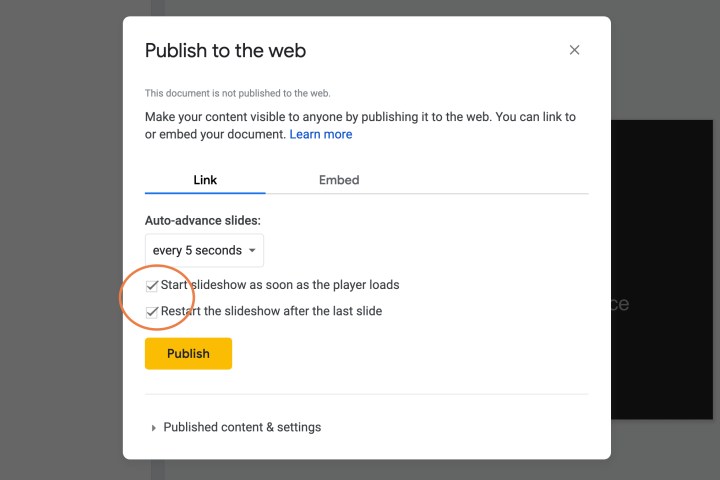
Step 4: Now find the section that says Auto-advance slides. Click on this menu, and you’ll be able to see options for advancing slides from every one second to every minute, with the default set to three seconds. Three seconds is actually quite fast for the average slide, especially if there are words to read or other kinds of content to absorb, but the time spent on slides still depends on the type of slideshow. For this example, we’re bumping up the wait time to five seconds.
Step 5: Find the two options bellow the Auto-advance section: they are Start slideshow as soon as the player loads and Restart the slideshow after the last slide. These are your looping options. Make sure both are enabled so that the slideshow takes care of itself.
Step 6: Now you are finished. Select Publish, and you’ll get a link you can copy or share using social media. All you – or someone else – has to do is open the link, and the slideshow will now do the rest. Keep in mind, the automatic timer is set when the slideshow is published and can no longer be changed. If you decide you want a different timer on the slides, you’ll have to publish a new version.
What does loop audio mean in Google Slides?
This is a separate audio option available in Google Slides to loop a particular section of audio over and over so it doesn’t stop – maybe if you want to include a little music in the background, for example. It may take a little tinkering to get looping audio just right. We have a full guide on how to add audio to Google Slides and customize it.
Finally, if you’d like to add a bit more customization to your slides, you can draw on them, too! Here’s how to do it.
Editors' Recommendations
- How to change theme colors in Google Slides
- How to delete a file from Google Drive on desktop and mobile
- How to delete files on a Chromebook
- How to get Android apps on a Chromebook
- How to delete Google Chrome on Windows and Mac