If your Windows 11 PC is having issues, one way to troubleshoot those issues is start your PC in Safe Mode. Safe Mode is essentially a very basic version of Windows 11, without all the bells and whistles and only a restricted set of features, drivers, and files. This mode essentially lets you take a look at your computer and helps you figure out exactly what issue is plaguing your PC.
But booting into Safe Mode on Windows 11 isn’t as easy as just pressing a single button. You’ll need to navigate through a series of menus first and the method for getting there depends on your PC specific situation (Is your PC still working or is it just a blank or black screen?).
Regardless of your current situation, we can show you how to boot Windows 11 into Safe Mode. Let’s take a closer look at Safe Mode and how to get there.
The different safe modes

Before we jump into explaining how you get into Safe Mode, we just want to touch on the different versions of the diagnostic mode. There are three different Safe Mode versions in Windows 11. Each of these can be used for different diagnostic purposes. These are explained for you below.
- Safe Mode: This is the mode that most people will use. This turns off all the extra programs and features in Windows 11 and will only give you access to a basic desktop experience so you can access important files and documents, and tweak with drivers and other things. Note that there is no networking in the mode, so it’s a great way to access files if you think you’re a victim of malware.
- Safe Mode with Networking: This mode is the same as the regular Safe Mode, but enables the network. Despite the name, this isn’t safe to use as it can still allow hackers into your PC through the internet if you’re hoping to diagnose issues or rescue files.
- Safe Mode with Command Prompt: You’ll want to make sure you know how to use the Command Prompt before even entering this version of Safe Mode. This brings up the Command Prompt and lets you type in commands in old-school DOS style to get your way around broken things in the operating system. It’s less dependent on a visual interface.
Getting to Safe Mode from login on Windows 11
If you can still get into Windows 11 and your PC isn’t entirely broken, one of the easiest ways to activate Safe Mode on
Step 1: Hold down the Shift key and click on the power button icon in the lower right corner of the screen.
Step 2: Continue to hold Shift and choose Restart.
Step 3: Release the key afterward. The PC will then restart. If you have Bitlocker encryption turned on, you might have to enter the key.
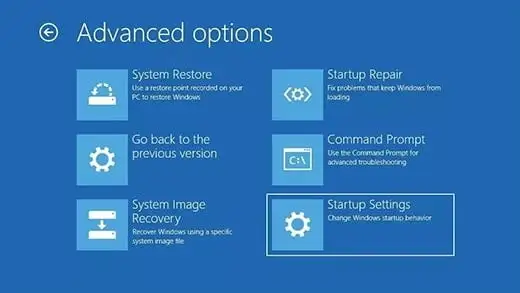
Step 4: Once you see the Choose an option screen, choose the Troubleshoot option.
Step 5: From there, choose Advanced options, and then choose Startup settings.
Step 6: Pay attention to the prompts on the screen and then select the Restart button.
Once the PC restarts, there will be a list of options on the screen. Be sure to select the option you want, pressing the respective key on the keyboard. Each number on your keyboard will correspond to a respective Safe Mode. These numbers might vary by PC, so pay attention to what’s listed on the screen. You’ll only have a few seconds to make a choice before the Safe Mode prompt times out.
Get into Safe Mode from a black screen or broken Windows 11 PC

In the event that you can’t get into Safe Mode on Windows 11 from the login screen, you can do so by turning your device on and off again, until it forces you into the Windows Recovery Environment. This is an environment built into a special place on the storage drive of most new PCs, allowing you to restore or fix issues with Windows. You can get into the Windows Recovery Environment with our steps below.
Step 1: Hold down the power button for 10 seconds to turn off your device.
Step 2: Press the power button again to turn on your device.
Step 3: If you see that Windows has started and see the logo of your PC maker, hold down the power button again for 10 seconds to force turn off your device.
Step 4: Press the power button again to turn on your device.
Step 5: When Windows restarts, hold down the power button for 10 seconds to turn off your device.
Step 6: Press the power button again to turn on your device.
Step 7: Allow your device to fully restart and you’ll be taken to the Windows Recovery Environment.
Once you’re taken into the Windows Recovery Environment, you can follow our steps in the section above (starting from Step 4) to get into Safe Mode.
Get into Safe Mode directly from Windows 11
A third way of getting into Safe Mode can happen directly from Windows 11. You can do this by following our steps below. Just keep in mind that this option will require you to have a fully working PC.
Step 1: Select the Start menu and search for Settings.
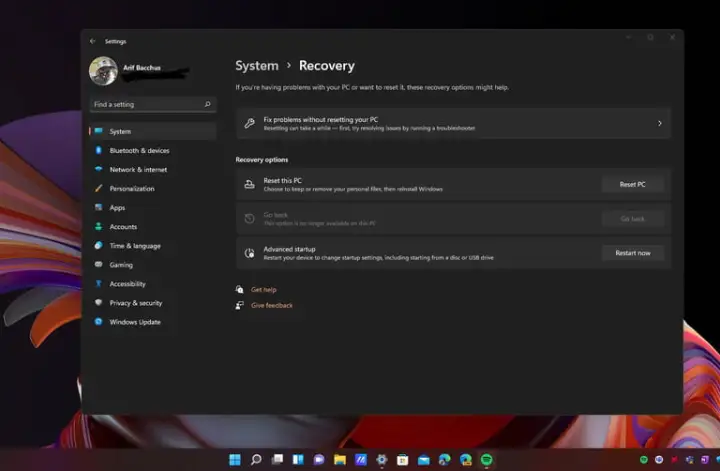
Step 2: Select System in the side menu on the right of the screen, then choose Recovery on the left. (You may need to scroll down first.)
Step 3: Scroll down and find Advanced startup, then select the Restart now button.
Step 4: Follow the steps in the second section of this article, starting with Step 4.
How to exit Safe Mode
After you diagnosed and resolved your Windows 11 issue, you can restore your PC to its original state and exit Safe Mode. This is as simple as restarting and shutting down your device as you normally would. There’s no need for extra steps.
Frequently asked questions
What is Safe Mode?
Safe Mode is a mode in which you can run a basic version of Windows, a version that only uses some drivers and files. Running your PC in Safe Mode is a great way to troubleshoot issues with your computer.
What button do I press to boot into Safe Mode?
Before you can even press a button to boot into Safe Mode, you’ll need to follow one of the methods outlined earlier in this article that will get you to the menu that allows you press that button.
Once you reach that menu, you’ll be presented with a list of options. Here are the main ones for booting into Safe Mode in Windows 11:
- To boot into Safe Mode: Press 4 or F4.
- To boot into Safe Mode with Networking: Press 5 or F5.
- To boot into Safe Mode with Command Prompt: Press 6 or F6.
How do I boot into Safe Mode on Windows 10?
Booting into Safe Mode on Windows 10 is not that much different from doing so on Windows 11. But if you need a thorough guide to help you navigate the steps, you should check out our guide on how to boot into Safe Mode in Windows 10.
Editors' Recommendations
- Windows 11 might nag you about AI requirements soon
- The most common Windows 11 problems and how to fix them
- NordVPN free trial: Try the service for free for a month
- The most common Zoom problems and how to fix them
- How to clean a laptop screen without scratching it