At Leap Motion, we’re making VR/AR development easier with Widgets: fundamental UI building blocks for Unity. In part 4 of our Planetarium series, Gabriel takes us into Planetarium’s navigation scheme.
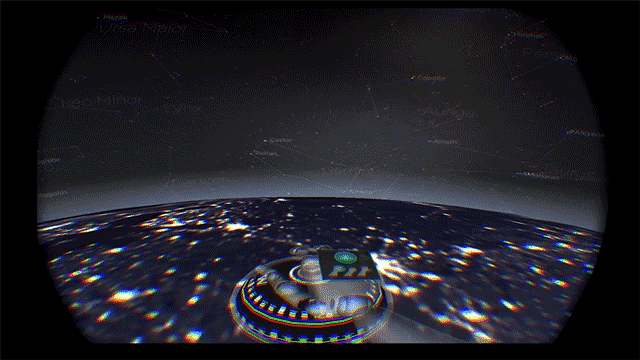
One of the major features of Planetarium is the ability to travel around the globe using motion controls. While this approach is still rough and experimental, we learned a lot from its development that we’d like to share. Later on in the post, we’ll even take a look under the hood at the code involved with the movement and spinning physics that tie everything together.
Lessons in UX Prototyping
Our initial idea for navigation controls was a simple Joystick – in other words, a system relating hand position to player velocity. When the Joystick design began, we had already created a reliable palm-outward grabbing gesture that would pull constellations into the user’s hand. We decided to use the same grabbing gesture to initiate and end navigation, but would distinguish navigation from star grabbing by having the palm face the user.
We also added visual feedback in the form of a “Joyball,” or object that people could hold. If the user turned their hand over, they would immediately end navigation. This way, people would seem to be holding an object, and thus avoid turning their hand over unintentionally. Along with linear movements, the ball could also be twisted to rotate the player.
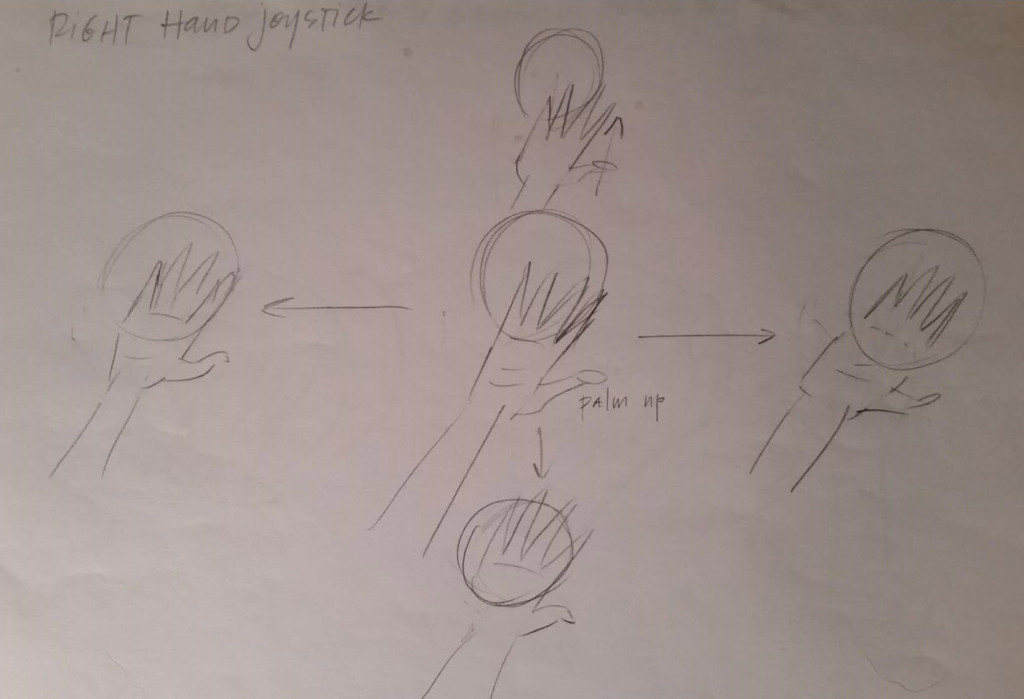
Early sketch for Joystick UI
Based on our user testing, however, this design failed due to a simple matter of ergonomics. We discovered that when users moved their hand around to move the globe, their hands naturally started to tilt downwards when they moved their arm to the left across their body. Because they needed to keep the palm facing upward, it was difficult for users to move their arm to the right, away from their body. There were also issues with motion sickness when the tracked hand would vanish without explicitly halting navigation, leaving the player moving around the globe.
After going back to the drawing board, we switched it to activate when the palm faces downwards. Now, just like grabbing a constellation, the line of sight through the user’s palm must intersect the earth. We added a gain curve to the linear and angular velocities, so that small movements yield precise control, while large movements cannot exceed a maximum speed. To avoid motion sickness, we made absolutely sure that the player would stop moving whenever the controls were not in use.
One very positive result from the user testing was that the palm-down navigation interaction was in many ways a significant improvement over a traditional Joystick. Simply pretending to fly with your hand allows for displacement and rotation that feel natural. All users were able to discover and reliably use the navigation controls, even though only one was able to articulate how the controls worked. With subsequent versions of the Joyball, we’ve implemented activation cues by highlighting the earth and presenting visual guides on the back of the hand. The representation of the Joyball is now a ship’s compass which always points north.
Here are some of the important UX design lessons that you can take from this experiment:
- The user must always have control over their motion.
- Good ergonomics is essential. Always be willing to modify other aspects of your interaction design to ensure user comfort across the board.
- Line of sight is a very useful indicator for determining what the user wants to interact with.
- Use visual feedback to make your application more intuitive.
How to Avoid the Hand Lag Feedback Loop
Now that we’ve looked at the navigation mechanics of Planetarium, there’s an important problem we need to resolve. With this navigation system, the player moves according to the position of their hands relative to their body in virtual space. By default, the HandController script in Unity creates unparented hands in the scene, but this can create a feedback loop when the HandController moves with the player.
Why is this a problem? First, imagine that the HandController updates the position of the hands, and then the navigation system uses this position to move the player. In this case, the player’s movement will be smooth and correctly controlled.
Now, suppose instead that the order of operations is reversed. First the navigation is computed, then the hands are repositioned. This would result in a feedback loop in the navigation, since each movement of the player effectively displaces the hands. Unfortunately, the hand lag is completely invisible – by the time rendering begins, both hands and player position will have been updated.
The problem is that, in Unity, either order of operations is possible! Fortunately, the solution to this problem is simple – make the player’s body the parent of the hands. This ensures that updates to the body position immediately apply to the hands, thereby preventing hand lag.
Let’s Get Mathematical! Orbital Calculations in Unity
The JoyBall displacement can immediately be used for navigation in space, or on a flat map. However, adapting the controls to navigation on the surface of a globe requires some additional calculation.
Along with the Joyball, Planetarium also showcases a TouchMap navigation model. The TouchMap uses a latitude and longitude coordinate system, with the azimuth fixed at zero. The problem with this coordinate system is that if forward/backward motions of the Joyball are tied to latitude, while left/right motions are tied to longitude, a small motion left or right near the pole will rapidly spin the player around. This is because the poles are coordinate singularities and are numerically unstable.
Fortunately, we have a straightforward solution – move along geodesics! Even more fortunately, Unity provides an implementation of the required math. When a player moves the Joyball, they are in effect saying “I want the reference point to move towards the Joyball point.” Since the player is rotating around a planet, this means that they want to move along a rotation around the earth center that will transform the reference point to the Joyball point.
relativeDisplace = joyballPosition - referencePosition;
relativeDisplace *= gainDisplace;
orbit = Quaternion.FromToRotation(referencePosition - earthCenter, referencePosition - earthCenter + relativeDisplace);
player.transform.position = earthCenter + orbit * (player.transform.position - earthCenter);
This addresses linear movement (really orbital latitude and longitude), but doesn’t address spinning (azimuth). Spinning is implemented by twisting the Joyball around the axis that is “up” with respect to the player. Again, Unity has an implementation of the required math.
relativeRotation = referenceRotatio * Quaternion.Inverse(joyballRotation);
relativeRotation.ToAngleAxis(out angle, out axis);
angle *= Vector3.Dot(axis, player.transform.up);
angle *= gainAngle
player.transform.RotateAround(player.transform.position, player.transform.up, angle);
(API References: FromToRotation, ToAngleAxis, RotateAround)
The parameters gainDisplace and gainAngle have values in the range from 0 to 1. They are responsible for establishing maximum speeds of movement and ensuring that small displacements of the Joyball yield precise control. Because the gains pertain to speed, calculations of the gains must take into account the framerate since they apply to linear and angular speed, not to displacements.
Implementing the TouchMap is both simpler and yet somewhat less intuitive. The latitude and longitude coordinates are a choice of Euler-Angle coordinates. (Note: these need not be the same as the Unity Euler-Angles.) To be specific, suppose that the basis of the Earth GameObject has the “forward” axis pointing to the North Pole, and the “up” axis pointing to latitude = 0 and longitude = 0, which is in the Gulf of Guinea.
To position the player at a specified latitude, longitude, and azimuth, we would begin by positioning the player at the origin of the coordinate system – on the earth’s “right” axis at a radius just above the surface of the earth, looking north so that:
player.transform.rotation = earth.transform.rotation
Next, rotate the player around the earth’s “right” axis to the specified latitude, then rotate the player around the earth’s “forward” axis to the specified longitude. Finally, rotate the player around the player’s own “up” axis by the specified azimuth. (The effect of this final rotation is equivalent to beginning by rotating the player around the Earth’s “up” axis by the azimuth.) At the north and south poles the longitude and azimuth rotations have the same effect, since they rotate the player’s “up” axis is parallel (or anti-parallel) to the earth’s “forward” axis.
Consequently, if the TouchMap implemented an update loop that first computed the player’s longitude, latitude, and azimuth to position the cursor, and then attempted to set the longitude, latitude, and azimuth to those same values, floating point errors near the poles would result in rapid uncontrolled motion. While this might seem to be easy to avoid, keep in mind that setting a single coordinate requires knowledge of the other two, which yields feedback. Likewise, applying a change to a single coordinate requires knowledge of the coordinate’s initial value.
As promised, the solution to this problem is simple – when the user is interacting, the TouchMap only sets latitude, longitude and azimuth. Conversely, the TouchMap reads in values only when the user is not interacting. In fact, we’ve established this pattern for all widgets:
- When the user is interacting they have sole control of the widget state.
- When the user is interacting, the widget only sends change requests to bound parameters.
- When the user stops interacting, the widget reverts to displaying information about bound parameters.
If you made it this far, here’s an Easter Egg: if you type ‘w’ in the main scene of the Planetarium, it will make wickets appear around the equator of the planet. Take the navigation system for a test drive!
After all these orbital location calculations are complete, there’s one little wrinkle left to let us show the proper orientation of the night sky. Time. So now I’ll pass the ball back into Daniel’s court.
– Gabriel Hare, Physics & Algorithms
Calculating the Night Sky in Planetarium
Daniel here again, with another dash of astronomy. As you probably know, the earth’s rotation means that the stars appear to move through the night sky.
Given the orientation of the Earth’s axis, if you’re in the northern hemisphere, it will appear as though the stars rotate around the star Polaris (or North Star). Since the earth rotates once every 24 hours, the stars move across the sky once every 24 hours… almost! The 24 hour day is close to being accurate, but between it being slightly wrong (which is where we get the leap second) and the revolution of the earth around the sun, a 24-hour celestial day is not quite the same as a 24-hour terrestrial day. (It turns out programming accurate time calculation is hard, which is why all our times in Planetarium are simply in GMT and we decided not to work out time-zones.)
To understand why, imagine that you’re looking up at the midnight sky on June 1st. At that moment, you’re on the opposite side of the world from the sun. But if you look at the sky at midnight on New Year’s Eve, you and the Earth have since travelled halfway around the sun! This means that the stars will appear in different places than they did in June. In fact, the stars you can see throughout the year will fall a few minutes behind every night, and this tiny difference in each day adds up over time.
Astronomers solve this by measuring days in “sidereal time,” which measures accurate celestial time. The stars above you at midnight sidereal time on January 1st will be the same as the stars above you at sidereal midnight on June 1st, though that may be 2pm in the afternoon according to a terrestrial clock. The calculation to compute (relatively accurate) sidereal time is a bit verbose, but generally pretty simple.
Greenwich Sidereal Time = 6.5988098 + 0.0657098244 × (day number of the current year) + 1.00273791 × (Time of day in Universal Time)
(Obviously, this is a bit obtuse-looking and has a few nasty magic numbers. If you’re interested, you can look into how this time is derived here.) Once we know the proper sidereal time, we can rotate the earth and the viewer by the proper offset to finally display the proper night sky. Tomorrow, we’ll start digging into how we integrated the UI Widgets into the data model for Planetarium, so that these two systems will play nicely together. Trust me, accidental gyroscopes were just the beginning.
– Daniel Plemmons, Designer and Developer
Next: Designing the Widgets Event and Data-Binding Model

New approaches to theoretical physics often involve a revolutionary change and radical expansion of the conceptual paradigms that we use to understand our world. From CERN to Leap Motion, Gabriel has been involved in creative applications of math and physics principles to novel problems.

[…] Next: Travelling Around the Globe (and Under the Sky) in Planetarium […]
February 11, 2015 at 6:18 am[…] Planetarium’s Joyball widget makes it easy to move along the surface of a globe. Since changes of elevation are unnecessary, […]
April 18, 2015 at 7:06 am