How to take screenshots on the Vive Focus
As a blogger, I often need to show you the content of the headset I’m using to show you what I’m working on. In the last months, I’m using a lot the Vive Focus and so I often felt the need to shoot a video or take a picture inside this headset. Regarding the videos, I’ve already written a thorough article about how to shoot them. But, how to take a screenshot inside this HTC headset? Let me show you three methods, leaving the best one as the last one (so, if you are in a hurry, go directly to stage three).
Vysor
If you already use Vysor to stream the content of your headset, you should know that it contains a handy feature to take screenshots of the content of your Android device. If you don’t have Vysor, you can download it for free from its website, install it on your PC and then simply launch it with your headset attached to the USB port of your computer.
Vysor will automatically detect your device: at this point you have to click the green “View” button on Vysor window, next to the data regarding your Vive Focus headset. Vysor will install its service on the Focus, and then will let the streaming start. At this point, you should see the content of your headset streamed to your PC. If you select the “screenshot” button, Vysor will take a screenshot and then will let you save it through your browser (this is a bit weird: it automatically opens your default browser and lets you download the file). Even if you use the free version of Vysor, that shows you a degraded version of the streaming, the screenshot will have an optimal quality.

This solution is easy to be used and gives you a file directly on your PC, but requires a third-party software and especially requires you to use your PC to take a screenshot from your headset. My advice is to use it only if you are already using Vysor to show/record the content of the headset.
ADB
I’ve already talked about adb various times when writing articles on standalone virtual reality headsets (like the Oculus Go, for instance). And in my article about the streaming of Focus content, I’ve already shown you a solution to take screenshots from the Focus using this tool. Copy/pasting myself, this is how to initialize adb and make screenshots.
Before starting with adb, you have to activate the developer mode and the USB debugging on the Vive Focus. You can do that going into Menu -> Settings -> More Settings and then digging a bit into the various developer settings of the Focus (they are very similar to the settings on any Android device, so I guess you will find it easy to do that). Furthermore, be sure to have installed all the Android dev Tools (for instance by installing Android Studio) and to have put the directory of the Android Tools (<android-sdk-path>\platform-tools\) inside your PATH environment variable. If reading these 3 lines your brain has exploded, it is better that you use one of the two other methods, otherwise keep reading and let the nerd power be with you.
Connect your Vive Focus to your PC through the USB cable to start. Then, open the command line by pressing Win+R and typing CMD.
Once you are here, verify that your device is correctly connected by typing:
adb devices
If the result is a device ID, then your Focus is correctly detected and we can go on. If you have more device IDs, then disconnect the other android devices, because otherwise triggering adb is a bit more complicated (it is possible, though). If you have no device ID or a device ID and the word “unauthorized”, you may have to authorize development tools and USB debugging on your Focus. Once everything is ok, we can go on.
If you want to take a screenshot of the Focus content, you have to use the screencap command. Here you are the syntax:
adb shell screencap <NAME_FILE_ON_FOCUS>
adb pull <NAME_FILE_ON_FOCUS> <NAME_FILE_ON_PC>
adb shell rm <NAME_FILE_ON_FOCUS>
These three lines do the following:
- The first line takes the screenshot and saves it to a local file on the device;
- The second line copies this file to a file on your PC;
- The third line removes the temporary screenshot on the device.
One example of usage, that I use often for myself, is the following (you can directly use these three lines and just change the name of the destination file on the PC):
adb shell screencap /sdcard/screen.png
adb pull /sdcard/screen.png c:\Users\anton\Pictures\ViveFocusPicture.png
adb shell rm /sdcard/screen.png
Adb works like a charm and is a tool that all Focus developers have installed. But it is really a complicated solution to be used. My advice is to use it only if you want to impress your friends to show how much nerd you are.

Integrated screenshot feature
Lately, HTC has introduced a shortcut to directly take a screenshot inside the Focus without messing around with third-party software or complicated command line solutions.
All you have to do is:
- Look at the thing you want to take a picture to;
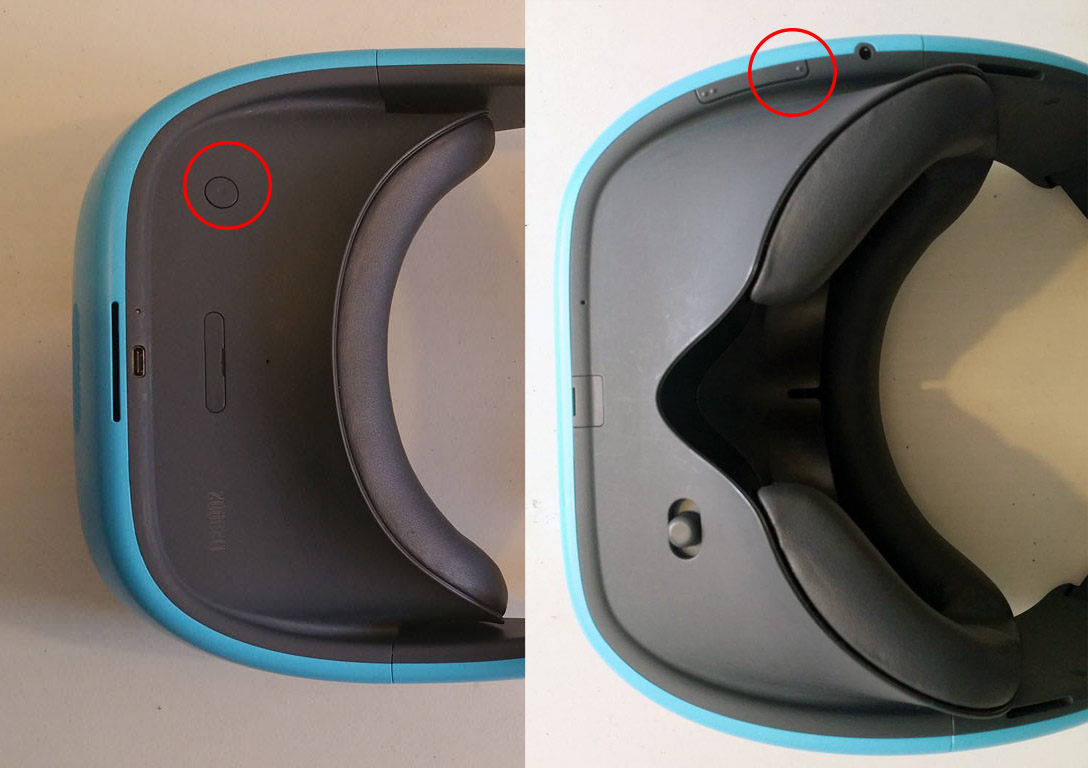
- Press for circa two seconds the power button and the volume-down button on your headset (if you, like me, always forget which is the volume down button, it is the backward one, the one with only one little raised circle on it;

The two buttons to press to take the screenshot. The left one is on the top of the headset, the other one is on the bottom - If the operation was detected by the OS, you should see a little animation showing the screenshot taken;
- Continue doing screenshots this way;
- When you’re done taking screenshots, connect the Focus to your PC using the USB port. The screenshot will be in the \Picture\Screenshots folder of the device.
As you can see, this is a super-easy solution, that everyone can use and that doesn’t require third-party software. It is the one that I will use in the future for all my posts.
In my opinion, HTC has still to improve a bit this, because:
- The key combination seems a bit unnatural to me and can have unintended effects (for instance, sometimes I get a screenshot of the volume level);
- The animation shown by the system makes my eyes to cross.
Anyway, I find it super-super-handy: another step forward made by the Focus, very useful for us bloggers. Remember: power button and volume down button on the headset: hold them down until the screenshot is taken.

And that’s it for today. I hope to have helped you: if this is the case, why don’t you subscribe to my newsletter? 😉
Disclaimer: this blog contains advertisement and affiliate links to sustain itself. If you click on an affiliate link, I'll be very happy because I'll earn a small commission on your purchase. You can find my boring full disclosure here.