
In a previous tutorial, we were able to measure vertical surfaces such as walls, books, and monitors using ARKit 1.5. With the advent of vertical plane anchors, we can now also attach objects onto these vertical walls.
In this tutorial, you'll learn how to make your augmented reality app for iPads and iPhones by using ARKit. Specifically, we'll go over how we can place virtual paintings like the Mona Lisa on our walls.
What Will You Learn?
We'll be learning how to place objects such as 2D images through SceneKit on vertical walls using ARKit 1.5.
Minimum Requirements
- Mac running macOS 10.13.2 or later.
- Xcode 9.4 or above.
- A device with iOS 11+ on an A9 or higher processor. Basically, the iPhone 6S and up, the iPad Pro (9.7-inch, 10.5-inch, or 12.9-inch; first-generation and second-generation), and the 2017 iPad or later.
- Swift 4.0. Although Swift 3.2 will work on Xcode 9.4, I strongly recommend downloading the latest Xcode to stay up to date.
- An Apple Developer account. However, it should be noted that you don't need a paid Apple Developer account. Apple allows you to deploy apps on a test device using an unpaid Apple Developer account. That said, you will need a paid Developer account in order to put your app in the App Store. (See Apple's site to see how the program works before registering for your free Apple Developer account.)
Step 1: Download the Assets You Will Need
To make it easier to follow along with this tutorial, I've created a folder with the required 2D assets and Swift file needed for the project. These files will make sure you won't get lost in this guide, so download the zipped folder containing the assets and unzip it.
Step 2: Set Up the AR Project in Xcode
If you're not sure how to do this, follow Step 2 in our post on piloting a 3D plane using hitTest to set up your AR project in Xcode. Be sure to give your project a different name, such as NextReality_Tutorial8. Make sure to do a quick test run before continuing on with the tutorial below.
Step 3: Import Assets into Your Project
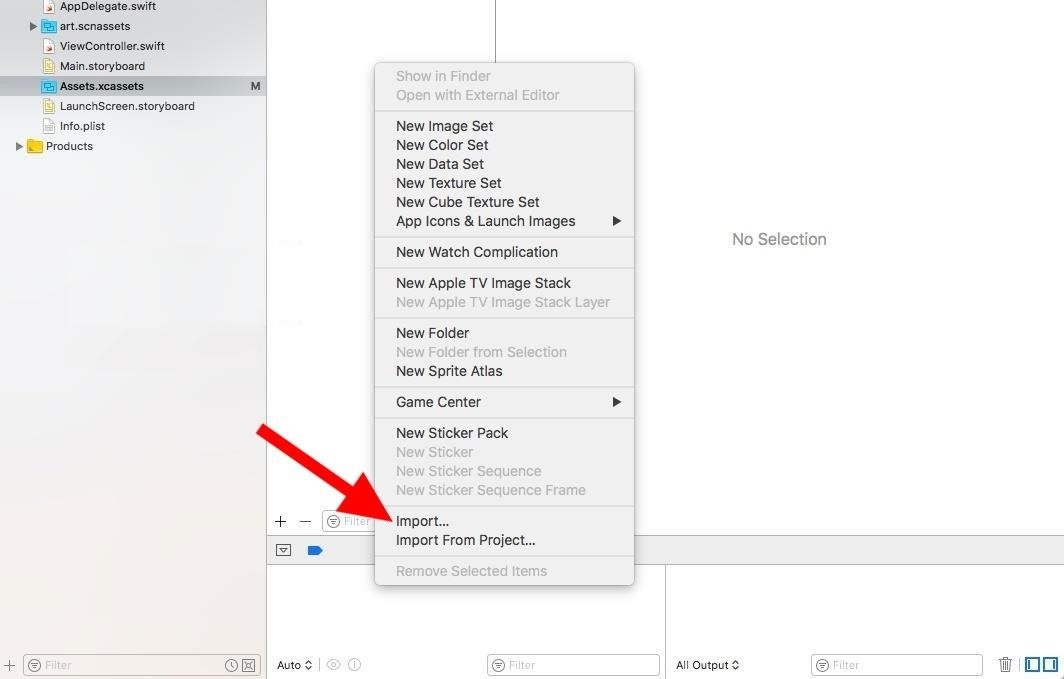
In the project navigator, click on the "Assets.xcassets" folder. We'll be adding our 2D images here. Then, right-click on the left pane of the area in the right side of the project navigator. Choose "Import" and add the "overlay_grid.png" and the "mona-lisa.jpg" files from the unzipped Assets folder.
Next, once again in the project navigator, right-click on the yellow folder for "NextReality_Tutorial8" (or whatever you named your project). Choose the "Add Files to 'NextReality_Tutorial8" option.
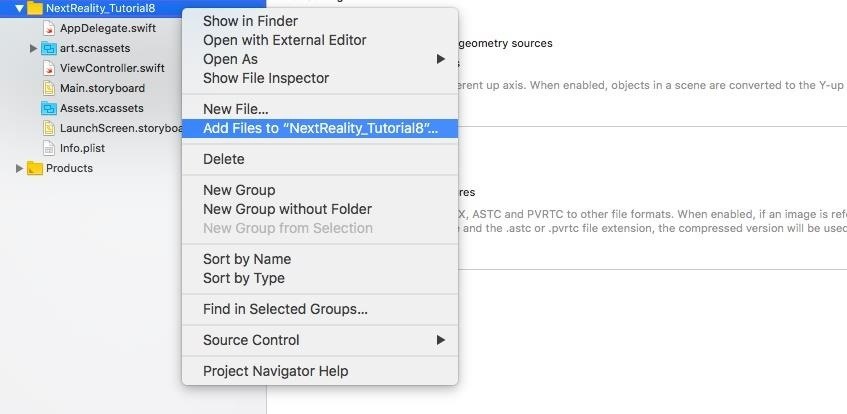
Navigate to the unzipped "Assets" folder, and choose the "Grid.swift" file. Be sure to check "Copy items if needed" and leave everything else as is. Then, click on "Add."
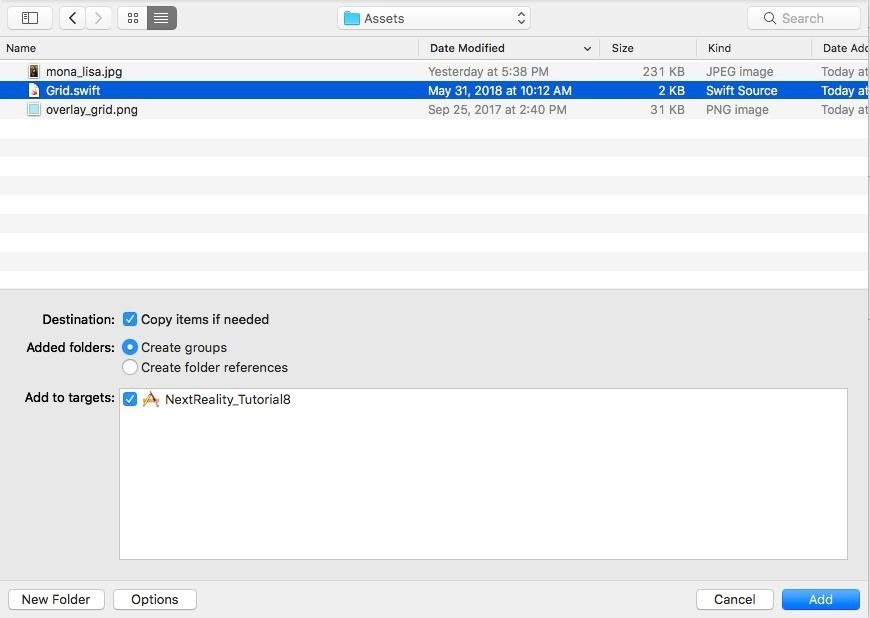
"Grid.swift" should now be added into your project, and your project navigator should look something like this:
This file will help render an image of a grid for every vertical plane ARKit detects.
Step 4: Place a Grid to Show Detected Vertical Planes
To quickly go over ARKit's plane detection capabilities, take a quick look at our tutorial on horizontal plane detection. Although this covers horizontal plane detection, the strategies and logic to detect vertical planes are quite similar.
Note: This step will be quite similar to Step 4 from the previous article on vertical planes.
Open the "ViewController.swift" class by double-clicking it. If you want to follow along with the final Step 4 code, just open that link to see it on GitHub.
In the "ViewController.swift" file, modify the scene creation line in the viewDidLoad() method. Change it from:
let scene = SCNScene(named: "art.scnassets/ship.scn")!To the following (which ensures we are not creating a scene with the default ship model):
let scene = SCNScene()Next, find this line at the top of the file:
@IBOutlet var sceneView: ARSCNView!Under that line, add this line to create an array of "Grid's" for all vertical planes detected:
var grids = [Grid]()Copy and paste the following two methods as listed below to the end of the file before the last curly bracket ( } ) in the file. These methods will allow us to add our Grid on the vertical planes detected by ARKit as a visual indicator.
func renderer(_ renderer: SCNSceneRenderer, didAdd node: SCNNode, for anchor: ARAnchor) {
    guard let planeAnchor = anchor as? ARPlaneAnchor, planeAnchor.alignment == .vertical else { return }
    let grid = Grid(anchor: planeAnchor)
    self.grids.append(grid)
    node.addChildNode(grid)
}

func renderer(_ renderer: SCNSceneRenderer, didUpdate node: SCNNode, for anchor: ARAnchor) {
    guard let planeAnchor = anchor as? ARPlaneAnchor, planeAnchor.alignment == .vertical else { return }
    let grid = self.grids.filter { grid in
        return grid.anchor.identifier == planeAnchor.identifier
        }.first

    guard let foundGrid = grid else {
        return
    }

    foundGrid.update(anchor: planeAnchor)
}
Let's quickly go over what's happening in these two methods:
- The didAdd() is called whenever a new node is added to the ARSCNView. Here, we ensure that the detected ARPlaneAnchor corresponds to a vertical plane and add it as our Grid object, which adds the grid image we imported to any plane detected.
- The didUpdate() is called whenever newer ARPlaneAnchor nodes are detected (again, we ensure that they correspond to vertical planes), or when the plane is expanded. In that case, we want to update and expand our grid as well. We do that here by calling update() on that specific Grid.
Now, let's enable feature points. Under this line in viewDidLoad():
sceneView.showsStatistics = trueAdd:
sceneView.debugOptions = ARSCNDebugOptions.showFeaturePointsNext, let's turn on vertical plane detection. Under this line in viewWillAppear():
let configuration = ARWorldTrackingConfiguration()Add:
configuration.planeDetection = .verticalThis is very important! It will ensure that ARKit is able to detect vertical planes in the real world. The feature points will allow us to see all the 3D points ARKit is able to detect.
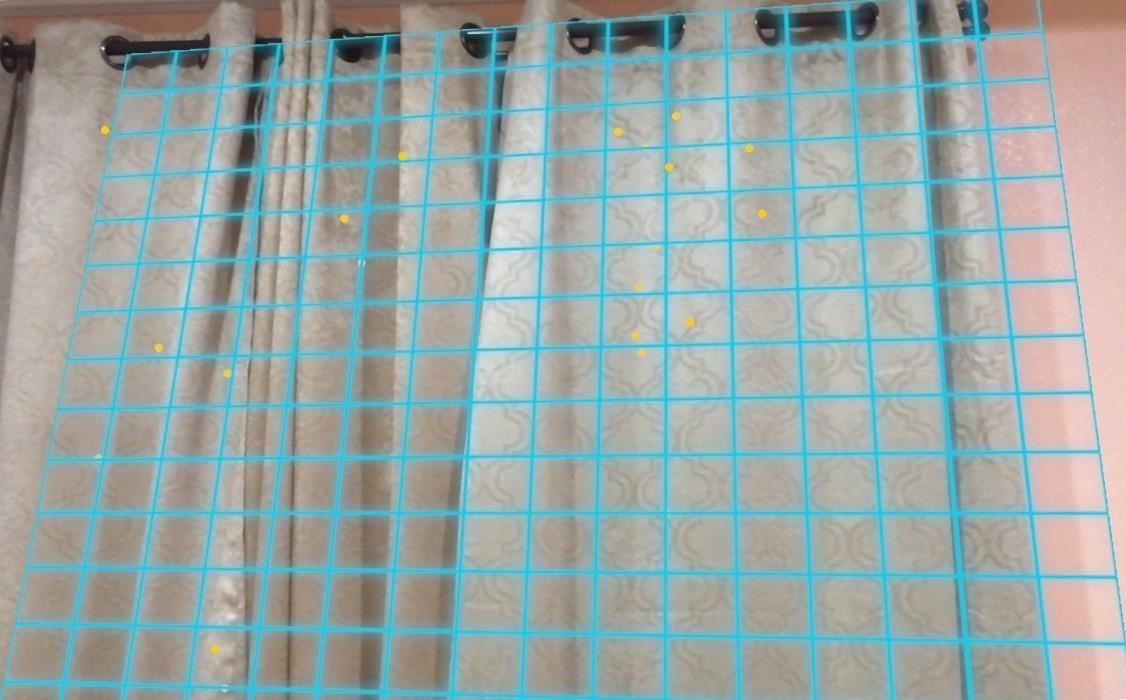
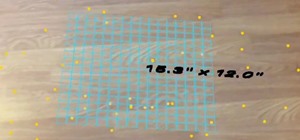
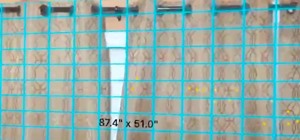
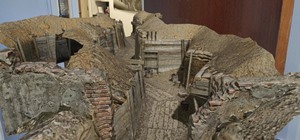
Now, run your app on your phone and walk around. Focus on a well-lit wall or flat, vertical surface; you should be able to see blue grids appear whenever a vertical plane is detected:
Checkpoint: Your entire project at the conclusion of this step should look like the final Step 4 code on my GitHub.
Step 5: Use hitTest to Place the Mona Lisa on a Wall
Ever seen the Mona Lisa in real life before? It is a marvel to look at, although it's very small in-person. For centuries, the entire world has spoken highly about it, and now you can place it on your wall in your home.
We'll be using our old friend, the hitTest, to place the Mona Lisa painting on a detected vertical wall.
First, let's add gesture recognizers on our scene view. Open the "ViewController.swift" class (all work from here on will involve this file) and at the end of the viewDidLoad() method, add these lines:
let gestureRecognizer = UITapGestureRecognizer(target: self, action: #selector(tapped))
sceneView.addGestureRecognizer(gestureRecognizer)
Next, let's add the tapped() method to be called when a tap gesture on the phone is registered. Add the following code at the bottom of the file, but before the last curly bracket ( } ):
@objc func tapped(gesture: UITapGestureRecognizer) {
    // Get 2D position of touch event on screen
    let touchPosition = gesture.location(in: sceneView)

    // Translate those 2D points to 3D points using hitTest (existing plane)
    let hitTestResults = sceneView.hitTest(touchPosition, types: .existingPlaneUsingExtent)

    // Get hitTest results and ensure that the hitTest corresponds to a grid that has been placed on a wall
    guard let hitTest = hitTestResults.first, let anchor = hitTest.anchor as? ARPlaneAnchor, let gridIndex = grids.index(where: { $0.anchor == anchor }) else {
        return
    }
    addPainting(hitTest, grids[gridIndex])
}
Here, we basically translate the 2D points the tap gesture relates to on the iPhone screen to real world 3D points using the hitTest. We make sure to use the existingPlaneUsingExtent hitTest type to allow the results to only come from planes that have been detected (by our grids being displayed) based on their dimensions (extent). We then ensure that the anchor detected by the hitTest is an ARPlaneAnchor rather than any feature point, and that the anchor itself correlates to a grid that has already been detected and is being shown. Finally, we call the addPainting() method to actually place the painting on the wall.
Let's add the addPainting() under the tapped() method, but before the last curly bracket ( } ) in the file:
func addPainting(_ hitResult: ARHitTestResult, _ grid: Grid) {
    // 1.
    let planeGeometry = SCNPlane(width: 0.2, height: 0.35)
    let material = SCNMaterial()
    material.diffuse.contents = UIImage(named: "mona-lisa")
    planeGeometry.materials = [material]

    // 2.
    let paintingNode = SCNNode(geometry: planeGeometry)
    paintingNode.transform = SCNMatrix4(hitResult.anchor!.transform)
    paintingNode.eulerAngles = SCNVector3(paintingNode.eulerAngles.x + (-Float.pi / 2), paintingNode.eulerAngles.y, paintingNode.eulerAngles.z)
    paintingNode.position = SCNVector3(hitResult.worldTransform.columns.3.x, hitResult.worldTransform.columns.3.y, hitResult.worldTransform.columns.3.z)

    sceneView.scene.rootNode.addChildNode(paintingNode)
    grid.removeFromParentNode()
}
There are a few things happening here:
- We created a 2D plane geometry, SCNPlane, and gave it the mona-lisa image we downloaded before as its background material.
- We then set the geometry to a new SCNNode, called paintingNode. We made sure to set this node's transform (this is the combination of the node's rotation, position, and scale properties) value to what the hitResult's anchor's transform value is. Then, we accordingly set the euler angles (this defines the angle and rotation of the node based on the x, y, and z axis). Finally, we set the position of the node (of the painting) to where the tapping gesture happened based on the hitTest result.
After adding the paintingNode into the scene, we'll remove the grid that it is on so we can admire the Mona Lisa without any blue grid lines!
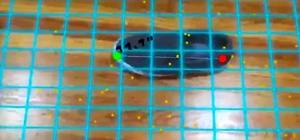
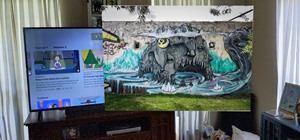
Save and run the app. Walk around and find a well-lit, textured vertical flat surface such as a wall.
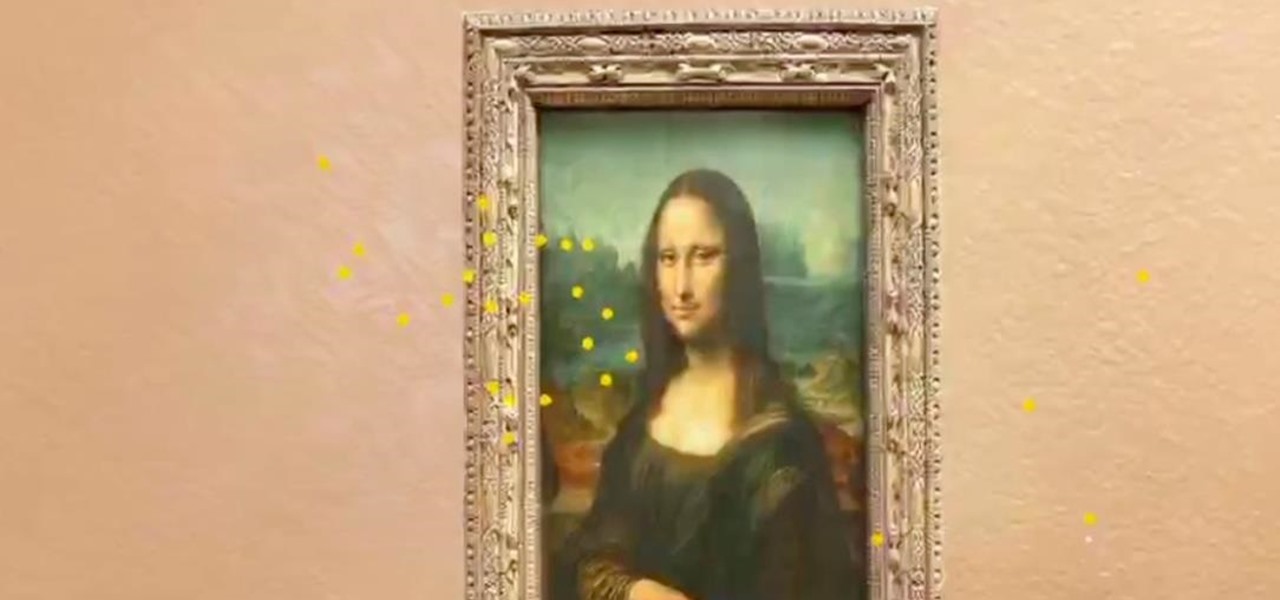
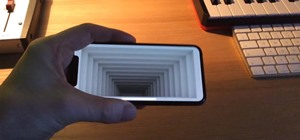
Note: For a wall, you might have to get up really close as most walls lack the texture that ARKit needs to detect vertical planes. I would suggest finding a window or another colored, vertical surface to allow ARKit to detect the planes. After detecting a wall through the blue grid, tap in an area on the grid to place the Mona Lisa on the wall. You should see something like this:
Checkpoint: Your entire project at the conclusion of this step should look like the final Step 5 code on my GitHub.
What We've Accomplished
Great job! You were successfully able to detect a wall and place an actual object on it using ARKit 1.5! Isn't it marvelous what ARKit is capable of doing? Thanks to Apple's update, the difficulties of dealing with the intricate math and computer vision logic have been completely hidden from us thanks to ARKit. Using this tutorial, we were able to place a detailed image of the Mona Lisa on our wall in our own home. Isn't that neat? Feel free to play around by placing different images and modifying their sizes.
If you need the full code for this project, you can find it in my GitHub repo. I hope you enjoyed this tutorial on ARKit. If you have any comments or feedback, please feel free to leave it in the comments section. Happy coding!
Just updated your iPhone? You'll find new emoji, enhanced security, podcast transcripts, Apple Cash virtual numbers, and other useful features. There are even new additions hidden within Safari. Find out what's new and changed on your iPhone with the iOS 17.4 update.


Be the First to Comment
Share Your Thoughts