
Hello, budding augmented reality developers! My name is Ambuj, and I'll be introducing all of you Next Reality readers to the world ARKit, as I'm developing an ARKit 101 series on using ARKit to create augmented reality apps for iPad and iPhone. My background is in software engineering, and I've been working on iOS apps for the past three years.
I'm a huge fan of augmented reality and was very excited when I first found out about Apple's release of ARKit (in fact, I almost jumped out of my seat at WWDC when it was announced). Since then, I've worked on personal projects involving ARKit and have decided to share with you all some of what I've learned.
Pilot? Me? I Barely Even Know How Planes Work!
Don't worry, you won't have to know anything about flying mechanics for this tutorial. ARKit, with the combination of Apple's high-level 3D rendering engine called SceneKit, offers intricate capabilities to easily simplify a bunch of the complex maneuvers that come with flying an airplane in 3D space.
By the end of this tutorial, you'll be able to have your 3D plane fly to specific locations in the augmented reality world by simply tapping on your iPad or iPhone. Pretty neat, right?
What Will I Learn?
In this tutorial, we'll be going over the methodology of mapping a 2D point (x, y) on our iPad or iPhone to a real-world 3D point (x, y, z) using the hitTest. We'll also be learning a little bit about SceneKit and how to customize certain 3D assets.
Minimum Requirements
- Mac running macOS 10.13.2 or later.
- Xcode 9.2 or above.
- A device with iOS 11+ on an A9 or higher processor. Basically, the iPhone 6S and up, the iPad Pro (9.7-inch, 10.5-inch, or 12.9-inch; first-generation and second-generation), and the 2017 iPad or later.
- Swift 4.0. Although Swift 3.2 will work on Xcode 9.2, I strongly recommend downloading the latest Xcode to stay up to date.
- An Apple Developer account. However, it should be noted that you don't need a paid Apple Developer account. Apple allows you to deploy apps on a test device using an unpaid Apple Developer account. That said, you will need a paid Developer account in order to put your app in the App Store. (See Apple's site to see how the program works before registering for your free Apple Developer account.)
Step 1: Download the Assets You Will Need
I've created a folder with a few images and a scene file so you can follow along with this tutorial. So to make sure not to get lost in this guide, download the zipped folder containing the assets and unzip it.
Step 2: Set Up the AR Project in Xcode
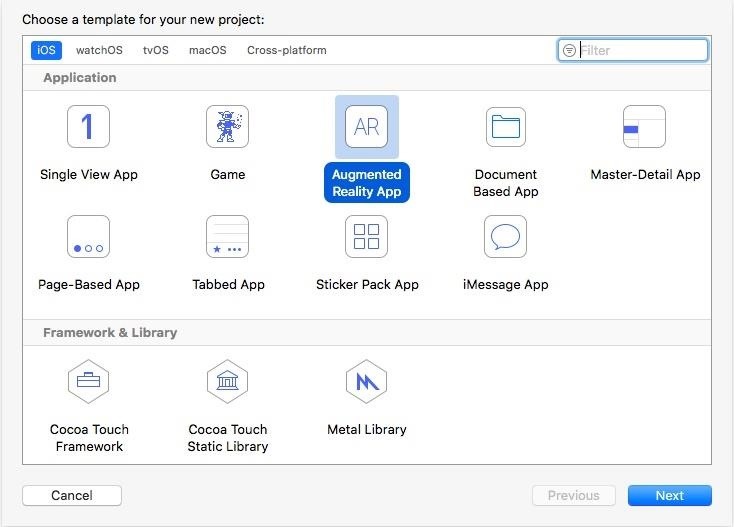
Open up Xcode on your Mac, then click on "Create a new Xcode project" on the Welcome screen. When the template options come up, select "Augmented Reality App," and click "Next".
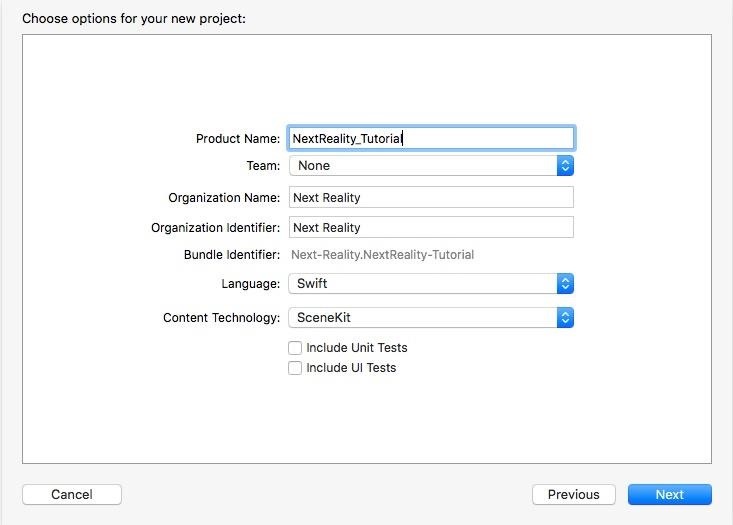
Fill out the options for your new project when prompted. Make sure to choose "Swift" and "SceneKit" as the Language and Content Technology, respectively. You should pick your Apple Developer account here from the Team dropdown (if you don't have one, follow the last step under Minimum Requirements above). Fill out the rest like shown below.
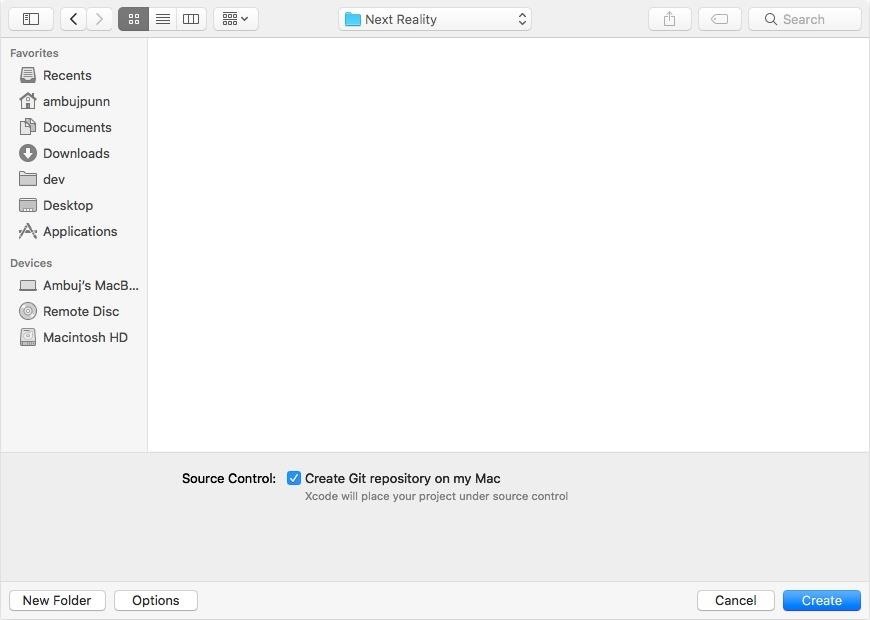
In the next window, choose the folder you'd like to save this project in, then uncheck the "Create Git repository on my Mac" since we're not going to be using source control. Click on "Create" to finish up.
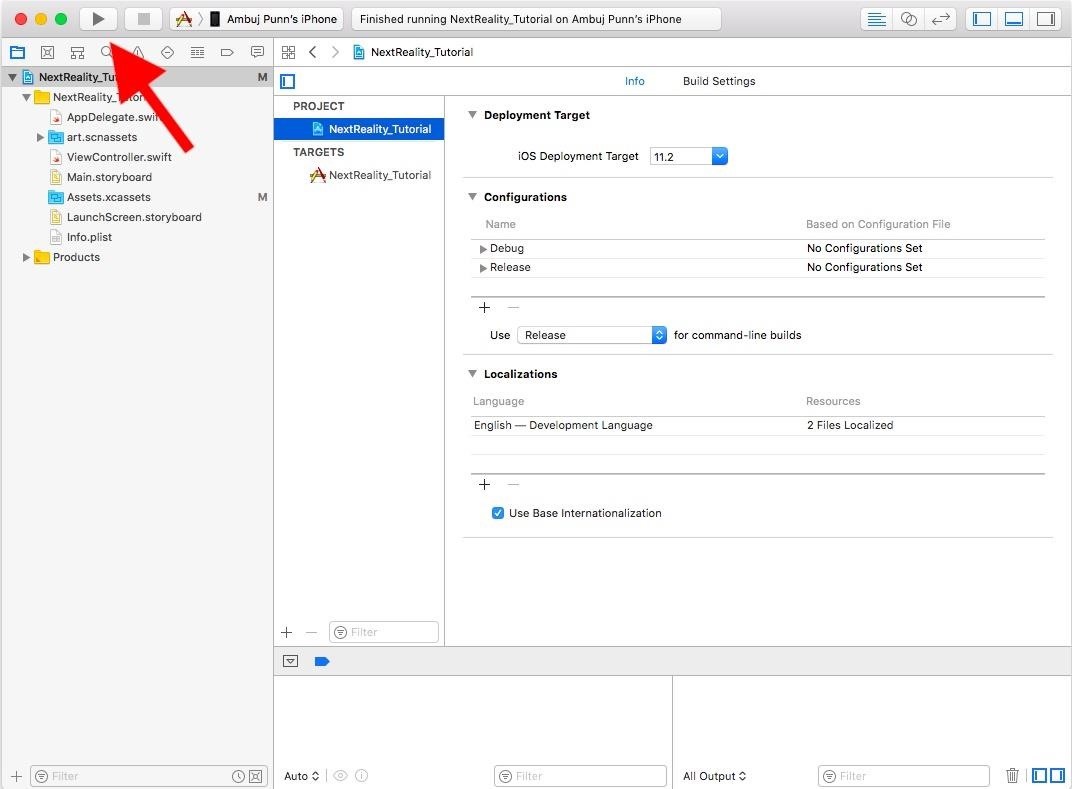
Under the General tab, look for Signing. You should have "Automatically manage signing" checked. This makes sure Xcode does all the heavy lifting when it comes to deploying on your mobile device.
Make sure your Team is set to your Apple Developer account if not already done. Once it is, the error in red (seen in the image below) won't show anymore. Let's also change the Deployment Target to "11.0" or higher (depending on your device) if it isn't already. This will make sure this app will run on any device that meets the minimum requirements.

Step 3: Do a Quick Test Run
Now, let's run the app to see if everything is working fine. Connect your iPad or iPhone via USB or wireless debugging. You should see your device's name appear in Xcode's toolbar. Click the "Play" button in the top-left corner as shown below, and the build should commence. Make sure your iPad or iPhone is unlocked otherwise Xcode won't be able to deploy the app.
In case you have a window come up alerting you about a codesign/keychain issue, just select "Always Allow" after entering in your password.
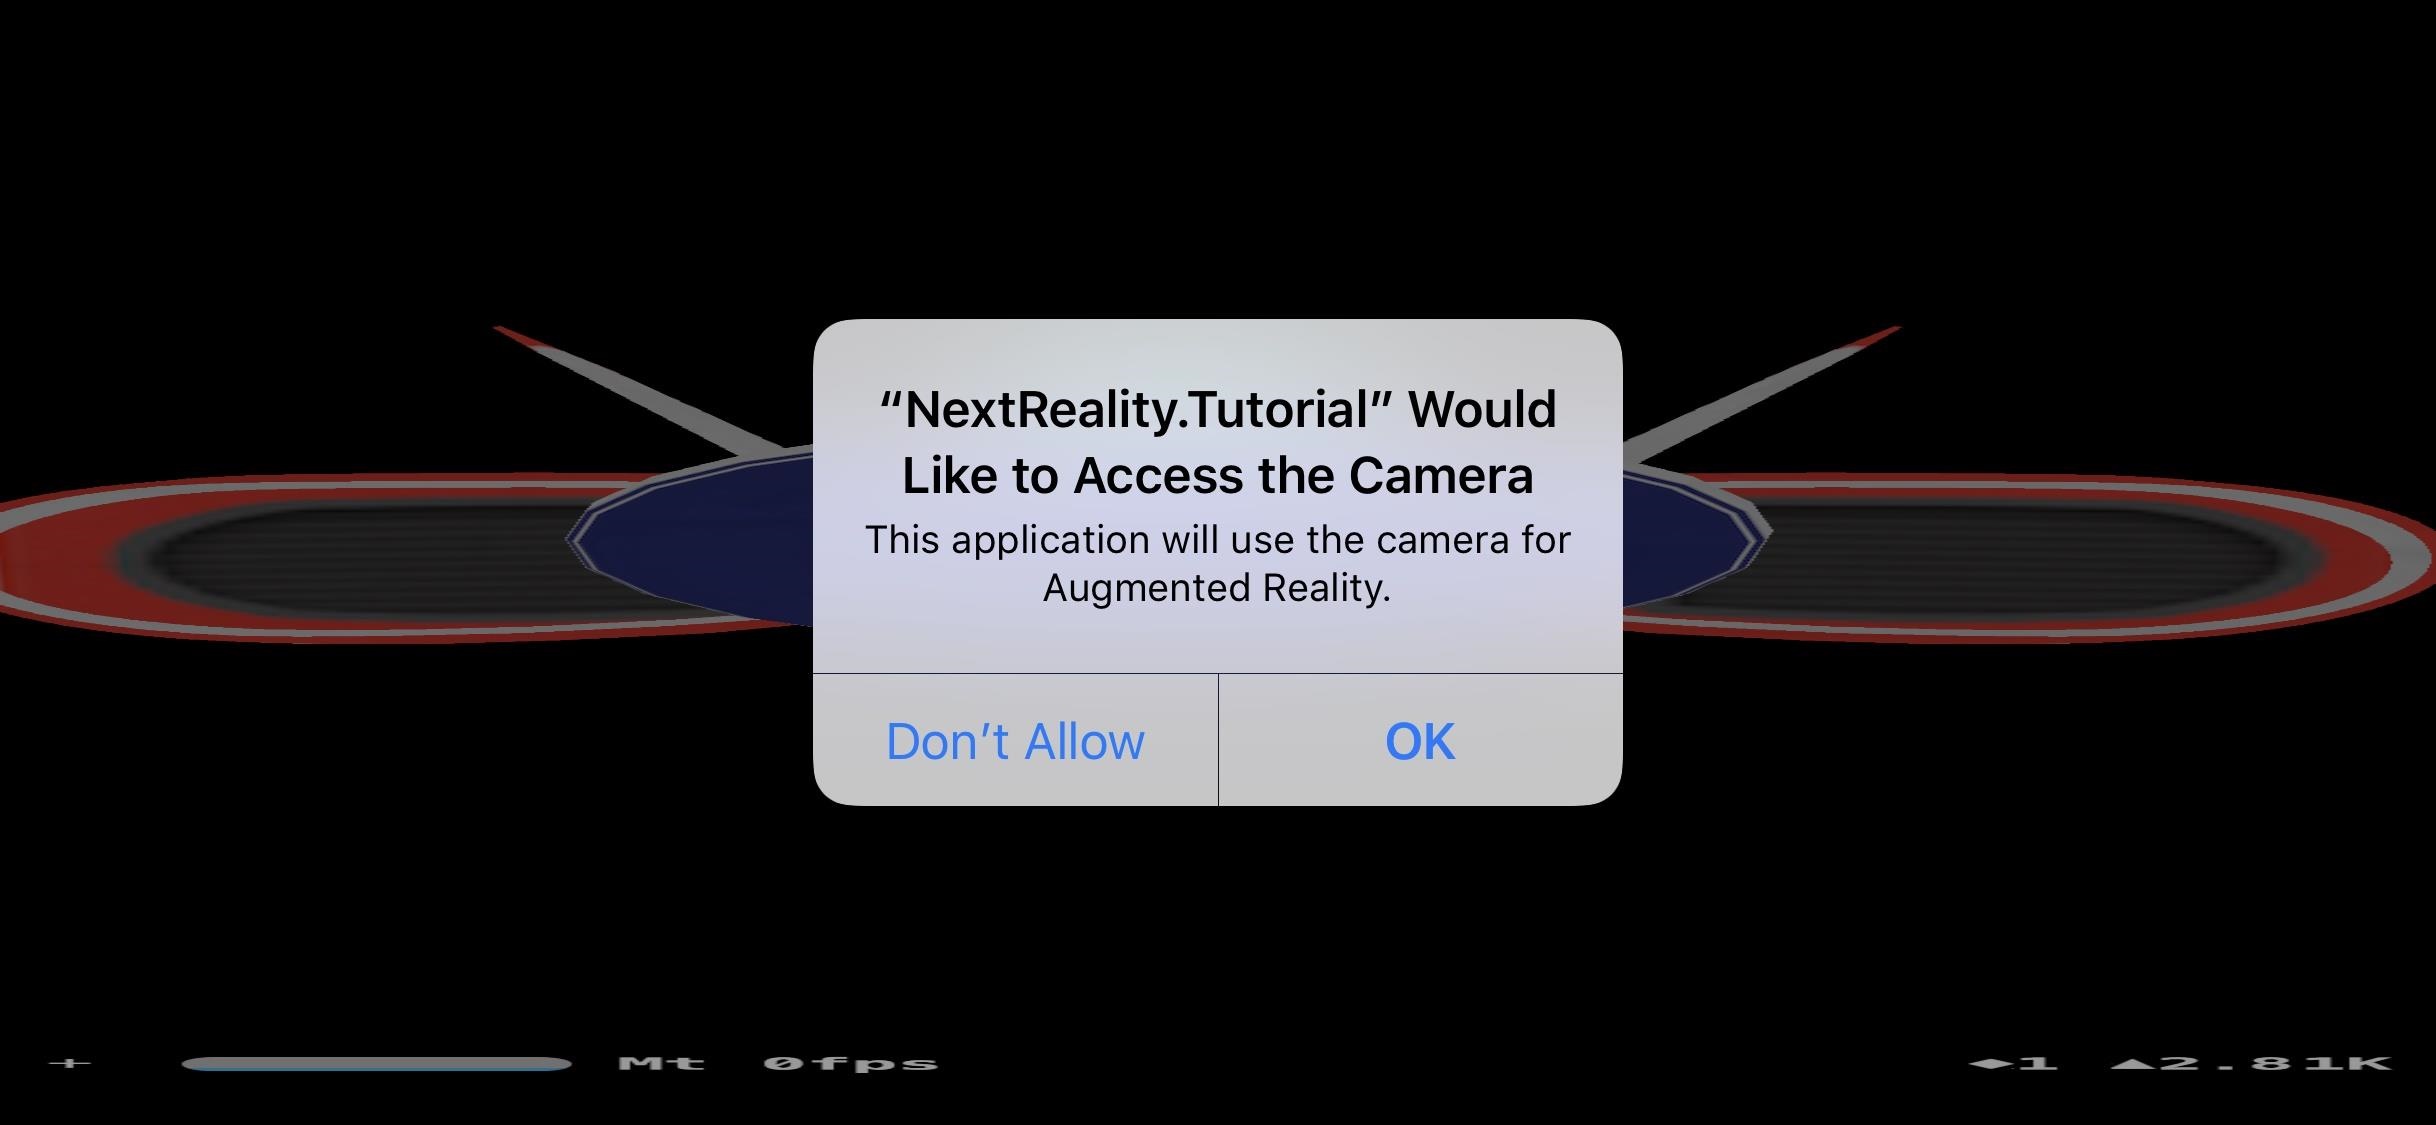
Once the build has succeeded and the app has been deployed, the app should automatically open on your iPad or iPhone. It will require you to give permission to the device's camera, which is absolutely necessary since ARKit apps relay on the camera. Accept it, then move your iPad or iPhone around, and you should see the default 3D ship model the AR template project comes with.
Newbie Note: Trust Your Developer Profile
If you received a "Could not launch" error in Xcode or an "Untrusted Developer" error on your iPad or iPhone, you'll need to trust the developer app certificate on your device before trying again. To do so, on your device, open the Settings app and tap "General," then "Device Management." Tap your profile under Developer App, then tap "Trust "yourdeveloperemailaddress," and "Trust" to confirm.
Step 4: Integrate the New Plane Asset & Next Reality Logo
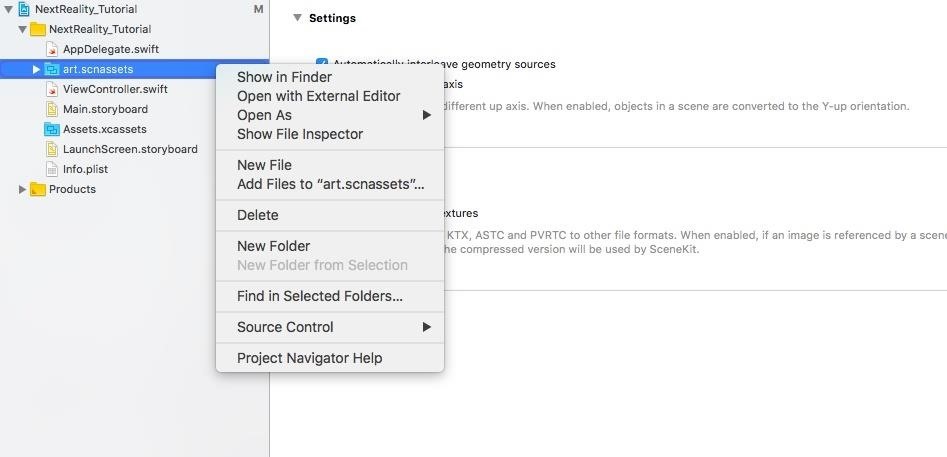
Unzip the folder you downloaded from Step 1 above, then go to the project navigator in the left sidebar and locate the "art.scnassets" folder. This is where you will keep your 3D SceneKit format files. Right-click on the folder, and choose the "Add Files to 'art.scnassets'" option. Add the "plane_banner.scn" file from the unzipped "Assets" folder.
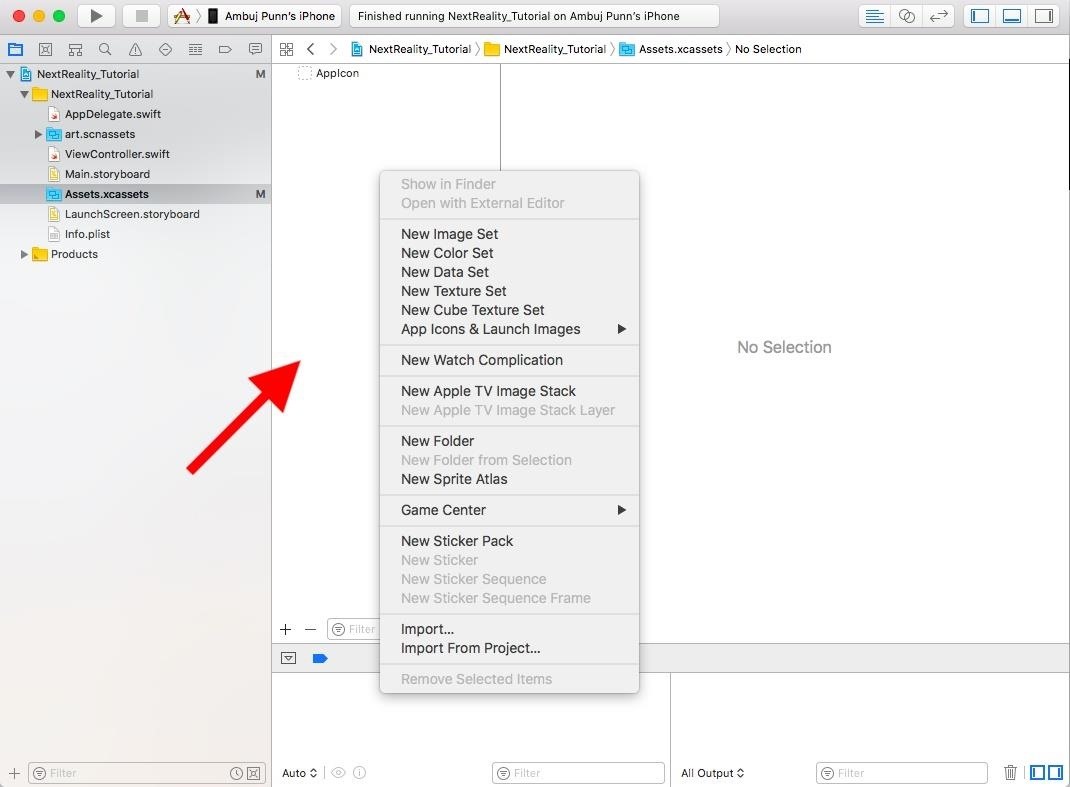
In the project navigator in the left sidebar again, locate the "Assets.xcassets" folder. This is where you keep all your image files. Click on this, and right-click in the left pane of the white editor area just beside the naivgator sidebar. Choose the "Import" option, and add the other two files ("next_reality_logo.jpg" and "finish_flags.png") from the unzipped "Assets" folder here.
Open the "ViewController.swift" class by double-clicking it. The rest of this step will be editing this document, so if you want to follow along with the final Step 4 code, just follow that link to open it up on GitHub. In the "ViewController.swift" file, modify the scene creation line in the viewDidLoad() method. Change it from:
let scene = SCNScene(named: "art.scnassets/ship.scn")!To the following, which ensures we are not creating a scene with the old ship model.
let scene = SCNScene()In the same "ViewController.swift" file, copy and paste the addPlane() method as listed below to the end of the file before the last curly bracket ( } ) in the file.
Note that in this code and in future code, where there is a // followed by a number, this is for reference to the explanation right below the code box. Otherwise, when copying/pasting, those // lines should be empty lines.
private func addPlane() {
    // 1.
    let scene = SCNScene(named: "art.scnassets/plane_banner.scn")!
    let planeNode = scene.rootNode.childNode(withName: "planeBanner", recursively: true)

    // 2.
    planeNode?.scale = .init(0.05, 0.05, 0.05)

    // 3.
    let bannerNode = planeNode?.childNode(withName: "banner", recursively: true)

    // Find banner material and update its diffuse contents:
    let bannerMaterial = bannerNode?.geometry?.materials.first(where: { $0.name == "logo" })
    bannerMaterial?.diffuse.contents = UIImage(named: "next_reality_logo")

    // 4.
    self.sceneView.scene.rootNode.addChildNode(planeNode!)
}
Let's examine each one of these steps:
- We load a new SCNScene instance as "scene" using the plane asset we have. We then store the SCNNode instance the plane is tied to as "planeNode." Additionally, we set a name identifier for our node to "plane."
- We modify the scale of the planeNode to be a little smaller in proportion to its original size (5% or 0.05, instead of 100% of size).
- We get the SCNNode instance that the banner on the plane is tied to. We then change the first material (which controls the visual elements of the node) of the banner (which is named logo) to the next_reality_logo image we added to our project.
- We then add planeNode to the sceneView we have set up. This ensures that the node that contains our plane model is added to the ARSCNView that is being shown in the app.
At the end of the viewDidLoad() method, add this:
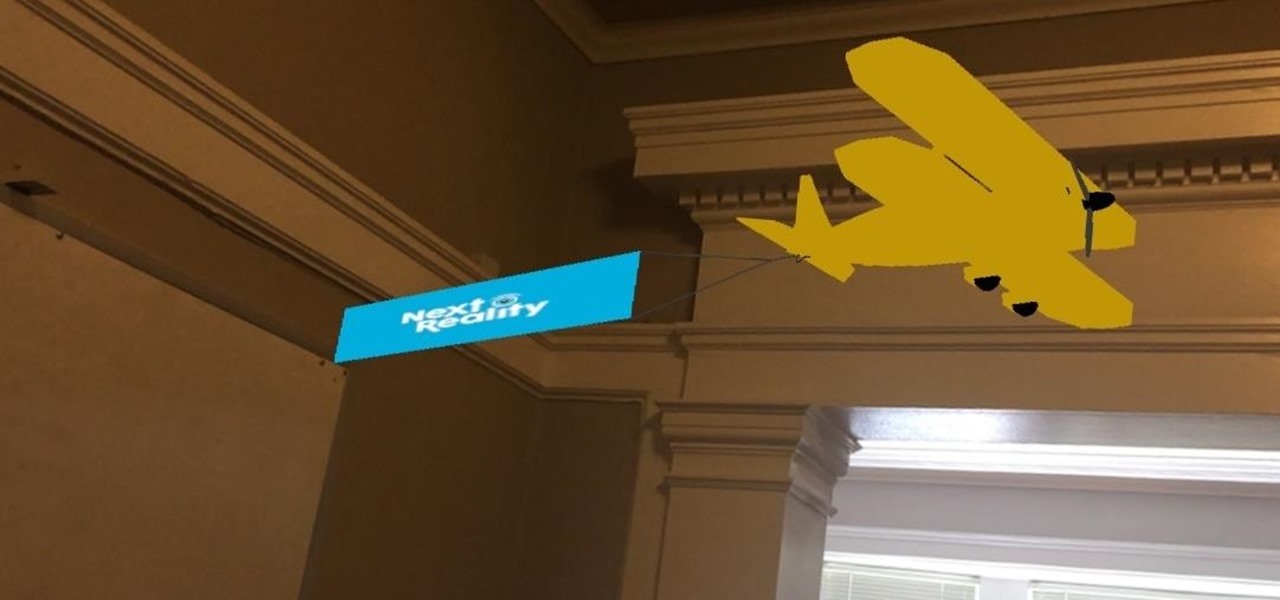
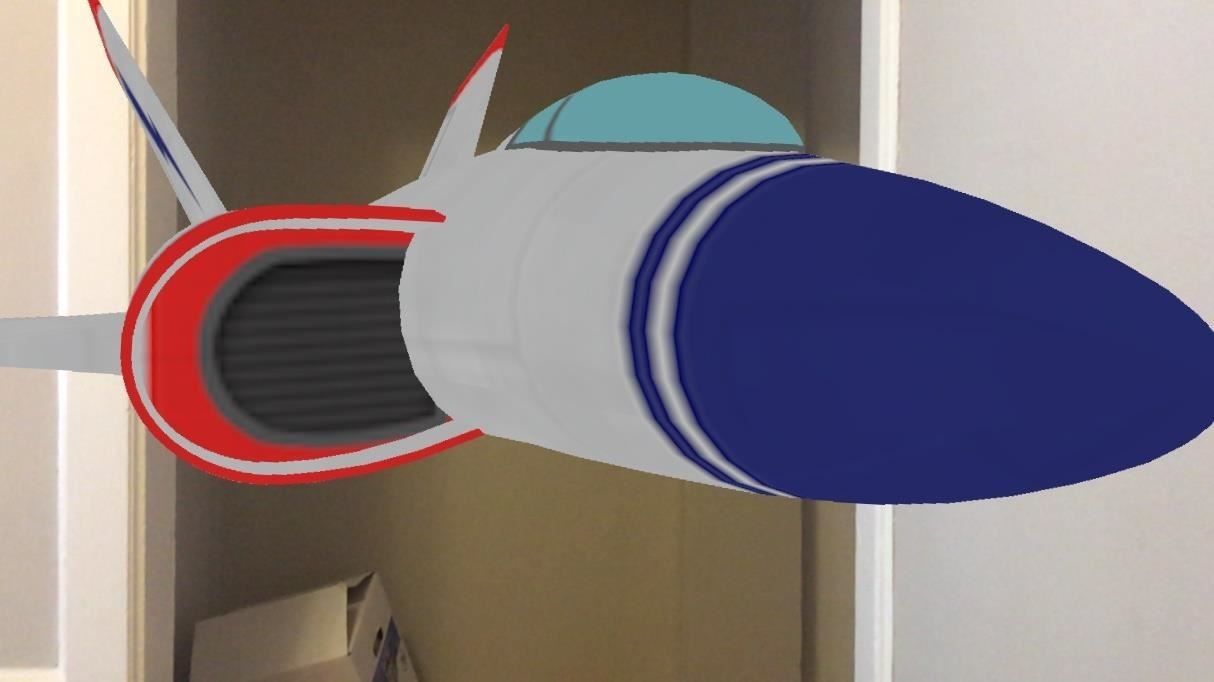
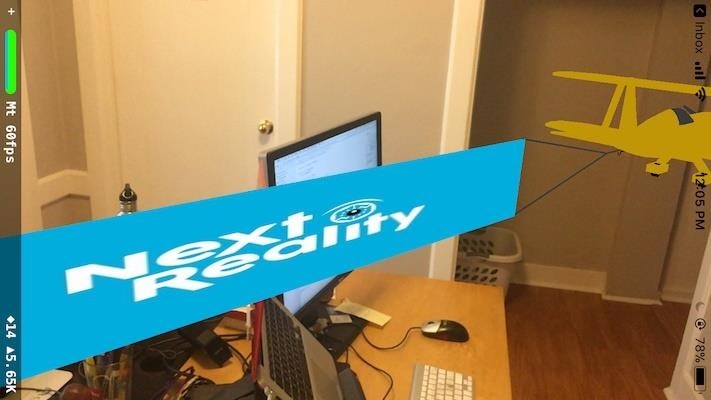
addPlane()Once deployed, move your iPad or iPhone around to see the plane with the Next Reality logo. Congrats, you have a custom plane model in your AR app! It should look something like this:
Checkpoint: Your entire project including the code you just pasted above in this step should look like the final Step 4 code on my GitHub.
Step 5: Find the Real-World 3D Point from a Tapped 2D Point
Apple's hitTest is a way for ARKit to map out a 2D point on our iPad or iPhone screen to the corresponding 3D point in the real world. We'll see how we do that with the code below. If you want to follow along with the final Step 5 code as you input the content below, follow the GitHub link to do so.
In "ViewController.swift" again (which is what we'll be editing for the rest of this guide), add a gesture recognizer to the end of the viewDidLoad() method:
let gestureRecognizer = UITapGestureRecognizer(target: self, action: #selector(tapped))
sceneView.addGestureRecognizer(gestureRecognizer)
This adds a touch event to our view controller. Every time a tap happens, the tapped() method is called. Also, delete the addPlane() method call that we added earlier in viewDidLoad() in Step 4.
Now, enable feature points. This allows us to see the feature points ARKit is able to identify based on real-world objects through the camera. After this line in viewDidLoad():
sceneView.showsStatistics = trueAdd this code:
// Add feature points debug options
sceneView.debugOptions = [ARSCNDebugOptions.showFeaturePoints]
Now, add the tapped() method right after where you pasted the addPlane() method at the end of the file but before the last curly bracket:
// 1.
@objc func tapped(recognizer :UIGestureRecognizer) {
    // Get exact position where touch happened on screen of iPhone (2D coordinate)
    let touchPosition = recognizer.location(in: sceneView)

    // 2.
    // Conduct a hit test based on a feature point that ARKit detected to find out what 3D point this 2D coordinate relates to
    let hitTestResult = sceneView.hitTest(touchPosition, types: .featurePoint)

    // 3.
    if !hitTestResult.isEmpty {
        guard let hitResult = hitTestResult.first else {
            return
        }
        print(hitResult.worldTransform.columns.3)
    }
}
OK, let's examine each one of these steps:
- We get the exact position where the touch happens on the screen. This is stored as a CGPoint instance containing the (x, y) coordinates.
- We call the scene view's hitTest() by passing in the touchPosition, and the type of hitTest* we want conducted: using feature points.
- We make sure the array isn't empty and take out the first hitTest result safely. We then print out the hitTest result for debugging purposes. The worldTransform property contains information about the result such as rotation, translation, scale, and position relative to the real world. We print out the third column in this 4x4 matrix which will give us the position of the intersection (the result of the hitTest).
*Note: ARKit extends a ray from the tapped location on your iPad or iPhone to see where the feature points intersect with that ray. Those intersection points, in order of distance from the camera, are contained in the hitTestResult array (the most accurate one being the first element in the array). There are other methods of doing the hitTest as well such as detecting points on a geometric plane whether it has been detected, has a known geometry, or has a known size. Refer to hitTest and its types of tests if needed.
Click the play button to build and run the app again. Once deployed, examine an area with good texture and lighting using the camera in the app. You should start to see yellow feature points like this:

Woohoo! ARKit is able to detect feature points of real-world objects! Now, tap anywhere in the app. Keep a lookout in your Xcode debugger like shown below.
You should start to see statements being printed out. You might see coordinates like the ones below (of course, yours will be different than mine):
(0.275357, -0.132157, -0.444675, 1.0)
(-0.207006, 0.331861, -0.402772, 1.0)
These are the real world x, y, z coordinates relative to your camera. That means tapping on your screen, which is a 2D CGPoint, maps to a real 3D point in the real world!
I'd like you to pause for a moment here. What we just did with few lines of code was immensely difficult before ARKit came out. Consider the amount of computer vision, graphics engineering, and complex math you no longer have to worry about because of ARKit. That is the beauty of the high-level abstraction that ARKit provides. You can confidently focus on your app's business logic while ARKit handles the more difficult parts.
Checkpoint: Your entire project including the code you just pasted above in this step should look like the final Step 5 code on my GitHub.
Step 6: Place the Plane at the 3D Point We Calculated
Here, we will use the data calculated by the hitTest we did above to place the plane at that specific 3D point. If you want to follow along with the final Step 6 code as you input the content below, follow the GitHub link to do so.
First, modify the addPlane() method signature you pasted in Step 4 to take in a hitTest result as an argument. Change it from this:
private func addPlane() {To this:
private func addPlane(hitTestResult: ARHitTestResult) {Then, in the tapped() method, right after this line:
print(hitResult.worldTransform.columns.3)Add the addPlane() with the passed in hitTest result as an argument:
addPlane(hitTestResult: hitResult)Next, modify the plane's position based on the hitTest result. In the addPlane() method, after this line:
let planeNode = scene.rootNode.childNode(withName: "planeBanner", recursively: true)Set the position to be the 3D point that the hitTest result correlates to by adding this code:
planeNode?.position = SCNVector3(hitTestResult.worldTransform.columns.3.x,hitTestResult.worldTransform.columns.3.y, hitTestResult.worldTransform.columns.3.z)In the same addPlane() method, modify the size of the plane by changing the line that sets the scale as shown below. Change it from:
planeNode?.scale = .init(0.05, 0.05, 0.05)To this:
planeNode?.scale = .init(0.005, 0.005, 0.005)Here, we create a SCNVector3 instance that is able to store x, y, z coordinates of that point and assign it to the position of the plane's node. We also shrink the size of the plane by 10x to make it a bit smaller.
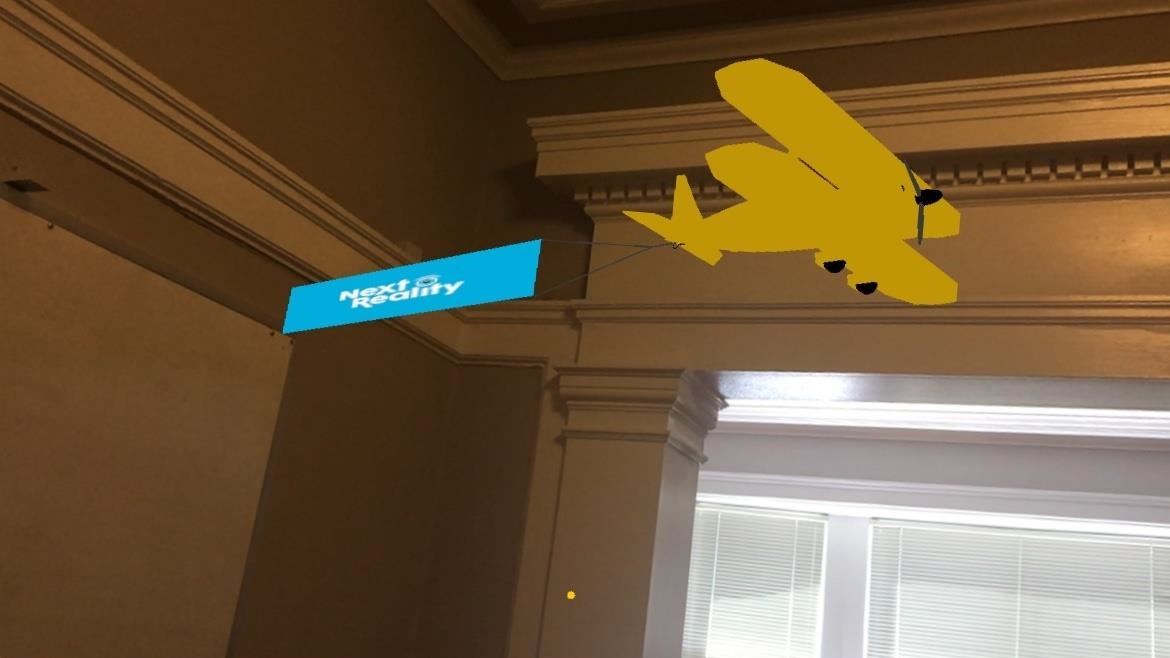
Click the play button to build and run the app again. Once deployed, you should be able to place a plane anywhere a feature point comes up by tapping on the screen (something like the image below; this picture was taken before the scaling down to 0.005, so your plane should be 10 times smaller). For now, you should be able to place a plane every time you tap (we'll modify that in the next step).
You should be able to see it from all angles and move around it to confirm that the plane is still pinned to that position. We are able to achieve this through ARKit's ability to track real-world coordinates. Fascinating, right?
Checkpoint: Your entire project including the code you just pasted above in this step should look like the final Step 6 code on my GitHub.
Step 7: Transport Our Plane to a Point in the Real World!
Here, we will combine what we learned about placing our plane with the help of the hitTest and animate it to a new point. If you want to follow along with the final Step 7 code as you input the content below, follow the GitHub link to do so.
First, let's get this out of the way. On the next line under the following:
private func addPlane() {
    let scene = SCNScene(named: "art.scnassets/plane_banner.scn")!
    let planeNode = scene.rootNode.childNode(withName: "planeBanner", recursively: true)
Add the following, something we could have easily done in Step 4 above.
planeNode?.name = "plane"Now, add another gesture recognizer. This gesture recognizer is for double-tapping. We'll indicate our plane's destination point by tapping twice. Since the single-tap gesture is already placing our plane, we need a new gesture to set our destination point. Add this to the end of viewDidLoad() right after you set up your first gesture recognizer in Step 5:
let doubleTapGestureRecognizer = UITapGestureRecognizer(target: self, action: #selector(doubleTapped))
doubleTapGestureRecognizer.numberOfTapsRequired = 2
gestureRecognizer.require(toFail: doubleTapGestureRecognizer)

sceneView.addGestureRecognizer(doubleTapGestureRecognizer)
We set the numberOfTapsRequired to 2 so that it can be recognized as different from our single-tap gesture recognizer. We also require the single-tap gesture recognizer to fail (to not happen) when the double-tap gesture recognizer is triggered. Otherwise, after the first tap of a two-tap action, the single-tap gesture recognizer would always get initiated. This method ensures that doesn't happen.
Conduct the hitTest on the double-tapped gesture recognizer point and add the finishing flags marker to that point. Add the doubleTapped() method below at the end of "ViewController.swift" before the last curly bracket:
@objc func doubleTapped(recognizer: UIGestureRecognizer) {
    // Get exact position where touch happened on screen of iPhone (2D coordinate)
    let touchPosition = recognizer.location(in: sceneView)

    // Conduct hit test on tapped point
    let hitTestResult = sceneView.hitTest(touchPosition, types: .featurePoint)

    guard let hitResult = hitTestResult.first else {
        return
    }
}
This is exactly how the tapped() method works. Now lets add the finished flags as a marker for our destination point so our plane knows where to fly to. After this line in doubleTapped():
guard let hitResult = hitTestResult.first else {
    return
}
Add this code:
// 1.
let planeGeometry = SCNPlane(width: 0.2, height: 0.2)
let material = SCNMaterial()
material.diffuse.contents = UIImage(named: "finish_flags")
planeGeometry.materials = [material]

// 2.
let finishNode = SCNNode(geometry: planeGeometry)
finishNode.name = "finish"
finishNode.position = SCNVector3(hitResult.worldTransform.columns.3.x,hitResult.worldTransform.columns.3.y, hitResult.worldTransform.columns.3.z)
sceneView.scene.rootNode.addChildNode(finishNode)
Let's examine each one of these steps:
- Here, we create a SCNPlane instance, since our finishing flags will resemble a 2D plane. We then set its visual attributes to look like our finish_flags image we downloaded before.
- Then, we create a new SCNNode instance for the finished flags and set its position to the hitTest result 3D coordinates. Additionally, we set a name identifier for our node to finish. We then add this node to the scene view.
Animate the plane to our finishing flags point (or fly, for the flying enthusiasts). After this line in doubleTapped(*):
sceneView.scene.rootNode.addChildNode(finishNode)Add this code:
// Find plane node and animate it to finish point
if let planeNode = sceneView.scene.rootNode.childNode(withName: "plane", recursively: true) {
    animatePlane(to: finishNode.position, node: planeNode)
}
Here, we capture our planeNode and then call a custom function to animate it to the specific point the finishNode is at. Now, add this animatePlane() method at the end of the file but before the last curly bracket:
private func animatePlane(to destinationPoint: SCNVector3, node: SCNNode) {
    let action = SCNAction.move(to: destinationPoint, duration: 7)
    node.runAction(action) { [[weak self]] in
        if let finishNode = self?.sceneView.scene.rootNode.childNode(withName: "finish", recursively: true) {
            finishNode.removeFromParentNode()
        }
    }
}
Here, we use the move() class method of SCNAction to move the passed in node (our plane node) to its destination point. After the action has been run and it reaches the destinationPoint, we remove the finishNode from the scene view. Feel free to experiment around with the duration: seven seconds was slow enough for me to see the plane in action for a while.
Disable the single-tap gesture recognizer from Step 5 to not allow multiple planes to be set. After the end of this if statement in tapped():
if !hitTestResult.isEmpty {
    guard let hitResult = hitTestResult.first else {
        return
    }
    print(hitResult.worldTransform.columns.3)

    addPlane(hitTestResult: hitResult)
}
Add this code:
recognizer.isEnabled = falseWhat are you waiting for? Build and run! Once deployed, place your plane somewhere by tapping on the screen once. Then, place your finished flags somewhere by tapping on the screen twice. Once the finished flags are added, the plane will automatically start flying towards it. It should look something like this:
Checkpoint: Your entire project including the code you just pasted above in this step should look like the final Step 7 code on my GitHub.
What We've Accomplished
Great job. Now you're a certified AR pilot! If you followed all the steps, you should have been able to get to the correct result. I hope you learned something new about ARKit. It is mind-blowing to think that ARKit has simplified so much of the computer vision and the complex math for us. Thanks to this framework, we can focus on creating interactive apps.
Let's quickly go over what you learned from this tutorial: Custom manipulation of 3D models; using the "hitTest" to map out 3D points from the 2D points we get by tapping on our iPads and iPhones; placing 3D models at specific 3D real-world points; and animating a 3D model to a specific 3D real-world point.
If you need the full code for this project, you can find it in my GitHub repo. I hope you enjoyed this tutorial. If you have any comments or feedback, please feel free to leave it in the comments section. Happy coding!
Just updated your iPhone? You'll find new emoji, enhanced security, podcast transcripts, Apple Cash virtual numbers, and other useful features. There are even new additions hidden within Safari. Find out what's new and changed on your iPhone with the iOS 17.4 update.


1 Comment
Does the hit test happen on detected planes? Where exactly hit test happen? does phone generate physical ray?
Share Your Thoughts