


Everyone feels, but it takes practice to translate those emotions into coherent words, and even more practice to do it on the spot. Conversely, while most people can think in 3D, not everyone can convert those thoughts onto a 2D page. But with the rise of virtual reality art, we won’t have to translate as much anymore. Five months ago I decided to make my art completely in VR, and now I can stand inside of these vast environments I’m building faster than I imagined. My audience no longer needs to guess how my sci-fi worlds would feel if they were real. I can just transport them there.
I often hear the phrase, “Sorry, I’m not an artist,” at group meetings which involve a whiteboard and stick figures, and that doesn’t surprise me. Art of any kind is hard to produce without practice, you either have to know how to manipulate matter while physics works against you, or you have to understand the technical details about perspective and shading. Digital applications like Maya, Zbrush, and Photoshop have made the job easier, but their interfaces are too complicated for a regular consumer to pick up quickly. We will always have master-level creatives, but new virtual reality apps are making it more intuitive for anyone to make art with a level of professionalism that just wasn’t possible without hours of training.
This guide is to help you understand which apps work best for certain projects, and how they could work together in order to create experiences that we haven’t imagined yet.
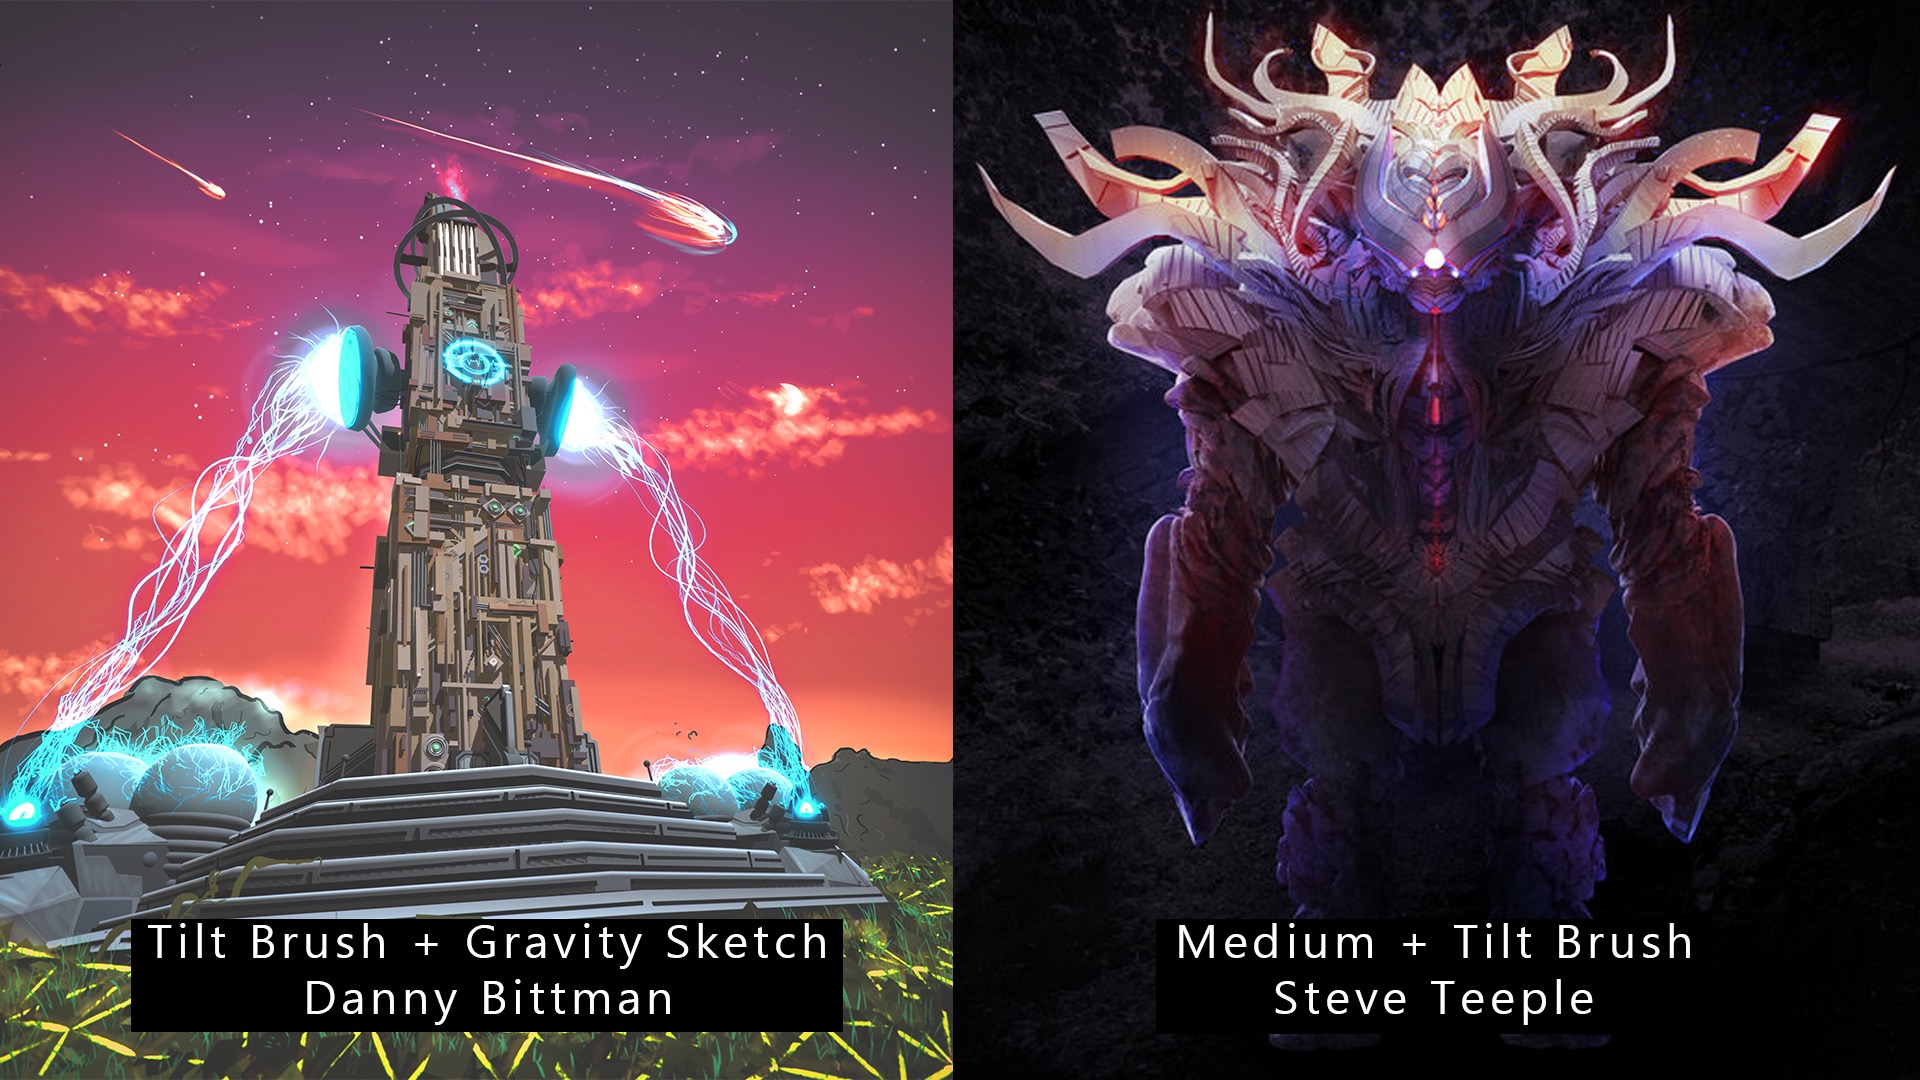
If you’re interested in joining the VR art community, I want to help. Google, Oculus, and Adobe are without a doubt anticipating 2017 to be a big year for VR art, and probably have a few surprises in store for us. But what’s available now, and what can those applications achieve? Better yet, how can these apps work together? I’ve been importing Gravity Sketch sculpts into Tilt Brush to add atmospherics and effects, while other artists like Steve Teeple have been building workflows between between Oculus Medium and Tilt Brush. There’s a lot of room for innovation right now, what could you come up with?
These are the top design apps. Let’s look at what they excel at, what they’re lacking, and what they could learn from each other.
Tilt Brush
Tilt Brush, created by Skillman & Hackett then acquired by Google, is a virtual reality drawing application where you use your whole body to paint in three dimensions. It’s designed to be accessible by everyone, and yet it’s feature set has enabled me to create self contained worlds for companies like Marvel. It is available on both the HTC Vive and the Oculus Rift through Steam. This is a breakdown of it.
THE PROS
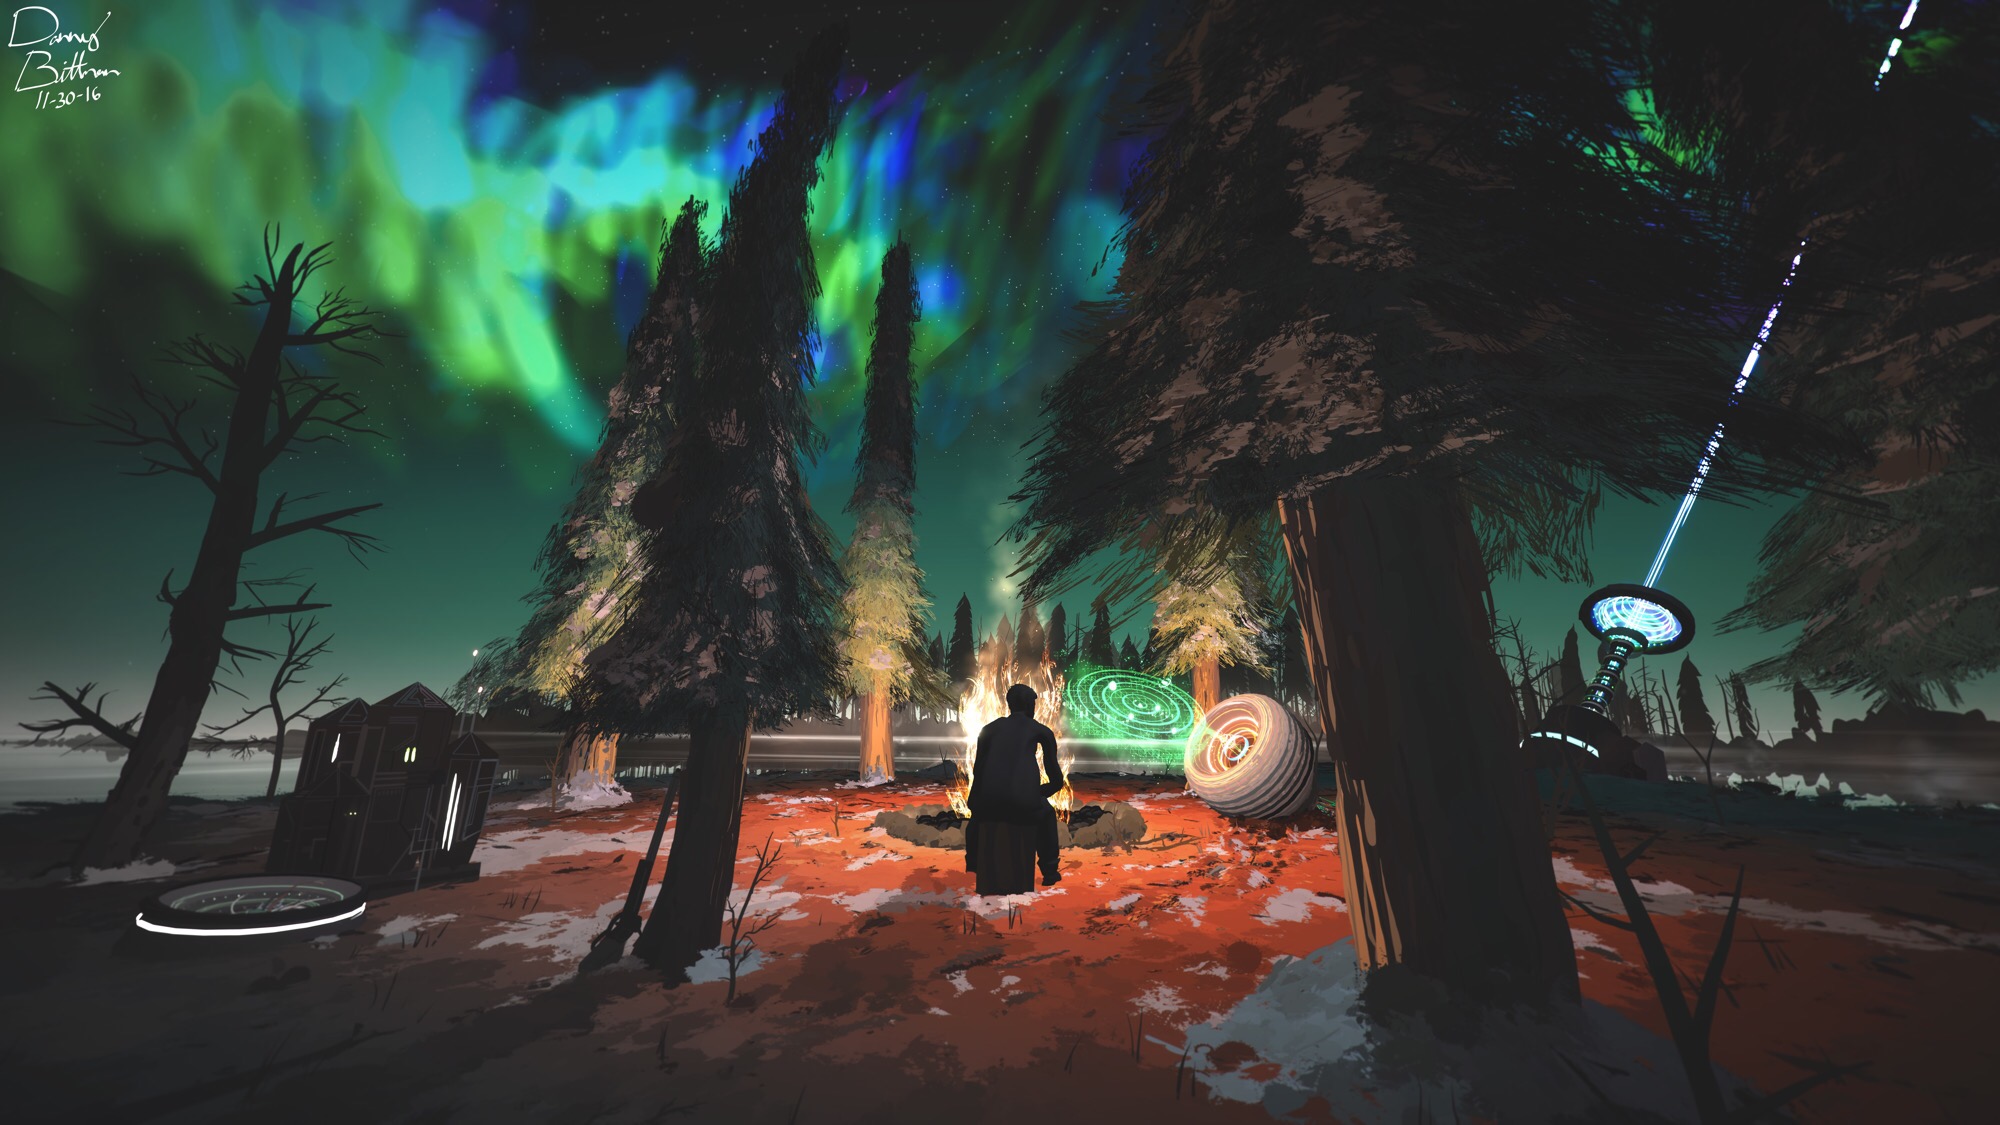
A Sense of Environment and Presence
When you first launch into Tilt Brush, you’ll find yourself standing on a floor in a dark environment. You always have the option to switch to a blank canvas, but the floor helps ground your understanding of scale and world location. While you can scale your scene like other applications, the world’s vertical rotation is locked, so you’ll always have an intuitive understanding of what is up and down. This locked rotation feature is the main thing I find myself needing with the other design apps. That said, I wish Tilt Brush included an option to unlock rotation so drawing on the underside of things would be easier.
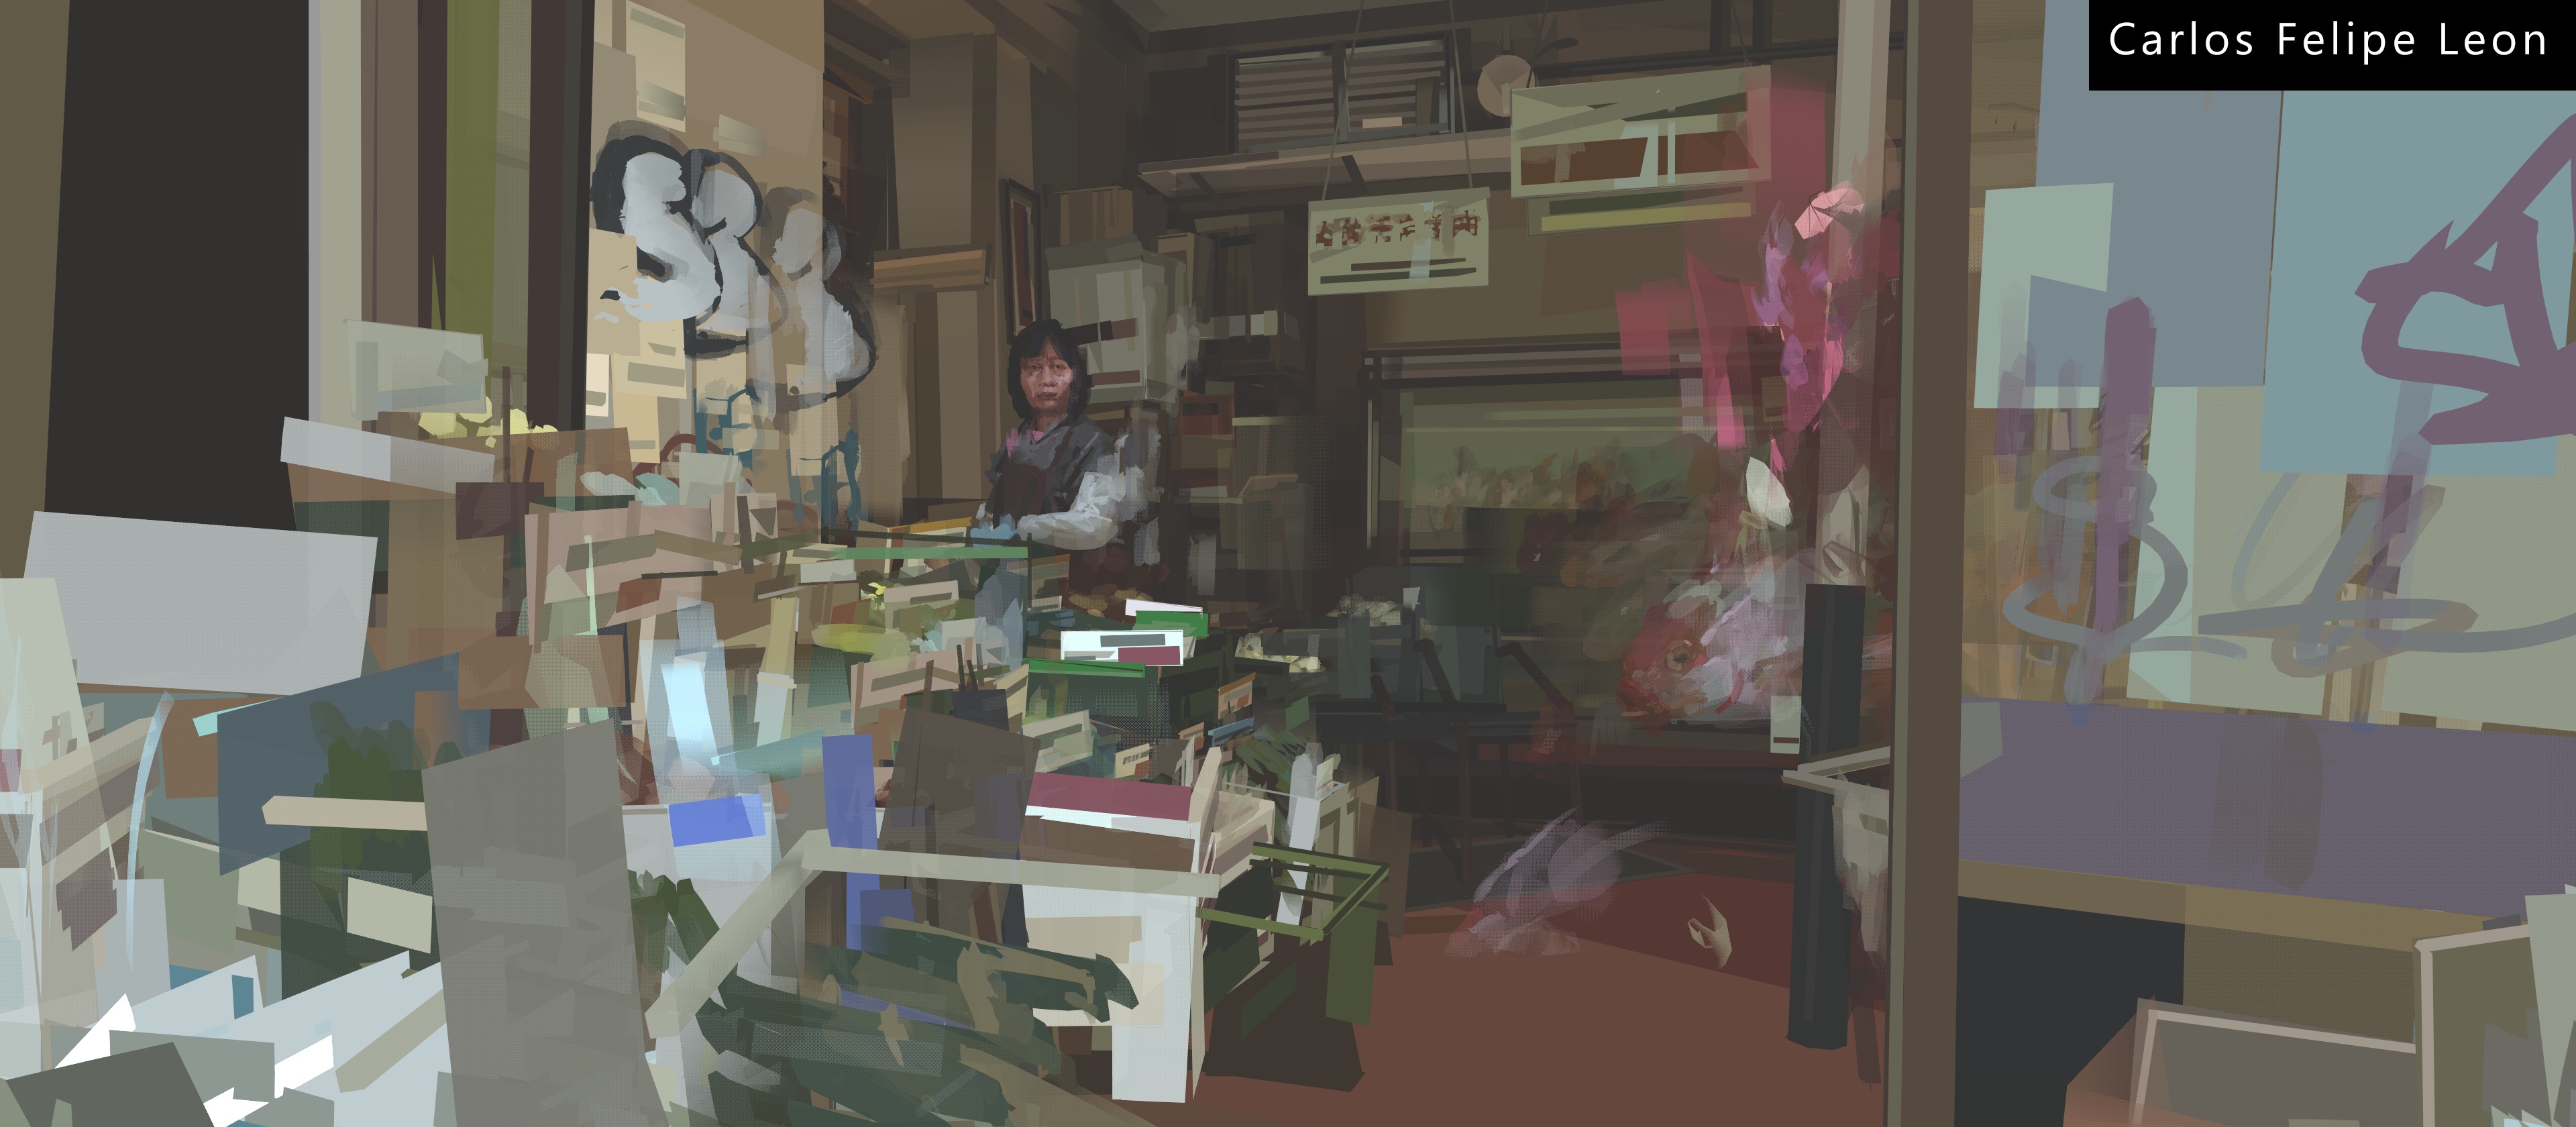
The shadows created by the shaded brushes help to initially sketch out a scene without being confused about the way a stroke is facing, or how far away it is from you. I prefer to use flat brushes to create my own shading, although it’s critical for beginners to have access to shaded brushes so they don’t need to worry about creating their own shadows. This extra worry is one of the biggest problems people have when attempting to make 2D art. Here’s a pre-production comparison between Tilt Brush’s shaded brushes and Quill’s shadeless counterpart.

Teleportation
Tilt Brush is currently the only professional design application that grants you the ability to teleport, so if you’re designing a game level or movie set, you can easily preview your world from multiple perspectives without losing your prefered world scale or rotation. This also allows you to make your Tilt Brush creation a self-contained VR experience, like Stu Campbell, Steve Teeple, and I did for Marvel’s Dr. Strange.
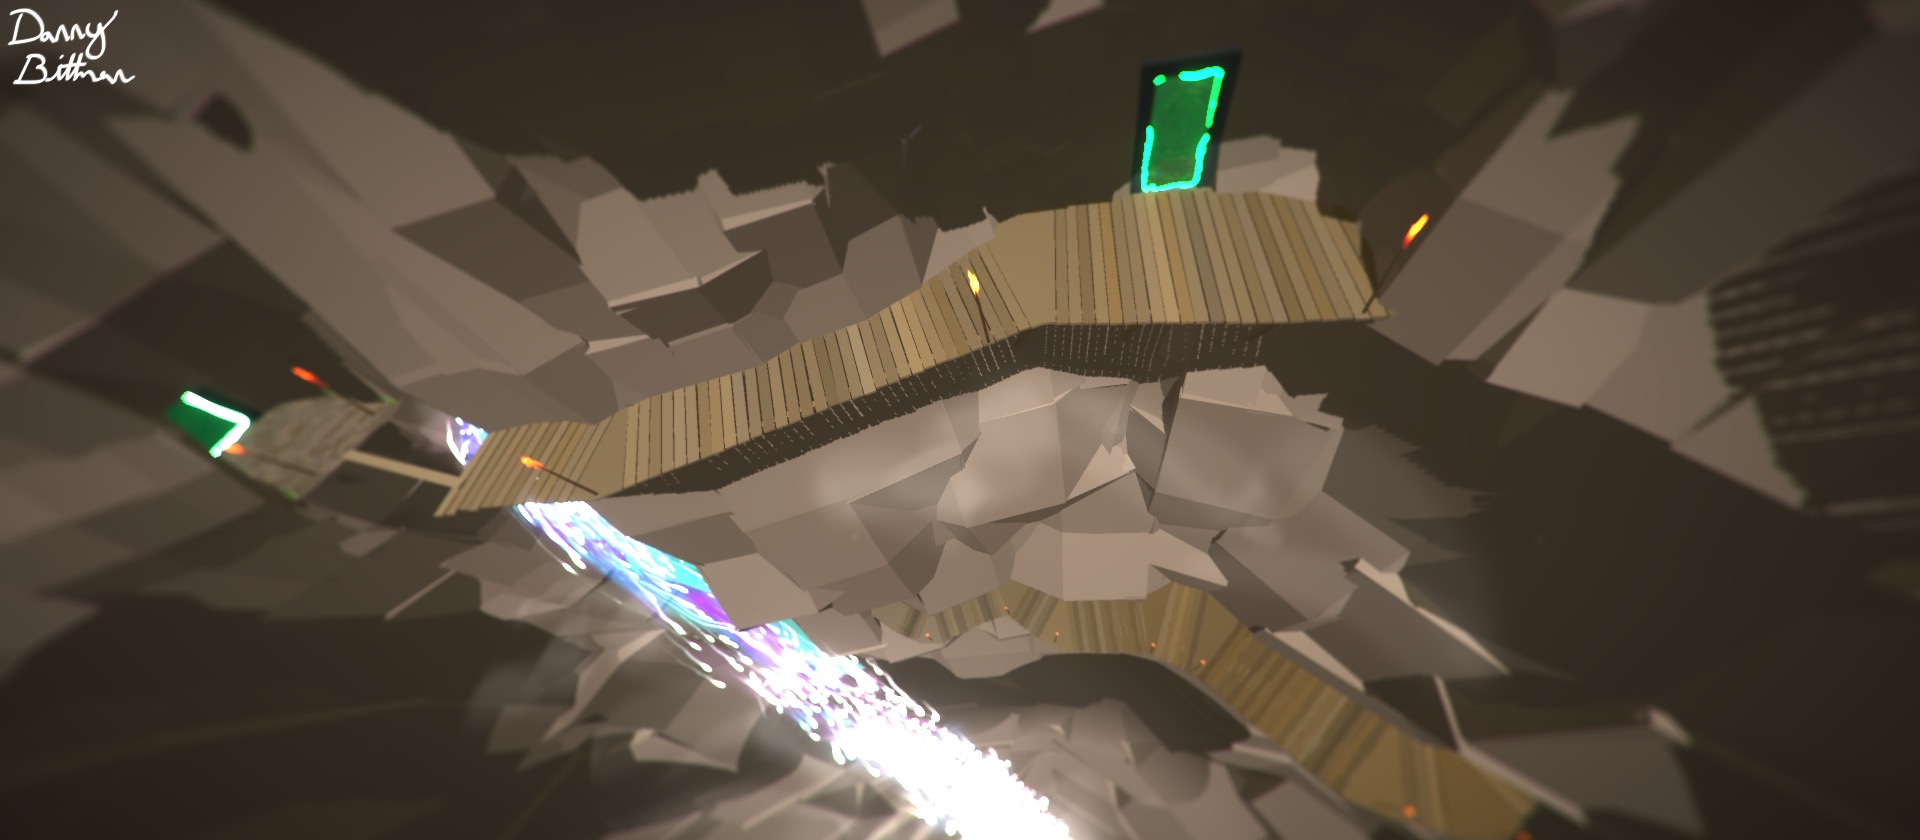
Guides, Symmetry, and 2D Drawing
Guides are like 3D rulers which allow you to draw on a two-dimensional plane. You have the option of using a square, sphere, or capsule guide that can scale non-uniformly, and then place them anywhere in your scene. This makes it much easier to add details on walls, create textured floors, or to just create any kind of 2D art. Here’s an example of a wooden bridge I made for a mixed reality video by using the square guide.
When it comes to angular precision, you can also snap straight lines to a 90 or 45 degree angle relative to the world, which makes creating buildings and maps easier when coupled with guides. Tilt Brush also comes with a symmetry tool that you can grab and place anywhere around you, which makes creating characters and vehicles a lot easier. The experience of seeing a ghost brush copying your arms movement is pretty mind blowing as well.
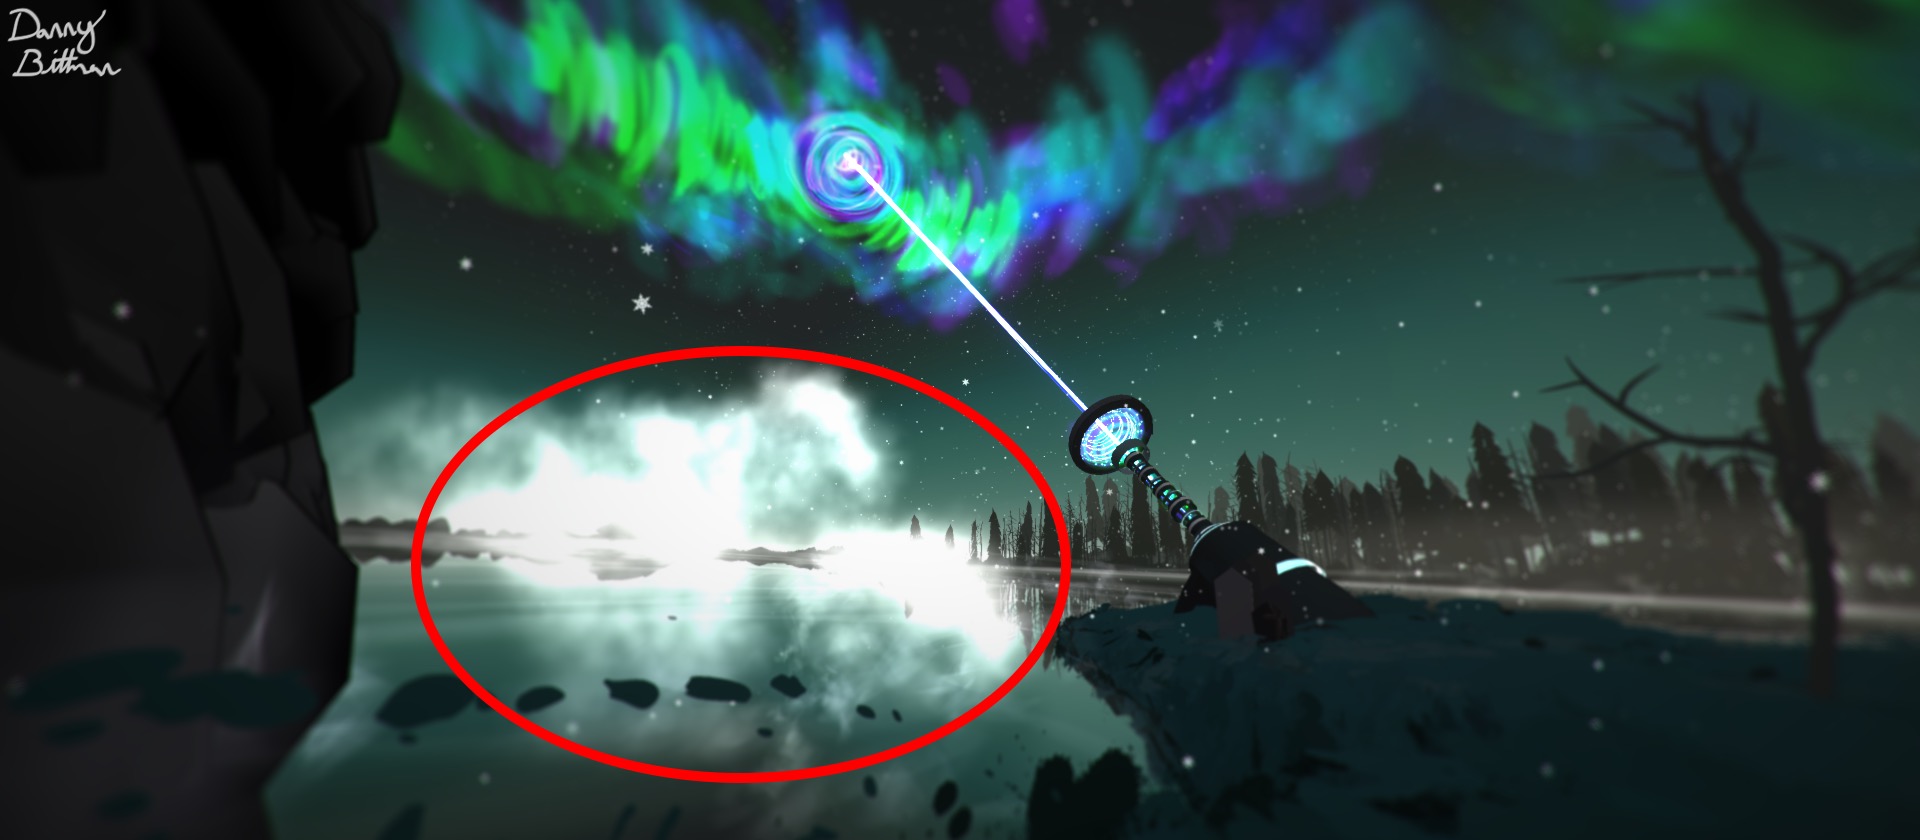
Special Effect Brushes
Tilt Brush comes pre-loaded with 36 brushes that can really make your scene pop. For example, there’s a particles brush that emulates snow falling, a light brush that can symbolize what aspects of your scene will be glowing, and a fire brush that could represent explosions. While I personally only use about 10 brushes for most of my art, it’s extremely convenient to have the options available.
Overall, the brush selection just makes Tilt Brush fun. It’s a great way to get people into making art. You can start with the silly brushes, and then work your way up to using the program more seriously. Sometimes I just want to play and create a lot of effects to see what happens.
[gfycat data_id=”OpulentIcyCrayfish”]
Social
Tilt Brush recently released a video showcasing a future multiplayer mode which would make it extremely easy for artists to collaborate on scenes, especially if they are working from different locations around the world. A multiplayer mode would turn Tilt Brush into the the premiere app for a team of artists to design maps and VR experiences. While this hasn’t been released yet, the announcement of this feature sets Tilt Brush up for being a leader in creative collaboration.
THE CONS
Post-Brush Stroke Editing
Everything you create lives on one layer in Tilt Brush. So, while you can go back and delete individual strokes, you can’t move any of those strokes later, and you can’t morph or re-color them, they can only be deleted. The lack of layers can feel limiting when you create things at the wrong scale and want to change their size, but you can’t without completely rebuilding it.
Lack of Opacity
The only brush that fades colors between each other is the semi-transparent highlighter, or the smoke brush. They work well, but they’re additive brushes, which means they lighten colors with each stroke. So if you draw too many, you might just end up with pure white.
CONCLUSION
Tilt Brush is my go-to option for creating explorable environments and 3D concepts for which I’d like to professionally model later. It’s the easiest app to jump into if you have minimal experience creating art, and yet, while it does have it’s drawbacks, it still feels advanced. It’s special effects brushes are fun to play with, and they can really be useful for annotating a scene. If you’re a 3D designer, you’ll probably want to render real lighting, fire, electricity, and fog in your final project. But before you do, Tilt Brush is your best option for planning out where all of those elements will be placed.
And it is in no way a static application. The dev team at Google has been pushing significant updates every month. First it was world scaling, then media importing, and now we have 2D drawing on 3D surfaces with guides. With Multiplayer around the corner, I don’t doubt that they have more useful features in the works.
More:
Quill
Created by Oculus Story Studio, Quill is a VR painting application like Tilt Brush, although it’s geared towards helping professionals in the entertainment industry storyboard scenes easier. While it only works on an Oculus Rift, it utilizes the more evenly weighted Touch controllers that have less resistive and sensitive trigger buttons than the HTC Vive.
It offers a vast amount of features, and makes learning easy with three in-app interactive tutorials, coupled with example work that you can explore and deconstruct. While it takes longer than Tilt Brush to learn, you could end up making something like this with practice .
THE PROS
Infinite Canvas
At face value being able to zoom in or out as far as you want sounds like a great way to make large scenes, but it also makes designing overall easier. If you wanted to create a building that’s 30 stories tall, it might take about an hour in Tilt Brush since there’s a limit to how much you can scale the world down; you would have to construct the building in parts. With Quill however, there’s no limit to your world scale, so you can design the building as if it were 3-feet tall, zoom in to add details, make the building a moveable object on it’s own layer, then make it as big as you want. In the end, the process would only take about 20 minutes. You don’t have to think about what world scale you’re at, or how big you’re making your creations, you can just create, and worry about you object’s scale later.
An inverse scenario would be to design an ant at the scale of a human, then shrink it down to its proper size, which allows you to add an insane amount of detail on every level, making your worlds not just explorable by walking around, but by scaling around. An example of this kind of post-design scaling can be found in Goro Fujita’s recent creation, “Worlds in Worlds”.
Layer System / Folders / Mixed Media
Quill has an amazing layer system that allows you to group brush strokes in folders, and even put those folders inside of folders. For people who have used layer systems found in Photoshop and other desktop design apps, this is familiar. For those who haven’t, here’s a quick video that shows how you can utilize layers and infinite scale to easily design a reposable character.
https://www.youtube.com/watch?v=962Qfs7jZtg
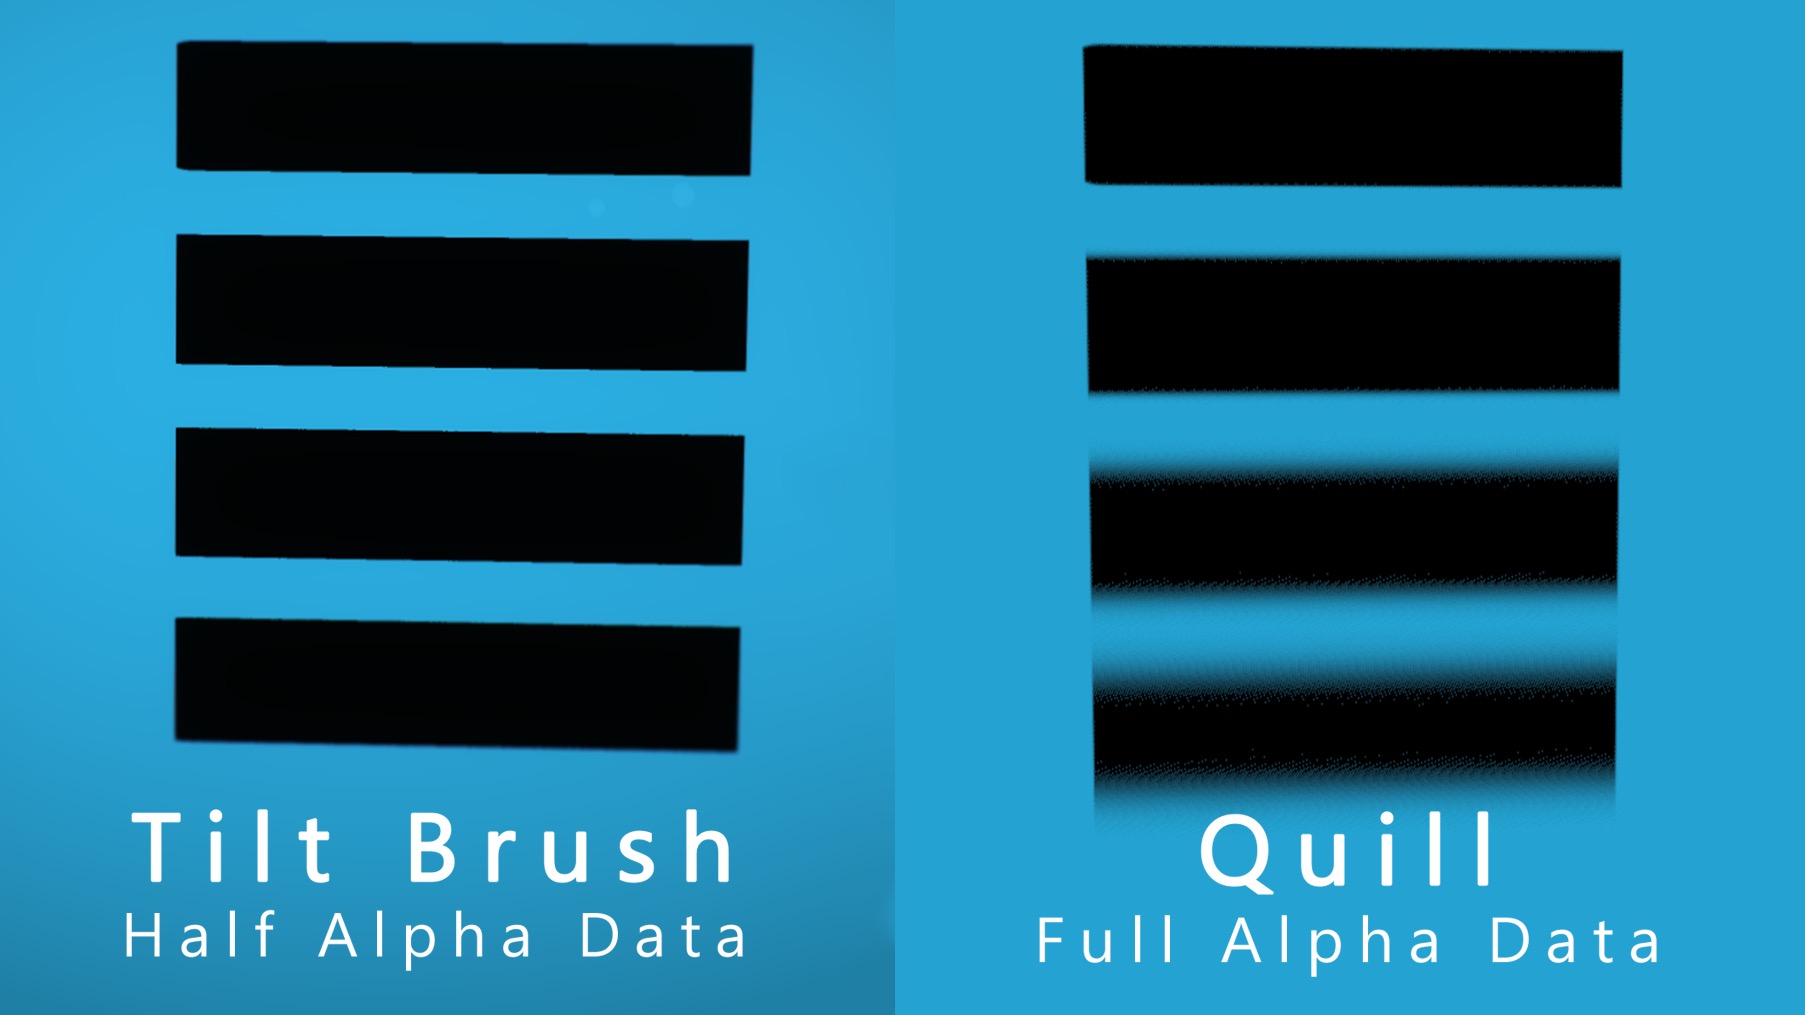
With this layer system, you also can import photos that retain their alpha channel, which represents the transparent aspect of an image. This means you can import something like a detailed logo into a Quill painting, and only see the words in the logo, not the background. While Tilt Brush can do this too, it doesn’t retain the alpha channel transparency as well as Quill. Here’s a side by side example of how Quill handles the alpha channel compared to Tilt Brush. Each black line below the previous one is supposed to get fuzzier and more transparent around the edges, but in this image, you can see that Tilt Brush only shows either a full image, or full transparency, it doesn’t show the fuzzy halfway part around the black lines like Quill.
You can also insert an audio file into your scene, which is phenomenal for creating a sense of presence. That file is then saved inside of a unique Quill scene folder that you can specify. In fact, everything you put into your scene is saved back into that root folder, which makes sharing your scenes simple.
Post-Brush Stroke Editing
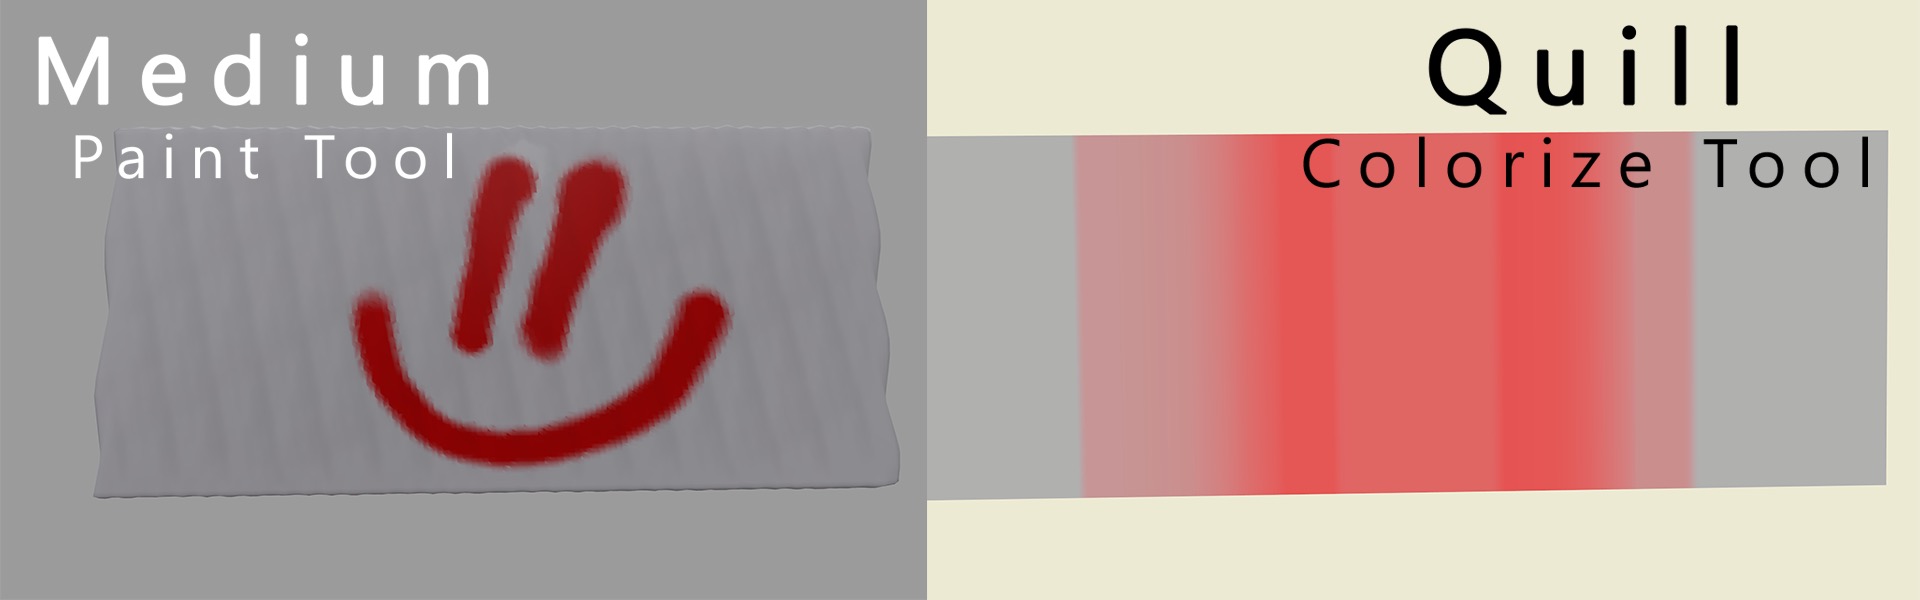
In Quill, you can resize and move your brush strokes after you place them, you can also modify their shape, color, and opacity. If you want to be more precise about where you place your strokes, you can. The drawback is that you can’t freely draw a 2D color onto a stroke, you can only change the color of a stroke along its curve path. To explain, look at the image below. The shot on the left represents how you could draw a 2D color on a 3D shape with Oculus Medium, while the picture on the right represents how you can the change color on a brush stroke in Quill. While I wanted to draw a smiley face on both rectangles, I could only draw along the path in Quill.
THE CONS
A Lack of Environment
It’s hard to gauge a sense of where you are in Quill until you create an environment yourself because there isn’t a default floor, backdrop, or human scale. It’s also missing a teleport mechanic, so if you wanted to design a location for a film set or VR experience, you couldn’t walk around it without having to grab and move the world, which will without a doubt break your world scale and rotation default. You can save and reset to a home position, but that doesn’t help if you want to quickly see how something looks to scale from another location.
Because you lack an inventory of shaded brushes in Quill it’s hard to understand where your brush strokes are in a scene, and which way they’re facing. In Tilt Brush, you can use your controller to gauge depth, or switch to environments that contain atmospherics, which changes the color of strokes the further away they are from you. This isn’t a problem once you start manually shading your scene, But it makes it difficult to understand when you’re first beginning to sketch things out, like I showed in the example in the Tilt Brush section.
Not Geared Towards Angular Precision
Being able to manipulate strokes with the layer system helps you be more precise after the fact, but if you want to draw a stroke at a right angle to the ground, you have to do that by eye. Tilt Brush was like this for a while, and it wasn’t that big of an issue. Since Quill’s world rotation can’t be locked however, It’s hard to understand how your canvas is positioned, and so placing straight lines accurately just isn’t easy without editing it later. To be fair, you can make your own environments by importing and placing images, but that’s an added process compared to Tilt Brush’s solution.
When it comes to adding 2D details on something like a wall, you must attempt to put your hand as close to that wall as possible, which can be very frustrating and time consuming compared to just drawing on the wall itself using . While you can put the details on another layer and then move that layer closer to the wall, you still can’t draw those details on a flat plane like Tilt brush. Quill’s also missing a symmetry tool, which makes several aspects of character, vehicle, and building design tricky.
Conclusion
For a new artist, Quill can be more daunting than Tilt Brush because it allows for more brush manipulation. I was hesitant at first, but after exploring its features more, I realized that the issue was more with me not knowing where to start creating than it was with Quill. When I was dropped into the white void labeled as infinite, where was I supposed to start? But that’s the point. Quill wasn’t made to influence our ideas, it’s made to enable them. It gives artists the tools that have been missing in VR this year, and works great for creating organic, infinitely large or small creations. It’s also perfect for conceptualizing art styles, color pallets, and even better for conveying a mood to an art team, especially due to the audio import feature. But it is missing some very simple features, and it’s menu design is a little reminiscent of windows 95. It’s important to realize though that it’s still a beta. It has a lot of time to evolve. I can’t wait to see what will be possible to make with Quill this time next year.
More:
Oculus Medium
Oculus Medium is a virtual reality sculpting application that has the potential to revolutionize the CGI industry. Unlike Tilt Brush and Quill, you work with molding a clay material with your hands, but you can also draw out 3D strokes, and then mend those strokes together if you like. There’s also a brush or spray paint tool to add color to your clay, and even change the way that your clay reflects or emits light.
The menus are easy to grasp as well, considering that I learned my way around within an hour. The reason it even took that long is due to the plethora of features that I wanted to explore, not because it was hard to understand where everything was, or what everything was supposed to be used for. Medium is available on the Oculus Rift, here’s how it works.
PROS
Sculpting / Fastest Way to Conceptualize 3D Ideas
Medium is more similar to traditional sculpting applications which professionals are used to, like Pixologic’s Zbrush and Autodesk’s Mudbox. You can select stamps like primitive objects, human anatomy, and mechanical components from a large library, and then draw with those like you would in Quill and Tilt Brush. You can even create your own stamps. The difference is that each stroke combines as one when they intersect each other, which can then be smoothed into a singular object. You also have the option to use a variety of tools that can be easily accessed from the menu hand to inflate, deflate, cut, add, and erase the clay.
https://www.youtube.com/watch?v=RHvUjrPLnZc
2D Vertex Color Painting
On your sculpt, you can paint in 2D on every part of the 3D surface to add character and additional shading, allowing you to achieve a level of color realism that just isn’t possible with any other VR app at the moment.
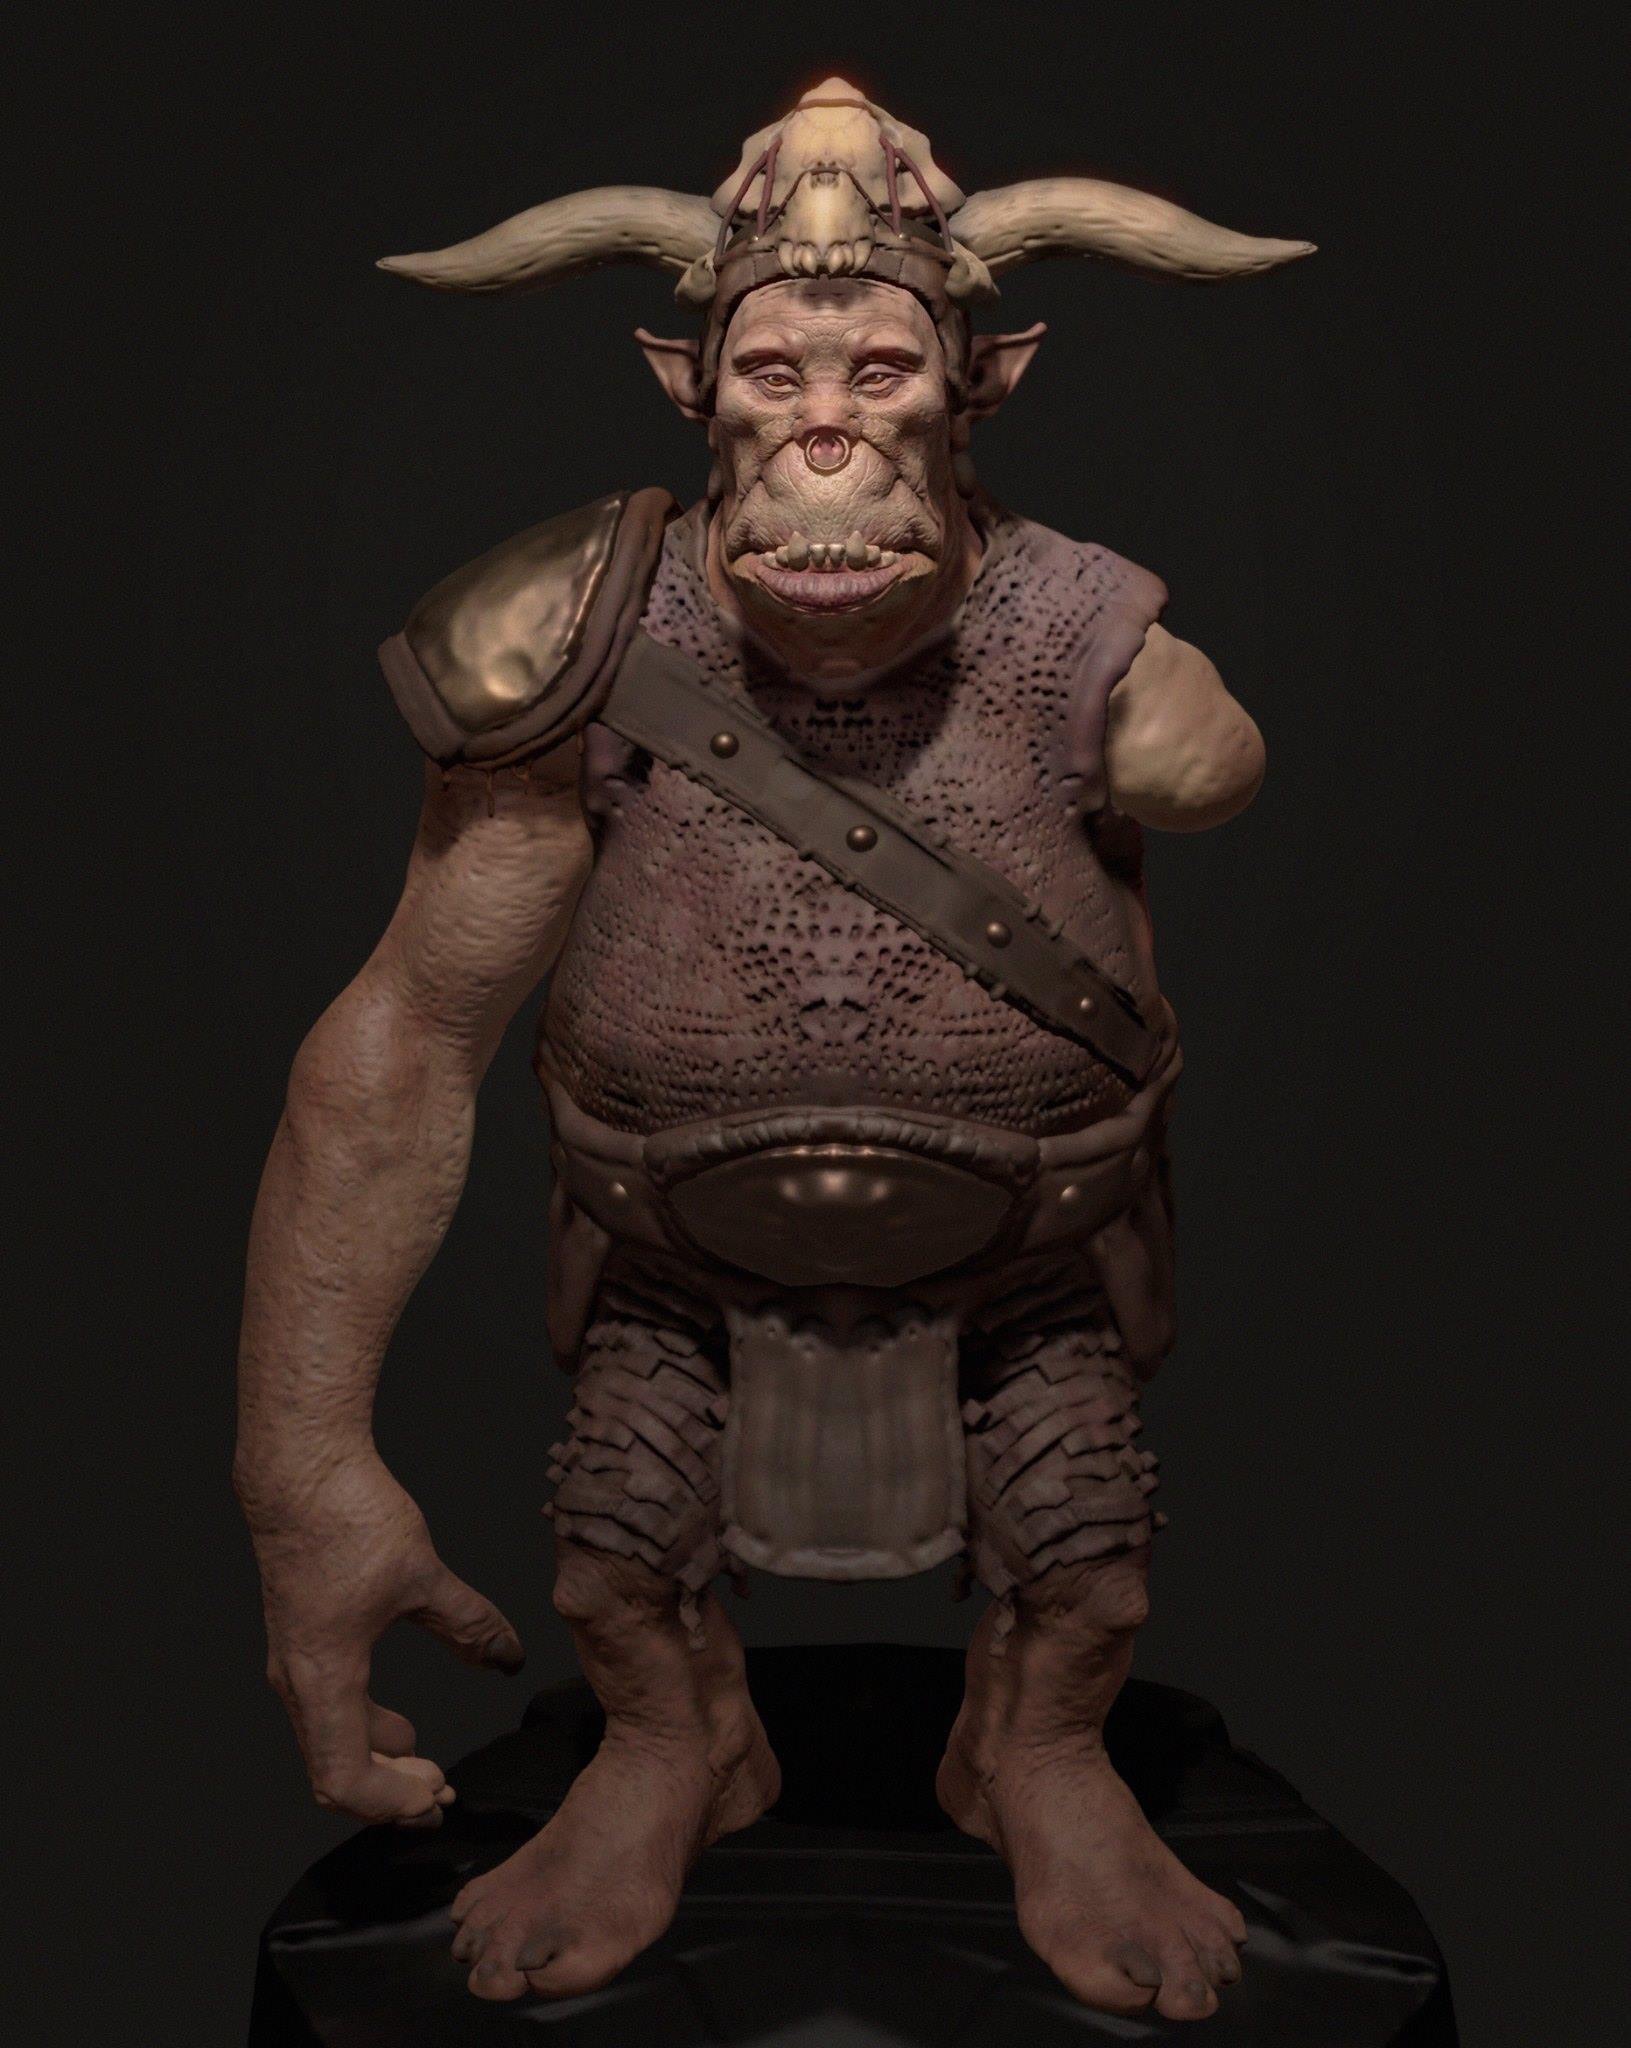
3D sculptor Gio Nakpi has been playing with Medium a lot lately, and has been able to create some very detailed characters entirely within virtual reality. Here is a great example of an Orc that he sculpted, painted, and photographed all within Medium.
Materials, Lighting, & Environment
In the above image of Gio’s Ork, you’ll notice that the shoulder blade armor reflects light differently than the rest of the body; that’s because Medium allows you to customize your materials. At the moment, you have the option to choose a default, metal, and emissive material then customize sliders that affect the material’s reflectivity, diffuse color, and more.
Medium is also the only professional VR design application that allows you to adjust the light source position by placing it with your hand, and then change its intensity and color. While this doesn’t allow for the same level of customizability as professional desktop applications, it’s great for quickly understanding how your model will react to light later on.
Layers, Resolution
It’s easy for the casual user to work on the lowest resolution on a single layer, Medium allows you to create up to 20 layers, and increase the polygon detail density as high as your GPU can handle. This means that you can sculpt a character on one layer, sculpt their clothes on another, and then morph the character’s body without affecting their clothes. It also means that you can consciously allocate your resources by deciding which parts of your sculpt deserve more polygons than others.
Don’t worry, if this is all new to you, that can sound pretty technical, and it is. But some of the top Medium sculptors are starting to release videos of their workflows. If you follow the Medium Facebook page, you can get updates about new live streams, lessons, and workflow breakdowns.
CONS
Resolution
At times, the limitations of Medium’s resolution can be frustrating. In Quill or Tilt Brush, your design’s resolution doesn’t change as you zoom in, but in Medium, things can get blurry and choppy at the smallest scale. Desktop sculpting applications work the same way however, so this isn’t a design flaw. If you’re serious about detail, you can buy a better graphics card and everything will work beautifully. But if you’re a beginner, the extra step of increasing your resolution just to paint non-blurry lines, while simultaneously worrying about not overloading your computer, is difficult to grasp.
Video
Medium’s photo export feature is great, the camera screen is big, the resolution is high, and you can adjust your focal length (the camera’s zoom) with a slider. But you can’t use these features to record video, you can only record your headset’s point of view, which can be very shaky at times. So for users who don’t know how to export and animate their sculpts with traditional software, the lack of handheld video exporting can make Medium sculpts hard to display cinematically.
Conclusion
Medium can’t completely replace desktop sculpting applications, but it does deserve a place in the professional workflow.. The UI is clean, the dev team is responsive, and the things people are starting to post continues to push our understanding of what this early build is capable of, and where it’s heading. Based on my talks with professional digital sculptors, the consensus seems to be that they’re willing to start most of their projects within Medium since morphing clay with their hands allows for quicker idea translation.
Above all, it’s fun. Try to remember what it was like to create with Play-Doh as a kid, but now you will never run out of Play-Doh, you have an infinite amount of colors, and gravity doesn’t exist. Can you imagine what that experience will be like in a few years with augmented reality?
More:
Gravity Sketch
Gravity Sketch is an independent company that has made the first multi-platform design application which focuses on combining sculpting and drawing. They’re a great example of how much room we have to innovate in the field of VR art, and how a small independent team could be the one to introduce that innovation. It will be available for early access on Steam for the HTC Vive in January of 2017, then on the Oculus Rift in February.
PROS
Patterns and Symmetry
Gravity Sketch makes pattern creation easy. There’s a tool that allows you to draw a single stroke, and then have that stroke be instantly replicated 1-9 times in a circle. An abstract artist could use this to create fractal patterns, while a sci-fi artist could use this to design high-detailed symmetrical buildings. This might feel like a gimmicky feature at first, but the more you use it, the more you realize how symmetrical and pattern based everything in real life really is.
They also take a different approach to the symmetry feature than other apps. In Gravity Sketch, an object drawn on one side of the symmetry line is directly connected to its counterpart on the other side. And so, if I want to grab an object on one side and move it, you’ll find that both sides move.
https://www.youtube.com/watch?v=Kt4MQxfdLWY
A Different Approach to Sculpting
Similar to the patterns tool mentioned above, you also have the ability to draw one stroke to create 3D objects such as a hexagonal prism, triangular prism, cube and more, allowing you to create intricate, smooth, and symmetrical objects that would take much more time to make in a tool like Oculus Medium.
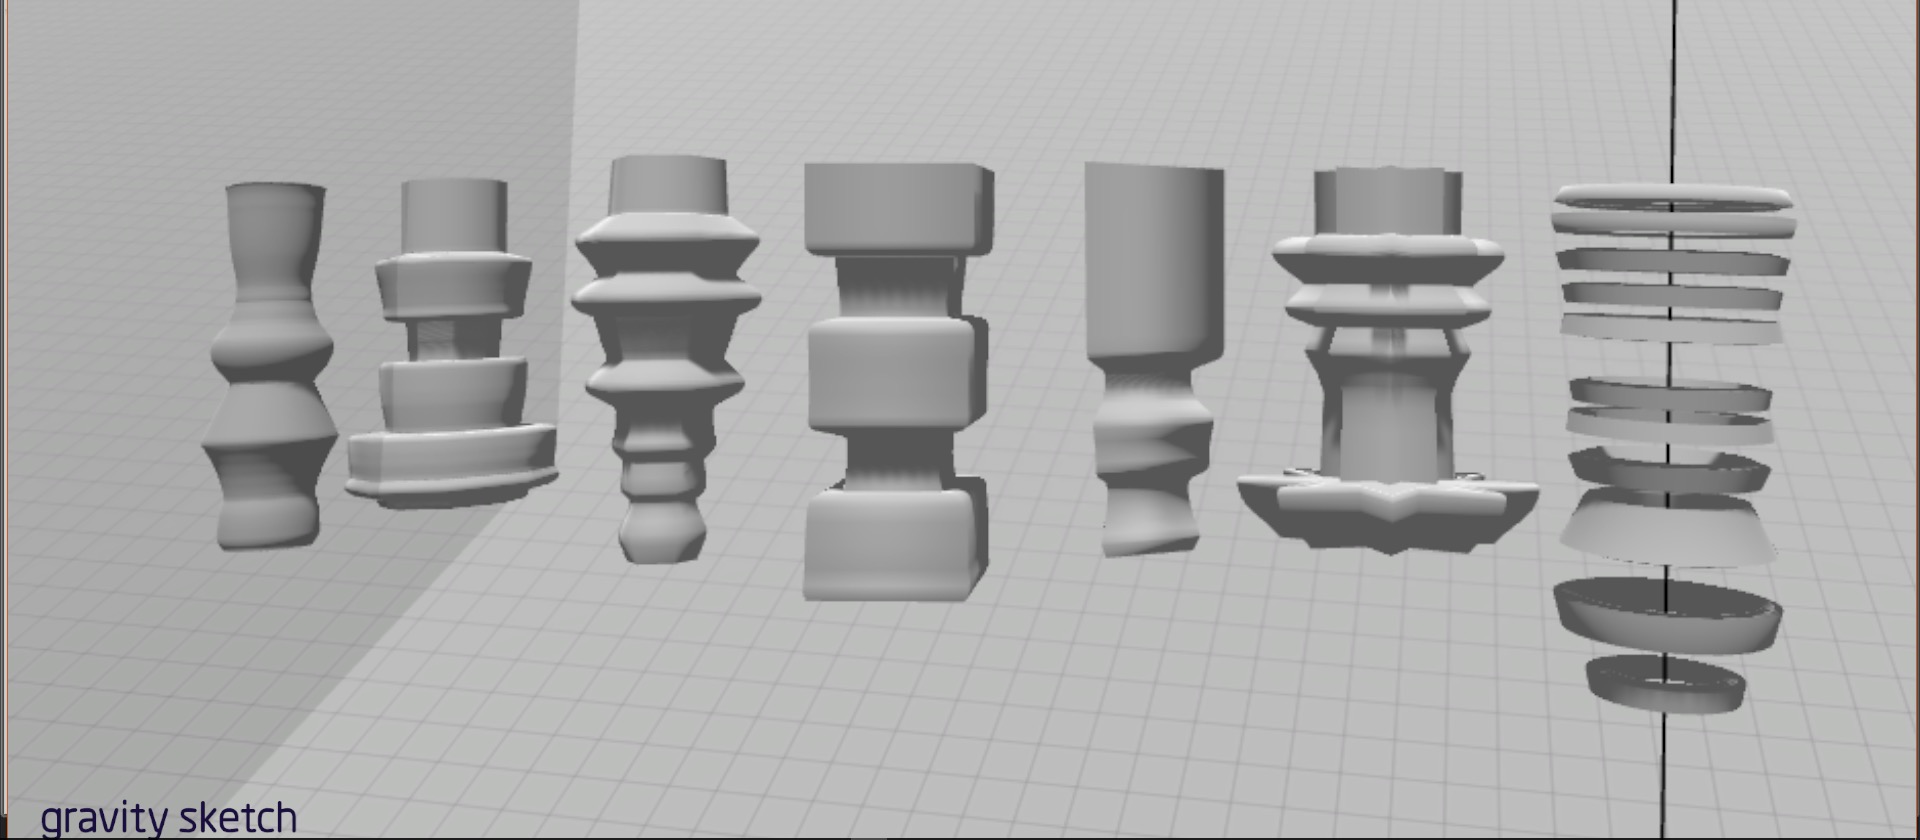
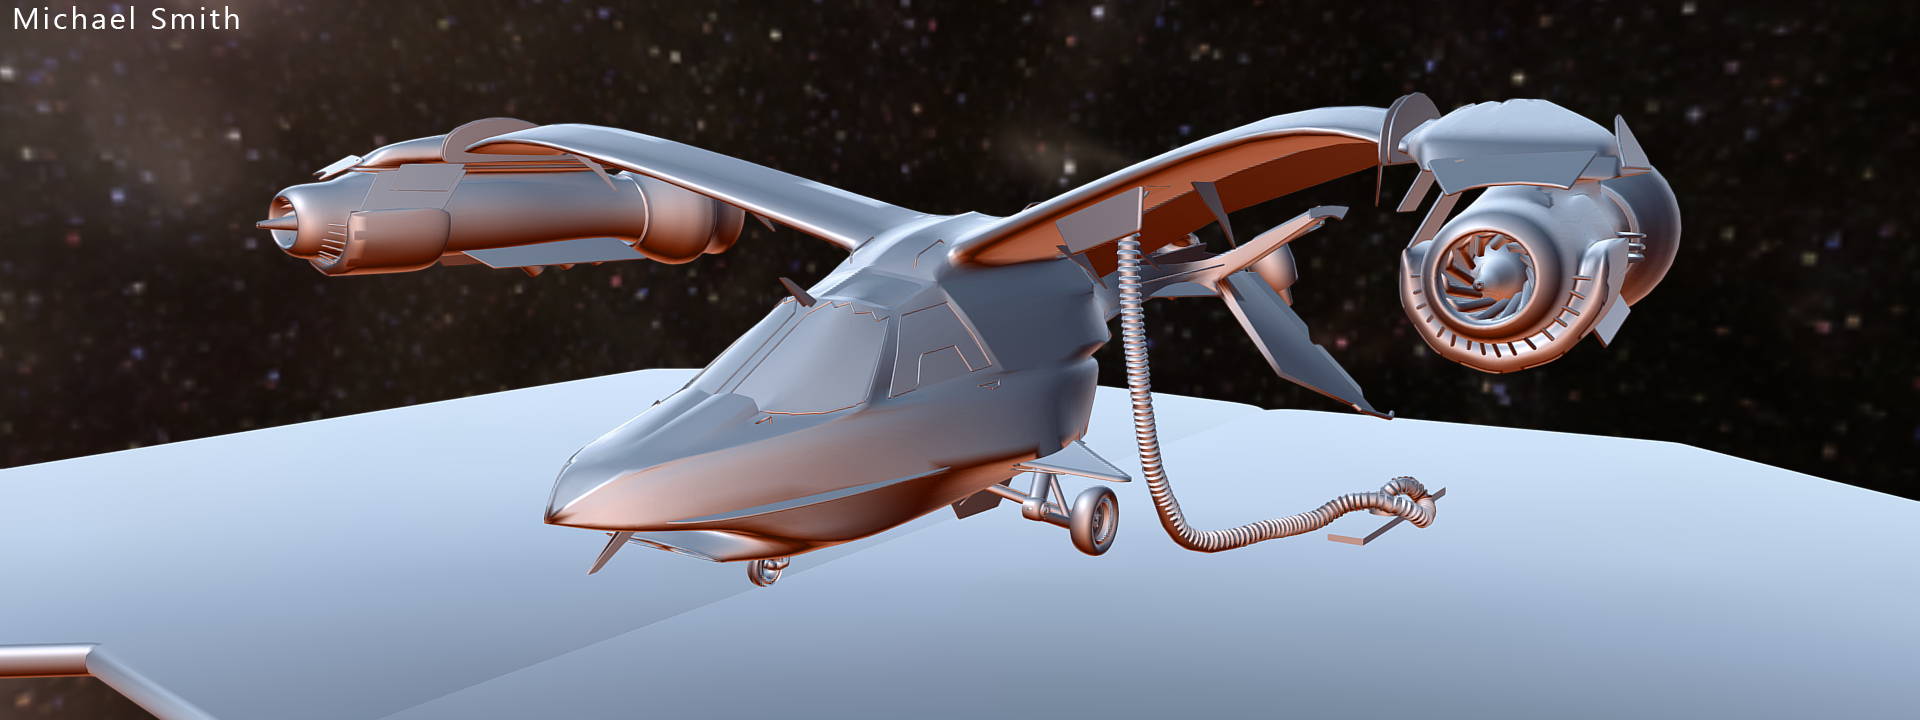
You also can draw flat plans in Gravity Sketch, and then piece those planes together to create three-dimensional objects. While this isn’t the most effective way to model since the polygon count is very high, it produces some very interesting results. Artist Michael Smith has been going to town on this by using these planes like puzzle pieces to construct cool cars. Here’s a few examples of his work.
Undo / Redo
Gravity Sketch takes a different approach to undoing and redoing your work. In every other application, you have to repeatedly click buttons in order to review your changes, but in Gravity Sketch, you spin a dial as if you’re going back and forth in time. This is beautiful because you won’t always want to just undo an action, sometimes you’ll want to remember how your piece looked five minutes ago. This also means that you have an unlimited amount of undos, so if you want to go back 30 minutes, it’ll take some time, but you’ll be able to get there.
A Different Kind of Dev Team
The Gravity Sketch team is much smaller, more independent, and has more freedom than the teams operating within larger corporations. Their philosophy is that they don’t want to make one kind of user experience, they want to give designers as many settings as possible, so that they can create the kind of modeling experience that they desire. As a member of the alpha tester program, I have seen a new feature added every week, and I don’t see the team stopping anytime soon. In fact, I asked for a lefty mode last night, and a patch was updated to Steam within 10 minutes (you’re welcome lefty nation)
CONS
Since Gravity Sketch hasn’t even been released yet, it’s hard for me to talk about what’s wrong with it since I know we haven’t even seen all the launch features yet, but the team does have some work ahead of them. At the moment, you can’t open a saved file from within the app, which makes it hard to get into a workflow since you’ll have to take your headset off every now and then. Without that library of previous work, Gravity Sketch just doesn’t feel like a self contained experience. You also can’t modify the size of the brush without going into the menu, although the team has said that that feature is being developed now.
Conclusion
Gravity Sketch is a refreshing reminder that even though you may have a prefered application to work in, there will always be room for another in your workflow. You may only need some crazy fractal pattern for a piece in Tilt Brush, but instead of trying to hand draw it, you could jump into Gravity Sketch, take 5 minutes to design your pattern, and then import it into Tilt Brush. Or, Maybe you want to hand draw that pattern in Quill, but you want a reference for how that pattern would look. You could instead design in Gravity Sketch, take a picture of that design, import it into Quill, and then paint away.
More:
Final Thoughts
Like Gravity Sketch, there have been several more design apps created and released by independent companies recently. This week I started beta testing MasterPieceVR, a unique painting and sculpting application that allows you to design online with other people. MasterPieceVR will be released on Steam December 20th, and will begin a new chapter in art collaboration. Another innovator is KingSpray, a 2D spray painting app that was just released for the Oculus Touch last week. Even Adobe has released a video demoing what looks like their upcoming version of a VR painting app. And then there’s the interactive creative tools, like Anyland and Modbox, which allow users visually code interactivity into their creations without having to know a line of code. Artists have a lot of options to choose from, and this is only Year One.
What’s important to remember, is that while these companies may be competing for the spotlight, artists shouldn’t pick sides. All of these apps have a unique feature that they pull off better than the rest, and so they all have a place in the creative workflow. These apps are young and easy to understand now, but overtime they’ll gain more features, which might make learning how to use them more daunting. So if you really want to get into making VR art, there is no better time than now. If you do start now, then you can grow with the apps, and even suggest features and UI designs that you want. It’s been so much for me to watch as the features I’ve suggested to the Tilt Brush and Gravity Sketch dev team turn into reality. The community is still small, so your voice, and your art, will be heard and seen more by people just as excited about the future of VR and AR as you.
So if you want to create, just do it! If you don’t own a VR headset yet, and would like to follow what’s being made, you can find my own work through my Twitter @dannybittman, along with every other VR artist in this list below! Feel free to reach out to me about any further questions at dannybittman@gmail.com.
- Danny Bittman
- Stu Campbell
- Liz Edwards
- Steve Teeple
- Goro Fujita
- Gio Nakpil
- Lee Petty
- Darren Bacon
- Vlad (VR Human)
- Dominic Qwek
- Landis Fields
- Mike Jelinek
- Miguelangelo Rosario
More:
Update: Cons section added for Oculus Medium on Dec. 20.


