A first look at the Tundra Labs HDK
Today I host a new article of the amazing Rob Cole, passionate maker and ergonomics expert from Immersion Mechanics, already the author of amazing posts on this blog, especially about the ergonomics of the Valve Index. Some weeks ago, he has bought a Tundra HDK, which is basically a Hardware Development Kit to create your objects that can be tracked by a SteamVR system and has played around with it for a while. Since these days Tundra has launched its own Tracker, which is being very successful on Kickstarter, Rob thought it could be a great idea to show the community what are the components of its underlying technology and I absolutely agreed with him. So, here you are his first look at the Tundra HDK, with a lot of juicy technical details!
Good things come in small packages…
Its often been said that good things come in small packages and once again this was proven true after I received a small package from Tundra Labs that contained not one, but two ‘good things’.

Who is Tundra Labs?
Tundra Labs was started by electrical engineer Luke Beno following his time in engineering roles at GE Healthcare, Plexus, and Triad Semiconductor. With qualifications and experience in Electrical Engineering, Signal Processing, Electromagnetism, IC Design, and RF Systems combined with years spent working as a design engineer, it’s safe to say Tundra Labs is in very good hands.
For readers familiar with SteamVR tracking system, Luke was one of the key people at Triad Semiconductor working on ASIC Architecture which included the TS3633 and second-generation TS4231 photodiodes used in the SteamVR tracking system.
Triad was an instrumental partner in bringing Valve’s tracking technology to production, with the photodiodes used in SteamVR headsets, tracking pucks, and motion controllers produced by Triad’s factory and shipped to off-shore manufacturing partners building XR equipment for brands like HTC, Pimax, Varjo, StarVR, and Valve.

These small “Light to Digital Converters” have the following characteristics, as listed by Triad on the TS4231 product page:
Valve SteamVR® Tracking Compatible Light to Digital Converter Integrated Circuit
- Convert infrared light pulses to digital pulses used to track position in SteamVR Tracking applications
- Convert infrared light pulses to digital pulses that follow the optical carrier
- 1MHz to 10MHz optical carrier frequencies
- 50Hz/60Hz ambient noise rejection
- Two-wire control bus shares E/D pins
- Sleep command
- Configuration
- DVDD: 3.3V
- Small Package Size simplifies industrial design of tracked objects
- 3×3 Chip Scale Package, 1.61mm x 1.61mm
- 9-bump WLCSP, 0.5mm pitch package

Luke Beno operated Triad’s Arctic VR Lab, from where he assisted many SteamVR licensees with hardware support and was also the designer of the Shoto HDK (Hardware Development Kit) which enabled customers to build tracked objects for the lighthouse system.

Luke made the decision to start Tundra Labs in 2018 with the goal of enabling customers to use SteamVR (lighthouse) tracking, and to develop future generations of the technology as its sub-mm accuracy has applications outside of virtual reality such as robotics and engineering.
Tundra has already partnered with many Worldwide brands including Logitech, JVC, Varjo, Wandelbots, Athanos3D and Valve.
For developers and prosumers, Tundra has released a number of SteamVR specific products; two of the products are reviewed here today, Tundra Labs 12VDC Power Kit for Head-Mounted Displays and SteamVR HDK.
Tundra also sell the TL448K6D-VR System in Package for SteamVR development, this tiny SIP that sits at the heart of the SteamVR HDK.
More recently, Tundra Labs announced their new Tundra Tracker SteamVR tracking module, which has a Kickstarter that went live on 29th March this year. You can read more about it at its official website: https://www.tundratracker.com/
Its great to see both Tundra Labs and HTC bring new, more performant SteamVR trackers to market which are smaller, lighter and have increased battery life.
However, Tundra Labs have an ace up their sleeves with a very Super wireless dongle to allow 3, 5 or 7 tracked objects to connect to SteamVR using a single dongle device (HTC Vive tracker requires a dongle per device).
Current pricing is listed as:
Super Wireless Dongle
- 1 connect 3 42.99$
- 1 connect 5 59.99$
- 1 connect 7 79.99$
This is a big deal for SteamVR enthusiasts with USB problems (no secret that many motherboards come with unstable USB ports) or simply a lack of USB sockets making this an important piece of hardware for connecting tracked objects.
With the increasing demand for FBT (full body tracking) being heavily driven by VR Chat enthusiasts who want to dance and pose with full freedom, and access to relatively affordable FBT setups now being possible, its possible we will see more software developers come on board to increase full-body interaction in virtual worlds. Other notable VR applications with FBT capability include Climbey, Goalie VR, Island 359, Richie’s Plank Experience, The Path of Greatest Resistance, Final Soccer, and Blade & Sorcery.
Where is Tundra Labs?

Tundra is based in the Titletowntech building in Green Bay, Wisconsin, USA, a state-of-the-art facility built by Green Bay Packers and Microsoft to act as a start-up incubator for small tech companies.
With our well-interconnected world, it’s very easy to ship packages direct to the consumer than having to use in-country distributors, with Tundra Labs retailing through their website shop.
Green Bay was an address I became familiar with after the novel experience of tracking my tracking system as it slowly moved across the US through many different locations including Chicago and New York before finally reaching the UK several weeks later.

That anything was moving during the Covid lockdown was impressive, and a small sign that life was continuing out there…somewhere! I was impressed with the constant email updates from the US Postal tracked shipping service, which had only cost $15.99. Eventually, my package arrived, it was much smaller than I expected but arrived in perfect condition in a well-padded bag with anti-static shrink-wrap covering the HDK.
As I said at the beginning, its true that good things come in small packages…
Tundra Labs 12VDC Power Kit for Head Mounted Displays

Usually, the simplest solutions are the best solutions so Tundra has simplified the provision of power for your PCVR headset with this elegant and affordable product ($22.99). It’s designed for use with HTC Vive and Vive Pro, Valve Index, and Pimax headsets. They also sell an extended version with a 10 Metre cable for $33.99
The SteamVR tracked headsets usually require a 12 volt supply as USB is limited to 5 volts. 12 volts may seem like a lot but there are two high-resolution displays, display and tracking electronics, room view cameras, on-board audio, and often a USB port for connecting Ultraleap modules or cooling fans.
Tundra have built this neat adapter that replaces the “power brick” commonly supplied with PCVR headsets from HTC, Valve and Pimax that turns 240v AC mains power into 12v DC

Replacing the headset power brick reduces cable clutter and frees up a mains socket which is always welcome. I’d always considered Index’s headset power brick cable excessively long: the excess cable always looked a little messy for those of us keen on good cable management, so it’s great to eliminate the mess with this clean solution from Tundra.
The Tundra adapter will supply up to 2 amps of 12-volt power which is more than enough for the Valve Index, HTC Vive Pro Eye, and Pimax 8K. It’s also fuse-protected to guard against overloads, and the kit includes a spare fuse.
Tundra lists the following items are coming with their kit:
- One Tundra Labs SATA to DC Barrel Jack Cable
- Custom designed and manufactured to our exact specification
- Includes a pre installed inline 2A fuse
- An additional Spare 2A fuse is also included
- One Signature edition Tundra Labs PCI Bracket
- Stamped Logo
- Black Electrophoretic Paint Finish
- Notches designed specifically to loop Vive USB and video inside PC case
- A connection cable/adapter that is custom designed to fit the selected HMD(s)
(selected HMD include HTC Vive, HTC Vive Pro, Valve Index and Pimax)
Tundra also lists this important feature for PC owners with mini-ITX builds (space limited)
“Do you have a Mini-ITX Build without a spare PCI slot?
No problem! Using the included panel mounting nut, the DC Barrel connector can mount to any hole that is approximately 5/16in (8mm) in diameter. This can be fairly common for Fan grills. Or just simply drill your own!”
I’ve been custom building desktop PCs since the start of such things being possible so am very comfortable with pulling them apart for upgrades and modifications; after having a quick look through the instructions provided in a video on Tundra’s website I got to work taking the side panels off my PC case so I could install the kit.
The first job was to bolt the power cable to the PCI bracket: I used a small adjustable spanner to tighten a locknut securing the barrel-jack end of the cable in place. And that was about it!

Perhaps a little trickier was routing the power cable to plug the SATA end of the adapter into a spare SATA socket somewhere inside my PC. Initially, I thought I might need an extension cable as my PC case is a Thermaltake X71 full-size tower with a “dual chamber” design with the PSU (power supply unit) in a separate lower chamber where it stays cool doing its own thing. However, I soon found a spare SATA socket on the backside of the motherboard next to one of my hard drives, and simply plugged the Tundra adapter cable in with no further fussing.

All that remained was to fit the PCI bracket end into my PC case, after removing one of the PCI blanking plates at the rear of the case with a Phillips screwdriver. The lowest location seemed to be the best fit, a moment later my installation was complete with the bracket fitting neatly and looking good with its neat black paint finish and Tundra Labs logo stamped into the bracket.

After refitting the side panels of my PC, I took the “Trident” cable which is supplied with the Valve Index VR headset, and fitted a small barrel-jack adapter which comes with the kit; very clean with the socket boasting a good tight fit which should prevent it coming loose with Trident movement over time. The image below shows the Trident cable and the barrel-jack adapter.

The image below shows my PC fitted with Valve’s Index Trident cable, which splits the headset tether into 3 cables on the PC side. DP (display port) and USB plug into a discrete graphics card and the motherboard respectively with 12 volt DC usually supplied by the headset power brick; in this case, this has been replaced by the Tundra Adapter which supplies power from the PC’s own PSU (power supply unit).

The verdict so far? I installed Tundra’s 12V kit a few weeks ago, and it’s just sat there quietly ever since doing its thing, providing 12V DC power to my Index headset. The only negative is that the socket is always “live” which means if your PC is switched on (and tether connected), the socket is on providing power to the headset, whether you want your headset on or not.
It’s easy enough to detach the power cable on the Trident to avoid this, but it’s not something I had considered as previously I had used extension leads with switchable sockets to allow me to control power to individual sockets. Not a problem, but just something to be aware of.
However, it was great to lose the headset power brick from my setup, with a much cleaner and simpler method of powering the headset. Very simple, very elegant, highly recommended for HTC, Valve, and Pimax headset owners!
Tundra SteamVR HDK

Now onto the most interesting part of my order, Tundra’s SteamVR Tracking General Purpose HDK Reference Design (TL448K6D-GP-HDK)… it’s probably easier to just call it ‘HDK‘ for this preview 🙂
This arrived carefully shrink-wrapped against a piece of stiff card in a well-padded bag, to stop the HDK from getting damaged during shipping. After carefully cutting away the edge of the shrink wrap, I gently pulled the HDK free to have a proper look at it. I’d only seen these HDK’s in photographs so it was great to finally have one in my hands The first impression was how much smaller it was than I’d assumed.

Tundra also supplied a USB-mounted HTC Vive tracking dongle to allow the HDK to “’talk” to the PC through 2.4 GHz wireless communication. These dongles are an optional extra (which adds $30) with the HDK, but well worth adding to your order as they are notoriously hard to find on their own, as they are often out of stock with resellers. At the time of this article, the dongle is showing as being out of stock again on Tundra’s website, allowing customers to purchase only the HDK.
Pricing for the HDK:
TL448K6D-GP-HDK without dongle $149.99
TL448K6D-GP-HDK with dongle $179.99
PCVR headsets from HTC, Pimax and Valve already contain two wireless modules, as one module is required for each motion controller (they cannot share the connection), but only one module or dongle is needed for the HDK as it’s a single tracked object. Now it was time to have a really good look at the HDK to find out what was on-board and to also find out what I needed to get it up and running.
What is a HDK?
HDK stands for ‘Hardware Development Kit’, in this case, a complete SteamVR tracking system that is designed to be integrated into product prototypes during early product development.
This effectively enables a developer to build a working prototype model to test function and fit, before the process of starting pre-production engineering which involves the difficult job of shoehorning all the components into the desired form factor whilst making it cost-effective to manufacture. The HDK allows the creation of a tracked motion controller, a tracked gun, or other tracked prop, basically anything you can think of that you might like to bring into VR. I’ve even seen an image of a coffee cup built as a tracked object so the user could easily locate and drink their coffee safely in VR!
This HDK has a number of parts as explained below:
TL448K6D-VR System in Package for SteamVR Tracking
This is the beating heart of the HDK, and very impressive considering its tiny size and full feature set.

From Tundra:
“The TL448K6D-VR System in package (SIP) contains all of the necessary processing power to create a SteamVR Tracked device. This is all accomplished in a 10mm by 16.32mm footprint. The SIP is delivered from Tundra Labs 100% functionally tested and programmed with SteamVR Firmware released from Valve.
This SIP is also very extensible in terms of inputs and outputs (IO’s). It features connection pads to connect up to 32 optical sensors and also has GPIO that can act as Digital Inputs, Digital Outputs for Haptic Control, Analog Input and numerous bus interfaces including SPI, I2C and UART. These IO’s can be used to connect buttons, IPD sensors or a peripheral Micro controller that can bridge data communication to the SteamVR PC.”
The layout diagram from Tundra shows the different components found inside the TL448K6D SIP, itself weighing just 1 gram which is very desirable when building wearable equipment which needs to be as light as possible.

On board the SIP are:
- 2 x Atmel ATSAMG55 Processors (the brains)
- 1 x Lattice ICE40HX8K-CB132FPGA (field programmable gate array)
- 1 x Nordic nRF52832 RF Processor (2.4Ghz for wireless communication)
- 1 x TDK/Invensense ICM-20602 (IMU – inertial measurement unit)
- 1 x MEMS clock for 48 MHz (reference clock)
- 1 x MEMS clock for 32.768kHz. (low power reference clock)
It’s easy to look up data sheets for the individual components if further information is required, but overall a very impressive array of components inside a tiny package, and one that enables wider applications beyond SteamVR tracking system.
Tundra share this specific information about their product:
“TL448K6D-VR was first created with SteamVR Tracked devices in mind but we know that it is also an extremely powerful compute engine for a variety of electronics projects. For this reason Tundra Labs is currently working on a firmware development SDK and development environment that will enable customers to co-develop FPGA logic, Micro controller and Radio code using a 100% open source tool chain.
We’ve invested in the port of the wonderful TinyUSB library to the ATSAMG55 MCU that is on module. This enables a number of additional great developer applications including:
- Porting of Circuit Python to TL448K6D-VR
- First time ever USB Mass storage bootloader for configuration of a ICE40 FPGA
- USB HID to FPGA bridge for peeking and poking registers
- Bluetooth to FPGA bridge
- So much more….
These SDK features, processing power and since makes the TL448K6D module a perfect fit for security research, embedded applications requiring dedicated logic (such as industrial/medical) and many other applications”.
Moving away from the SIP to look at the HDK itself as a complete package and what it contains, Tundra’s description explains everything:

TL448K6D-GP-HDK is a General Purpose Hardware Development Kit (HDK) for prototyping SteamVR Tracked Devices.
This flex includes the Tundra Labs TL448K6D-VR System in Package along with all of the necessary off module components.
This includes
- 2.4GHz Antenna for wireless operation
- RGB LED
- SteamVR System Button
- MP2667 1A Battery Charger & Power Path
- BQ27421YZFR-G1A Gas Gauge*
- USB Type-C connector
- 25 Triad TS4112 Rev B Optical Sensors
- Compatible with both Valve Gen 1 and Gen 2 Tracking
- 25pin FPC connector for Input/Output (IO) expansion.
*In case anyone is wondering what it is, the ‘Gas Gauge’ is made by Texas Instruments and is responsible for battery management, the name is a leftover from the fuel gauge used on automobiles. Gas Gauges are critical to battery management for Li-ion and Li-Po batteries to ensure they charge, discharge, and behave correctly at all times!
What Tundra has really accomplished here with great success is to build a complete unit around their SIP. Previously, developers could buy the SIP and then gather the components separately to build an HDK, which always adds extra cost and time.
I’d looked at doing this in the past, but not being an electrical engineer felt very out of my depth with making sure I chose the right components. With this ‘all in one’ solution it’s taken away this barrier by delivering something much more user friendly so developers can concentrate on the important part which is building their own objects.
As the HDK comes complete except for external connections and a battery, it was time to look into what else was needed to get it up and running; Tundra’s comprehensive datasheet told me everything I needed to know.

As the image above shows, the HDK has a number of connections and items of interest at the base of the board.
System Button
The System Button powers on / off the HDK with two-second button push to power up, and much longer fourteen seconds to power off, presumable to prevent accidental power off whilst in the middle of doing something important.
I was unsure from the documentation whether the System Button also acts as a SteamVR system button, similar to that found on the bottom of HTC and Valve headsets, but this is something I plan to find out once it’s up and running.
Battery connection and Gas Gauge
The HDK has a battery charging circuit allowing charging over the supplied USB-C connection; alternatively you can use a rechargeable, removable battery and charge it off-device. Tundra mention the battery charging circuits have been simplified to reduce layout size and complexity whilst still supporting rechargeable batteries and providing good system efficiency.
As already mentioned, the Gas Gauge is responsible for battery monitoring, and the Battery Connector allows physical connection of your chosen battery whilst making it easy to remove during development.
Tundra recommend the following battery connection items from Digikey:
JST ACHR-03V-S
Pre-Crimped Wires (for battery connector)
JST ASACHSACH28W152
IO connector
The IO (input-output) connector is really interesting because it allows the attachment of input components such as buttons, triggers, and joysticks; the kind of input you want on a tracked motion controller.
From Tundra:
‘The 25pin IO connector has a number of IO expansion pins for connection of Haptics, Buttons, Thumbstick(s), Trackpad,, Finger sensors or any other device. This is made possible with a SPI expansion port that interfaces to a customer supplied micro controller for data exchange. It is also possible to attach traditional controller IO’s directly to the TL448K6D-VR module for operation without a peripheral micro controller’
TE Connectivity 2-2328724-5
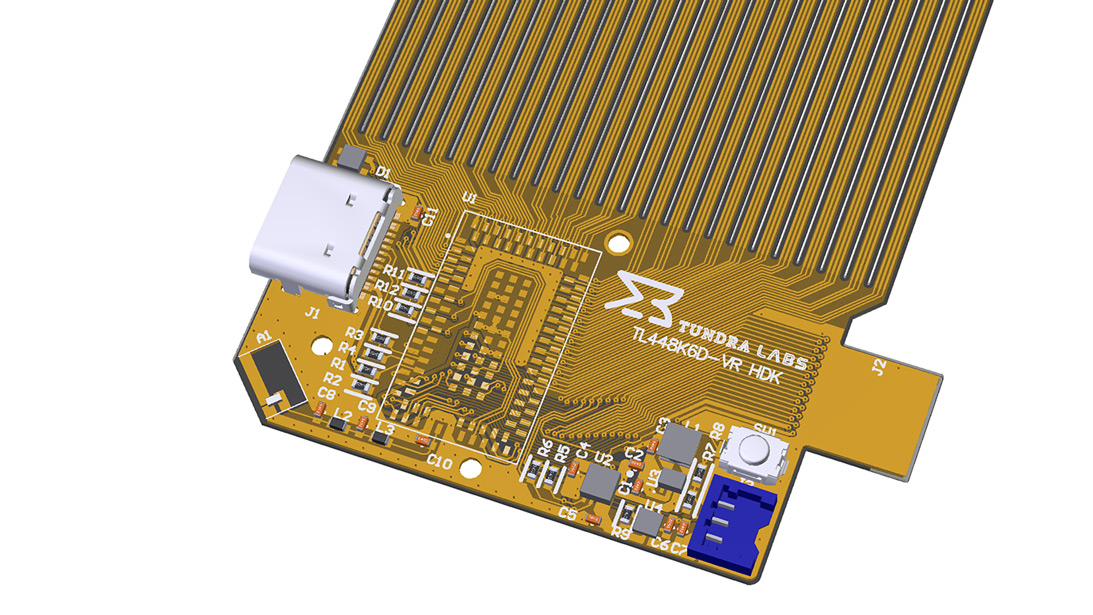
USB connector

The HDK comes with a USB Type-C connector, making it very easy to charge the battery from an external source. It was difficult to fit and remove a USB lead without the HDK being fixed inside a housing, but this would be much easier once the HDK is firmly fixed. Also seen in the image below is the RF antenna and match (Aerial), and just above the USB connector is a small RGB LED which provides the following information:
- Red: Device powered on without wireless connection (may or may not be connected via USB)
- Blue: Connecting via wireless
- Green: Connected via wireless
Physical mounting?

Turning the HDK over, you can see 3 stand-offs for firmly attaching the HDK to the inside of the tracked object; similar to those used on PC motherboards to secure the motherboard to the inside of the PC casing or motherboard tray. Bearing in mind the G-forces a motion controller can undergo during an intense session of Beat Saber, it’s great to see that Tundra has included this secure attachment to securely retain the HDK without any unwanted surface contact or loading. When building a prototype, this stand-off footprint is replicated with three stand-off pins mounted into the casing and small machine screws used to lock the HDK in place. The image above also shows a great detail of the previously mentioned IO connector, you can clearly see the twenty-five contacts used to connect additional inputs.

Moving away from the processing end of the HDK, we can see long flexes leading to the 25 different TS4112 sensors, each printed with a reference number for easy setup. These come in a flat package which allows each sensor and tail to be individually pressed out so it can be placed in the optimum location on the tracked object. This is built using a single, two-layer polyimide flex which allows the sensors to be directly connected to the SIP, rather than each sensor requiring its own connection.
With previous HDKs, it was time-consuming and bulky to connect sensors separately (whether single ‘pigtail’ or ’13 sensor flex’), with the risk of disconnects during assembly, and the added difficulty of identifying each sensor when troubleshooting or optimizing the layout. This new single flex layout is a massive improvement making construction, testing, and prototyping much easier, thanks Tundra!

The image above shows the numbered sensors: in this case, the HDK offers twenty-five in total (it may seem confusing, one sensor is labeled ‘S0’, the rest ‘S1-S24’) which should give great coverage for building a range of tracked objects.
From my understanding, it can support up to thirty-two sensors per object, though technically only five sensors need to be ‘hit’ by the base station to create a tracking pose (orientation and location). The bulk of the tracking is actually done by the IMU, with the lighthouse system providing error correction and a world reference to stop the system from drifting away.
The reason for using more than five additional sensors is that tracked objects move in three-dimensional space with the tracking lighthouses being fixed in two locations (typically wall-mounted). This means as a user moves the object about, it’s possible to occlude the “line of sight” between the sensor and the lighthouse. Therefore by using more sensors placed at different angles on the object, there is much less chance of occlusion. It’s easy to understand when thinking about using two motion controllers to work a weapon in a shooting game, both hands are brought close to the headset with plenty of occlusion potential.
When building a prototype, an important part is optimizing the sensor layout across the object, with the use of numbered sensors making it much easier to rework your installation.

The image above shows a close-up of the sensors: this is where the magic happens, you wouldn’t see these directly on a finished production item, as they are hidden behind optically neutral plastic windows embedded in the headset or controller casing. If you look carefully at your HTC, Pimax, or Valve headset and controllers, you will see the optical windows which are obvious on the Vive (a design feature) and less obvious on the Index. If you try occluding the sensors you will start to see the tracking become less reliable and predictable, it can be fun blocking different windows with tape to see the effect and understand more about occlusion at different angles.
What next?
I’m currently waiting on Digikey to deliver my items, then I plan to build a simple tracked object to test the HDK functionality and learn how it all works. There are also lots of technical things to further understand, input components to order and schematics to figure out (see image below)

I found a suitable cell-style Li-Ion battery to use for development of my prototype, but am looking at flat-pouch batteries if they make sense from a packaging point of view. I’m aware the Index controllers contain Li-Po batteries which apparently have a longer operating life without the reduction in capacity that Li-Ion batteries suffer from, so would use Li-Po if I can find the right unit to fit my needs.
I’ve already signed up as a Steam developer, which is free of charge courtesy of Valve, and have downloaded the SteamVR SDK (software development kit) which contains an application to optimize sensor placement on the tracked object.
Ultimately, without breaking my own non-disclosure agreement, the HDK will be used to build a working prototype of a new SteamVR motion controller called Caliper
All that is left to say is big thanks to the people that make this cool stuff possible: Luke Beno and colleagues at Tundra, Triad Semiconductor, Alan Yates and colleagues at Valve, and anyone else I am unaware of, thanks guys! More information about the development of my prototype controller is coming soon…
(Header image by Tundra Labs)
Disclaimer: this blog contains advertisement and affiliate links to sustain itself. If you click on an affiliate link, I'll be very happy because I'll earn a small commission on your purchase. You can find my boring full disclosure here.