
Your monitor is like a filter for your PC’s raw performance. You may get an excellent frame rate in games, but that doesn’t matter if your monitor can’t refresh enough times to display all those frames. That’s where overclocking comes in. In this guide, we’re going to walk you through how to safely overclock your monitor.
Overclocking your monitor won’t increase your gaming performance, but it can help make your games look smoother. We’ve rounded up three software tools that make overclocking your monitor easy, regardless of the graphics card or monitor you have.
There aren’t any restrictions on what kind of monitor you can overclock, but be aware of the port you’re using and its limitations. DisplayPort 1.4, for example, supports
Further reading:
- Should you overclock your CPU?
- How to safely overclock your CPU
- How to overclock RAM
- How to overclock your graphics card
- Best Computer Monitors
Overclocking your monitor: A primer

Before you start overclocking your monitor, let’s define what exactly you’re overclocking. Unlike a CPU or
The refresh rate of your monitor determines how many times it refreshes the image in a second. A 60Hz display, for example, will refresh 60 times each second. Refresh rate is similar to frame rate, but don’t get the two confused: The refresh rate is just how many times your monitor refreshes its image, regardless of whether it’s provided with new frames. Your frame rate, on the other hand, refers to how many new frames your
When overclocking a monitor, you’re pushing the refresh rate past its rated speed, which really only matters in gaming. If your frame rate is higher than your refresh rate, you can see more unique frames each second by overclocking. Basically, it makes your games look smoother. If you want a little more information, make sure to read our write-up on high refresh rate gaming monitors.
The problem is that every monitor is different. And we mean every monitor. Every panel is a little different, so you could take two identical monitors from the same brand and come out with different overclocking results. Keep in mind that your specific panel may overclock worse or better than other panels, even from the same brand.
If possible, try to find as much information about the panel your monitor has. That’s the actual display, not the monitor itself. Many manufacturers ship their
How to overclock your monitor
There are a few different ways to overclock your monitor. We’ve rounded up the three most popular tools, and we’ll walk you through how to use each. There are other tools available, but the three below will work with across nearly all AMD, Nvidia, and Intel GPUs.
Regardless of the overclocking utility you use, you’ll need to update your refresh rate in Windows to actually apply the overclock. To do that, open the Settings app, navigate to Display, and select Advanced Display Settings. You’ll find a dropdown there to update your refresh rate.
Like all overclocking endeavors, it’s best to start low and slow. Instead of jumping directly to the refresh rate you want, make moderate adjustments over a series of trials, making sure to verify your new refresh rate with each cycle.
To do that, we recommend using the frame skipping tool from Blur Busters. This tool syncs to your display’s refresh rate and quickly flashes a series of squares. For the test, take a picture of your screen (not a screenshot) with a long exposure. The goal is to capture multiple squares at once. If your image shows a series of unbroken squares, your overclock worked. If there are gaps, your monitor is skipping frames.
Custom Resolution Utility (CRU)
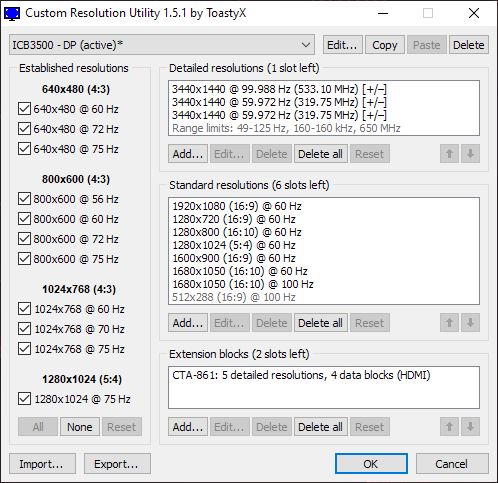
Custom Resolution Utility (CRU) is a free tool from developer ToastyX. You don’t actually need CRU because you can set custom resolutions and refresh rates in the graphics control panels from Nvidia and AMD. Still, it’s a nearly universal monitor overclocking tool, so it’s worth having in your back pocket.
Download CRU and extract the four executable files. Select CRU.exe from among them, then follow these steps:
Step 1: Select your active display using the drop-down menu at the top.
Step 2: Under Detailed Resolutions, click Add.
Step 3: Under the Timing drop-down, select Automatic (PC) if you’re using a traditional LCD monitor or Automatic (HDTV) if you’re using a TV.
Step 4: Enter your desired refresh rate in the Refresh Rate box.
Step 5: Click OK.
After that’s done, restart your computer and follow the steps in Windows to update your refresh rate. If your screen goes black or is messed up, wait a few seconds until Windows automatically reverts to your previous refresh rate. This means you’ve pushed the overclock too far. If all is well, update your profile in CRU and repeat.
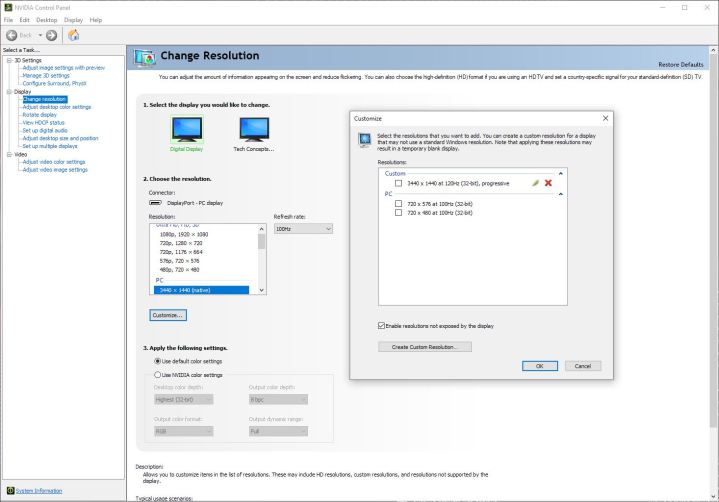
Nvidia Control Panel
If you have an Nvidia
Speaking of which, make sure your drivers are up to date and that you have the most recent version of Nvidia Control Panel installed. Open it up and follow these steps:
Step 1: Under Display, select Change Resolution.
Step 2: Click Customize.
Step 3: Check Enable Resolutions Not Exposed by the Display, then select Create Custom Resolution.
Step 4: Enter your desired refresh rate in the Refresh Rate box.
Step 5: Click Test.
Step 6: Select your new profile, then update the Refresh Rate drop-down.
Step 7: Select Apply.
Unlike CRU, you can test your new refresh rate inside Nvidia Control Panel. It’s not always accurate, though, so wait until clicking Apply to see if your overclock is actually working. After everything checks out, verify your new refresh rate in Windows, then repeat the process above until you reach your desired overclock.
Radeon software

For AMD users, you can follow a similar process in the Radeon Settings app. Just like Nvidia, make sure you’ve updated your drivers and have the most recent version of the Radeon software installed. After that, follow these steps:
Step 1: Click the Settings icon.
Step 2: Select the Display tab.
Step 3: Select Create next to Custom Resolutions.
Step 4: Enter your desired refresh rate in the Refresh Rate box
Step 5: Select Save.
Just like with the other tools, we recommend starting slow. Repeat the process above, making minor adjustments to your refresh rate until you reach the rate you want. After you’re done, verify the new refresh rate in Windows.
The risks of overclocking your monitor
Unlike a CPU or
However, it’s possible to apply an overclock where everything looks normal. That’s why verifying your overclock is so important. Even if Windows and the overclocking utility you’re using show the correct refresh rate, you still want to verify using the Blur Busters test linked above. Operating your panel too far above its rated refresh rate can increase power draw and reduce the life of your monitor.
Knowing as much about the panel inside your monitor as possible can reduce most of the risks of overclocking. As mentioned, some monitor manufacturers apply a factory overclock to the panel, even if you don’t see anything about overclocking on the box or in the manual. Avoid applying an overclock on top of an existing one.
Editors' Recommendations
- The best 5K monitors you can buy for max resolution
- The world’s first 8K mini-LED monitor has arrived
- What is thermal throttling and how does it affect frame rates?
- How to change your router’s Wi-Fi password
- How to change your Zoom background on Mac and Windows


